Home Porting Techniques
 December 3rd, 2013, 11:04 PM
#1
Registered User
Thread Starter
Join Date: Apr 2010
Posts: 978
Home Porting Techniques
A member that goes by the name Seff put together this handy index if you want to jump ahead to a specific topic. Thanks Seff!
Let the fun begin - workbench
Cylinder head stand
Tools
Porting stages explained
394 heads
Chamber polishing
Initial seat grinding (mock up)
Port matching and chamber to bore matching
Bowl work
Bowl work II
Steps to be covered
Pocket porting and opening up the bowl area on the exhaust
Research, theory and references
Teardrop shaping the exhaust guides
Filling the heat risers
Porting the intake runners
Intake port restrictions
Progress
Porting the exhaust runner
Porting the exhaust runner II & center divider clip
Exhaust divider clip
Valve job
Valve job II
Setting up the valve seat
Quick 'n dirty porting guide from Smitty
Valve job III
Installed spring/valve stem height
Porting the intake manifold
Valve job IV
Porting the intake manifold II
Exhaust side
Stock intake porting
Divider fill up
Looking for penetration!
Combustion chamber measuring
Trial fitting valves
Touch up
Installing bronze valve guides
Pictures and oil return drilling talk
TIG-welded divider
Resbond crossover filling
Total cost of #6 heads & valve stems
Sources for valves
Rusty head core
Rust removal/reversal
Cracked head & penetration
Valve spring installation height
Flow bench results
Extrude honed Tri-Carb intake
Track results and budget
Flow ratings for the different heads
Hello everyone, first thing I want to point out is that I am not a reputable engine builder. I have done a few port jobs and thought I would start this thread to pass on information, and hopefully share ideas of how to gain horse power without spending money, but simply spending hours grinding and massaging old heavy metal. I want to concentrate our efforts on breathing life into the old cast iron heads. Please feel free to chime in with your comments and ideas, but let's keep it civil. I've got a bag of frozen peas standing by for my nut sack. I don't plan on showing everything all at once, but a slow progression of what anyone can do with the right tools and dedication of time right in your own garage. This thread will be heavily ladened with photos, some very crappy. This is really just an intro so tomorrow I will start sharing what I've learned so far. By the way I don't have a flow bench or dyno, just a fridge full of beer.
Last edited by 67 Cutlass Freak; October 13th, 2014 at 02:38 PM. Reason: added index
 December 4th, 2013, 04:07 AM
#2
Registered User
Join Date: Aug 2013
Location: Central Illinois
Posts: 3,900
I'm anxious to see how this progresses. Are we talking port matching or major mods? I'm wondering if this will be, or even needs to be, head specific. I have #7 heads on a '71 SBO.
I"m actually sitting with a bag of peas right now, but it's on my lower back. Pain or no pain, I try to start every day like this
I"m actually sitting with a bag of peas right now, but it's on my lower back. Pain or no pain, I try to start every day like this
December 4th, 2013, 10:37 AM
#3
Registered User

Join Date: Aug 2008
Location: Iowa
Posts: 1,130
Hate to be a naysayer but.......how can you honestly say you are making HP without an accurate flow bench? Same goes for an accurate dyno to test. How are you going to test what you have done without either of these tools? I and a couple other guys found out a few years ago that copying Mondello's tech manual wasn't the best method. Yes the #7s dropped the ET. The next winter took them to a porter who used a flow bench and he made a world of difference.
Track testing can be flawed also. The differences in weather, wind, track conditions at many tracks, wind is a big factor, oh and altitude.
There is a guy on the Kings of Olds Power List that ran his time listed on a day with a -2000 DA. It all makes a difference.
Track testing can be flawed also. The differences in weather, wind, track conditions at many tracks, wind is a big factor, oh and altitude.
There is a guy on the Kings of Olds Power List that ran his time listed on a day with a -2000 DA. It all makes a difference.
December 4th, 2013, 11:08 AM
#4
Registered User

Join Date: Aug 2007
Posts: 2,250
Hate to be a naysayer but.......how can you honestly say you are making HP without an accurate flow bench? Same goes for an accurate dyno to test. How are you going to test what you have done without either of these tools? I and a couple other guys found out a few years ago that copying Mondello's tech manual wasn't the best method. Yes the #7s dropped the ET. The next winter took them to a porter who used a flow bench and he made a world of difference.
December 4th, 2013, 11:10 AM
#5
Registered User
Join Date: Aug 2007
Posts: 2,250
We had a meet once in Bradenton in Jan. Newly surfaced track, 25+ tailwind, DA at -1800, track altitude 50 feet. Twnty-some world records were set in one day. This is a situation where a dyno can be useful as you can correct for the situation and have a very fair comparison.
December 4th, 2013, 11:29 AM
#6
Seasoned beater pilot.
Join Date: Jan 2007
Location: Chicago
Posts: 5,468
bowl blend, air bump removal, and a standard 2 angle valve job on a set of #7 heads. Picked up an average of 36 cfm on the intake side and 39 cfm on the exhaust side by .from .1 to .5 lift.
209 int / 179 ex @.5
I'd guess it would be fine for up to 450 horse with that simple modifications. Maybe not so good for a high rpm deal though with the smaller ports.
But now that everyone is throwing away their irons in favor of edelbrocks, there is plenty o junk to mess with, just for the heck of it.
December 4th, 2013, 12:00 PM
#7
Registered User
Thread Starter
Join Date: Apr 2010
Posts: 978
Porting
Hate to be a naysayer but.......how can you honestly say you are making HP without an accurate flow bench? Same goes for an accurate dyno to test. How are you going to test what you have done without either of these tools? I and a couple other guys found out a few years ago that copying Mondello's tech manual wasn't the best method. Yes the #7s dropped the ET. The next winter took them to a porter who used a flow bench and he made a world of difference.
Track testing can be flawed also. The differences in weather, wind, track conditions at many tracks, wind is a big factor, oh and altitude.
There is a guy on the Kings of Olds Power List that ran his time listed on a day with a -2000 DA. It all makes a difference.
Track testing can be flawed also. The differences in weather, wind, track conditions at many tracks, wind is a big factor, oh and altitude.
There is a guy on the Kings of Olds Power List that ran his time listed on a day with a -2000 DA. It all makes a difference.
December 4th, 2013, 01:26 PM
#8
Seasoned beater pilot.
Join Date: Jan 2007
Location: Chicago
Posts: 5,468
Nick, thanks for your input. I welcome anyone to comment. I did not claim to be an expert. I started this thread to share ideas. I hope you can post some photos of good quality porting so everyone can learn by example. My personal race car is very mild stock compression with ported "C" casting heads. We will see if the work I did was a benefit by calculating HP from down track results. I do have a small block with ported heads that I plan to dyno in the near future providing funds are available. I'm at work right now so I can't really coment more, but later tonight I will start to share some of what I have learned and hopefully we can get others involved to share their own positive and negative experiences with porting.
December 4th, 2013, 02:14 PM
#10
Registered User
Join Date: Aug 2007
Posts: 2,250
Head work (porting, valves) is like anything else, it needs to match the rest of the combo. Hogging out the runners and making big flow numbers is easy, but in a 9 to 1 355 in a heavy car with 3.08 gears, it will run like crap.
Excluding guys like Nick who launch at 5500 , the most important thing for the vast majority of us is "flow under the curve". This is where experience REALLY pays off, IMO. Taking the right amount off in the right places. We spend most of our time between idle and 3 grand, increasing power and torque in those lower ranges is what it is all about.
Olds are known for their torque. Torque is all about port velocity (and cubes). Decrease the speed (velocity) of the air and you reduce torque. Of course, you need to find the balance between that and HP. Race cars are easy; big valves, hog them out, steep gears, big converter, let it eat. Street cars and daily drivers, another story.
Excluding guys like Nick who launch at 5500
, the most important thing for the vast majority of us is "flow under the curve". This is where experience REALLY pays off, IMO. Taking the right amount off in the right places. We spend most of our time between idle and 3 grand, increasing power and torque in those lower ranges is what it is all about.Olds are known for their torque. Torque is all about port velocity (and cubes). Decrease the speed (velocity) of the air and you reduce torque. Of course, you need to find the balance between that and HP. Race cars are easy; big valves, hog them out, steep gears, big converter, let it eat. Street cars and daily drivers, another story.
December 4th, 2013, 05:51 PM
#11
Registered User
Thread Starter
Join Date: Apr 2010
Posts: 978
Let the fun begin
Ok guys now that we've discussed some of the perils of home porting, I'm going to continue with passing on some of the information that I have learned about. I still encourage everyone to chime in with their pros and cons. I would like to have this thread be highly photo filled. I realize it's hard to take good close up flash shots with most crappy digital cameras like the one I own. Please share what you've got - good, bad, ugly. It's winter time here so we might as well do something on our cars. Let's face it, there's plenty of options for aluminum heads for Oldsmobile. We can discuss those more if you like but I was hoping to concentrate on the cast iron gems everyone seems to be discarding. Before we get into the actual porting I wanted to talk a little about tools and my work area. When I do porting, I'm standing because it's easier for me to move around and change my view and grinder angles. I stand on 1" foam pads to help reduce fatigue. I generally port for three or more hours at a time. It helps to be comfortable. I crank the tunes so they're louder than the grinder and compressor. I've also been known to wash down the metal grinding dust with a couple beers. Good lighting is essential and a strong compressor is also a must unless you choose to use an electric grinder. Here's some shots of my work stations-
118-1803_IMG.jpg
118-1803_IMG.jpg
December 4th, 2013, 06:03 PM
#12
Registered User
Thread Starter
Join Date: Apr 2010
Posts: 978
118-1806_IMG.jpg
118-1808_IMG.jpg
It's important to wear safety glasses and a paper type breathing mask would be a good idea. I can't stand wearing one it just fogs up my glasses. Safety should be a primary concern. Be sure to have a decent fire extinguisher handy in case your compressor starts on fire. Hasn't happened to me yet. Never try to extinguish an electrical fire with your beer. I hope this thread will encourage some of you younger Olds enthusiasts to give this porting thing a try. It takes a lot of patience and dedication, and I'm sure it's not for everyone. As has previously stated - you can "F" them up, so it might be a good idea to find some junk heads to practice on.
December 4th, 2013, 06:09 PM
#13
Registered User
Thread Starter
Join Date: Apr 2010
Posts: 978
tools
Here's some of the stuff I use when porting. You could get by with a lot less and along the way you will figure out which bits work best for what. Later on in this thread I will cover basic valve job and talk about specific problems you will encounter trying to install over sized valves.
118-1804_IMG.jpg
118-1805_IMG.jpg
118-1804_IMG.jpg
118-1805_IMG.jpg
 December 4th, 2013, 06:35 PM
#16
Registered User
Thread Starter
Join Date: Apr 2010
Posts: 978
porting stages explained
It's common knowledge that certain areas of your head when ported will yield maximum gains for minimal effort. For example pocket porting and a good quality 3 angle valve job are probably your best bang for buck. I want to share with you some text from an older Mondello Performance product catalog that covers their offered porting options. These prices are not current-
3b596809-4a93-483e-b6df-a38f41f15550.jpg
def72ec9-bc23-4fef-aa2a-e8398dc80c3d.jpg
I'm not here to promote any one, I am just spelling out some of the common services offered and terminology used for various options. Joe Mondello was a very well known reputable head porter. I talked to him many times. He always answered all my stupid questions. Sadly he is no longer with us and the Olds community certainly misses him. On Mondello's website there are a few articles about porting that really touch on common performance porting techniques for Oldsmobiles. Here's a link-
http://www.mondellotwister.com/articles.html
Along the way here I will from time to time point you towards threads where many of these topics have already been discussed. For everyone that is going to follow along, and try this at home, remember to be patient. These things can't be rushed.
December 4th, 2013, 06:39 PM
#17
Registered User
Thread Starter
Join Date: Apr 2010
Posts: 978
394 heads
116-1681_IMG.jpg
116-1678_IMG.jpg
December 4th, 2013, 06:44 PM
#18
Registered User
Join Date: Aug 2007
Posts: 2,250
In my part of the country a good race valve job is $350. A street port job (3-4 hours per head) runs about $350/pair. So, here is the issue. By the time you replace guides, resurface, weld the center divider, and fill the crossovers, you are over a grand, or the same price as the Pro Comps which are lighter and flow better. A lot of shops won't even port iron heads anymore. I know this thread is about doing it yourself, and that is fine, just putting the other info out there.
December 4th, 2013, 07:09 PM
#19
Registered User
Thread Starter
Join Date: Apr 2010
Posts: 978
In my part of the country a good race valve job is $350. A street port job (3-4 hours per head) runs about $350/pair. So, here is the issue. By the time you replace guides, resurface, weld the center divider, and fill the crossovers, you are over a grand, or the same price as the Pro Comps which are lighter and flow better. A lot of shops won't even port iron heads anymore. I know this thread is about doing it yourself, and that is fine, just putting the other info out there.
You are 100% correct Jim. I started this thread because some of us are broke and crazy. You'd have to be, to dedicate this much time and effort into massaging old junk cast iron heads. I spent close to 80 hours on my heads for my race car. I'm going to cover various different procedures and do a play by play photo documentary about the whole process. Your prices are dead nuts with my machine shops but they always say plus parts. Hell a good set of valves, springs, and keepers, will set you back $450. Thanks for your input. You are correct, for those that have $1000 - $1200 extra cash laying around the Pro Comps sound pretty good.
December 4th, 2013, 07:53 PM
#20
My #6's cost 1100 from rrp no porting just bowl work with stainless valves and all the good stuff. Add 345 for the valvetrain stuff. Rockers , pushrods, studs , then 120 for milling the intake. Totalling in at 1565 for iron 6's.
December 4th, 2013, 08:17 PM
#21
Registered User
Join Date: Oct 2013
Location: Edmonton, Alberta
Posts: 63
You are right. The 394's are odd ball heads. Thanks for the pictures that you posted. I haven't taken the heads off the spare engine yet, but it looks like the exhaust guides could use some cleaning up on the castings, just like you did on the intake side. I guess I have some work to do. Good thing that I have some time on my hands since it is -28 C outside, and we already have a couple feet of snow.
December 4th, 2013, 09:32 PM
#23
Registered User
Thread Starter
Join Date: Apr 2010
Posts: 978
Let the fun begin
Might as well get started. Recently J-(Chicago) picked up a set of bare #5 small block heads with a broken guide. They had been cleaned and checked for cracks. He did real well for $100. We decided to put some over sized valves in them so I thought it would be nice to do some port work. I started out by deburring and smoothing the chamber. From my understanding, this promotes a more complete burn and helps to reduce carbon build up. The idea here is not to remove a lot of material but just to smooth it out. I own five various dye grinders from different manufacturers at different angles. Two even have insulated handles. My favorite of all is the old school right angle Mac. It seems to be the most efficient with air consumption at a good speed. My compressor keeps up with it perfectly. I use a swivel hose adapter and an air regulator right on the grinder. This is a good place to start to learn how the bits remove material. It's all easy to reach and goes pretty quickly. You want to keep the bit moving back and forth sideways not in and out. Don't use a lot of pressure, just let it glide across the surface. Don't stay in any spot too long or you'll leave a divot. Do not let the bit bounce or chatter. Don't forget to oil your tool and drain any water off of your compressor. I also have another regulator and water separator at the compressor. Here's what the chambers look like to start with-
117-1737_IMG.jpg
Here's what the oversized valves will look like installed. The intake is 1.995" and the exhaust is 1.625"
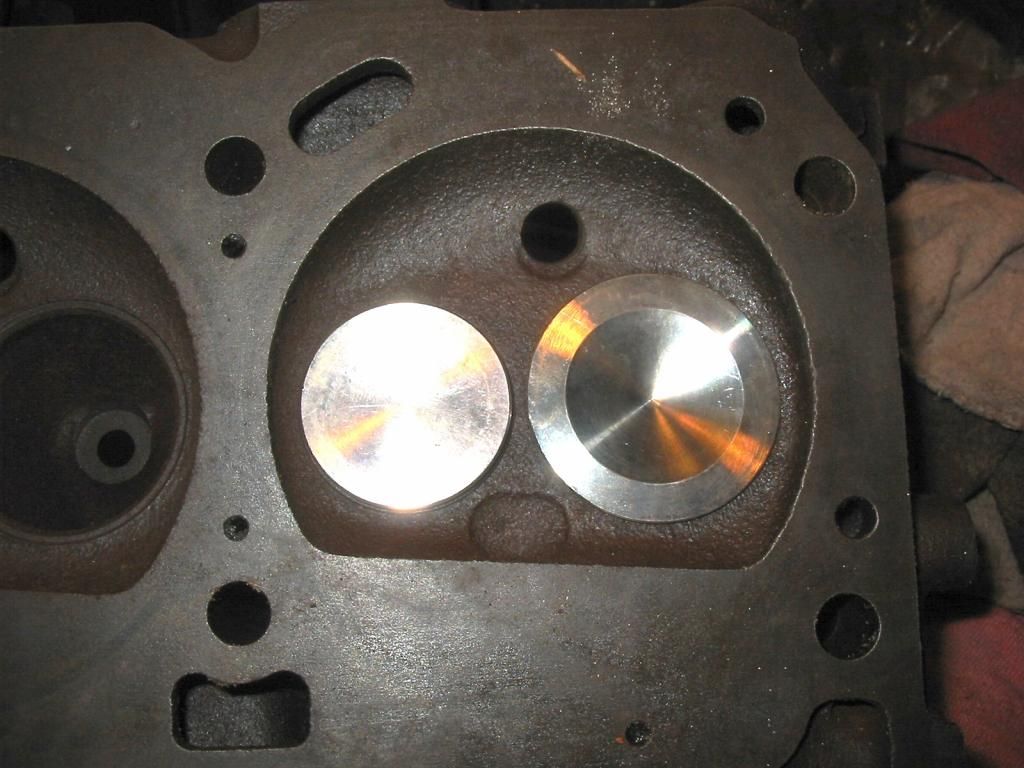
Here's the old original size valves I installed just to protect the seats while I cleaned up the combustion chamber.
117-1739_IMG.jpg
This was the first step with a tapered carbide-
117-1740_IMG.jpg
This was after the rounded carbide. I took the valves out 'cause they were in my way and I'm going to open up and regrind the seats anyway. If you're not planning on using over sized valves, you should be very careful not to nick the seats through out the entire port job. No matter what the valve job is going to be the last step, or maybe resurface-
117-1741_IMG.jpg
The tapered stone helps to smooth things out and get rid of grinding marks from the carbide bits. These stones wear away pretty fast, but they are cheap-
117-1742_IMG.jpg
This is after going over it with a 2" 40 grit roloc pad-
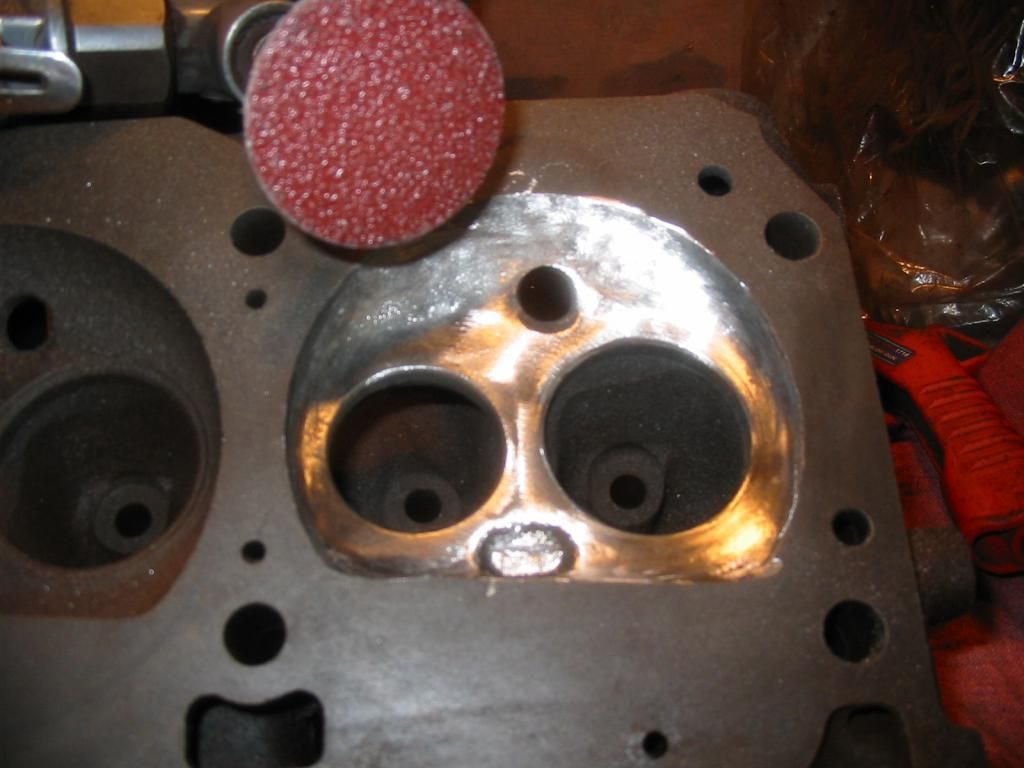
This is after the 80 grit 2" roloc. I have probably spent 20 minutes on this so far-
117-1744_IMG.jpg
You can see I have remove the outer ring above the seat area. You should only do this if you are going with bigger valves. Next I put down some machinist blue dye to mark where the edge of the valves will be-
117-1745_IMG.jpg
Using a sharp tipped pointer I will scribe a line tracing the outer edge of the valve-
117-1746_IMG.jpg
117-1747_IMG.jpg
December 4th, 2013, 09:51 PM
#24
Registered User
Thread Starter
Join Date: Apr 2010
Posts: 978
Just grindin'
Here you can see I've done some pocket porting on the intake. I opened up the sides all the way around and tried to visualize a straight line from where the lowest part of where the valve will contact the seat. I feel that pocket porting is probably where the biggest gains can be had, for the least amount of porting time. I've also tear dropped the guide some-
117-1749_IMG.jpg
I forgot to mention, when your porting you have to remember the shavings tend to go every where. Don't have any open electrical outlets or power bands near by. You could use those plastic child proof covers. Don't leave your air cleaner off with the carb exposed close by. Don't have your gas can too close with that tiny open spot, and most importantly cover your beer or move it away from the flyin' iron.
Here I'm getting ready to put a 45 degree grind onto the intake seat-
117-1751_IMG.jpg
Here I'm dressing the stone for the exhaust seat-
117-1753_IMG.jpg
117-1754_IMG.jpg
The reason I ground the seat here was to get an idea how far I could port the bowl. This is not the final grind, but it gives me some reference as to where the new valve will be. Also I checked the stem height here and found the new valve was going to be .070" further down than stock valve height. I will cover this some more very soon and discuss our options.
Last edited by 67 Cutlass Freak; December 4th, 2013 at 10:03 PM. Reason: photo
December 5th, 2013, 09:16 AM
#26
Registered User
Thread Starter
Join Date: Apr 2010
Posts: 978
no pain no gain
I'm anxious to see how this progresses. Are we talking port matching or major mods? I'm wondering if this will be, or even needs to be, head specific. I have #7 heads on a '71 SBO.
I"m actually sitting with a bag of peas right now, but it's on my lower back. Pain or no pain, I try to start every day like this
I"m actually sitting with a bag of peas right now, but it's on my lower back. Pain or no pain, I try to start every day like this
Macadoo, I'm going to cover match porting and some other mods, but I'm going to try to keep it simple enough for a beginner to handle. These techniques are not really going to be head specific but you should realize that the various letter Olds heads were casted differently. Some have larger water jackets than others. I will try to cover some of the thin areas to be avoided. A lot of the photos I'm going to post will be #5 & #6 castings - very similar to your #7s. TMI about the bag of pees. I was referring to people bustin' my ***** about not havin' a flow bench, or a dyno, or track results proving that all this grinding is worth while.
December 5th, 2013, 09:24 AM
#27
Registered User
Thread Starter
Join Date: Apr 2010
Posts: 978
race car
You're welcome, I just wish others would join in with some good photos of track proven examples. The heads you will see in this thread, I am currently working on, belong to J-(Chicago) and Coppercutlass. They are small blocks. The heads on my race car are "C" castings. I did not take any photos of them while I was porting them. I do have some Ga heads here that have been pretty warmed over. I will post up some photos of those for comparison purposes.
December 5th, 2013, 10:04 AM
#28
Seasoned beater pilot.
Join Date: Jan 2007
Location: Chicago
Posts: 5,468
http://www.headbytes.com/index.html
This gentleman does how too head porting on youtube
I think it is a good source of what to do and what not to, he also talks about cutters and positioning of them.
I think it is a great source for the garage head porter.
This gentleman does how too head porting on youtube
I think it is a good source of what to do and what not to, he also talks about cutters and positioning of them.
I think it is a great source for the garage head porter.
December 5th, 2013, 12:38 PM
#30
Registered User
Join Date: Apr 2012
Location: New Mexico
Posts: 2,972
Very interested in this thread. I currently have my motor torn down and was working on cleaning up the intake (tri-carb). I noticed that all of the runners had a lot of small bumps and are very rough. Is there an advantage to smoothing them out as well as the head ports and combustion chambers?
 December 5th, 2013, 01:27 PM
#32
Seasoned beater pilot.
Join Date: Jan 2007
Location: Chicago
Posts: 5,468
At low lifts the air has to take the steep stair case down instead of being able to get on at the ground floor, for lack of a better analogy.
Also, unwanted deposits could collect in all the bigger pores and pimples, and cause unwanted pre-ignition if there were to be enough, and one that stayed glowing hot for long enough.
December 5th, 2013, 02:08 PM
#33
Registered User
Join Date: Aug 2007
Posts: 2,250
Macadoo, I'm going to cover match porting and some other mods, but I'm going to try to keep it simple enough for a beginner to handle. These techniques are not really going to be head specific but you should realize that the various letter Olds heads were casted differently. Some have larger water jackets than others. I will try to cover some of the thin areas to be avoided.
No street port job should even come close to hitting water.
One thing I have not seen you mention. I apply machinist blue on the head around the chamber then bolt the head on the bare block, then scribe the bore on the bottom of the head and remove any material that is inside the bore. This is especially important on over bores like the SBC 4.125 dealio. That way no part of the head protrudes into the bore. Obviously, you must have the block prepared and mark the heads for the correct bank. Little tip.
December 5th, 2013, 03:55 PM
#34
Registered User
Join Date: Aug 2013
Location: Central Illinois
Posts: 3,900
Macadoo, I'm going to cover match porting and some other mods, but I'm going to try to keep it simple enough for a beginner to handle. These techniques are not really going to be head specific but you should realize that the various letter Olds heads were casted differently. Some have larger water jackets than others. I will try to cover some of the thin areas to be avoided. A lot of the photos I'm going to post will be #5 & #6 castings - very similar to your #7s. TMI about the bag of pees. I was referring to people bustin' my ***** about not havin' a flow bench, or a dyno, or track results proving that all this grinding is worth while.
captjim, wouldn't smoothing out the port and/or removing obstacles speed air flow? Or are you thinking all it does is create excess volume in the air tunnel?
December 5th, 2013, 04:20 PM
#35
Registered User
Join Date: Aug 2007
Posts: 2,250
Lol, I just thought it might be a good tip for those getting ready to bend over their heads for three or four hours at a time.
captjim, wouldn't smoothing out the port and/or removing obstacles speed air flow? Or are you thinking all it does is create excess volume in the air tunnel?
captjim, wouldn't smoothing out the port and/or removing obstacles speed air flow? Or are you thinking all it does is create excess volume in the air tunnel?
December 5th, 2013, 05:24 PM
#36
Registered User

Join Date: Nov 2008
Location: Central Fl
Posts: 7,821
For the record, I'm not an expert on port flow and porting in general.
However Tom Allen at Champion Race Heads in Palm Coast Florida is.
Here are few tidbits we recently discussed.
The problems with the Olds head configuration are multifold. The chamber roof is too flat, the valve angle is too flat. The port entry is too low. As mentioned the floor and roof need to be raised but with the combustion chamber being so flat you're only going to get so much flow out the current configuration anyway.
And the port entry, pushrod pinch, bowl area etc all have to be right proportionally for it to work correctly.
For instance he mentioned that after viewing a set of CNC ported Edelbrocks, that the pushrod pinch are was actually too large for the valve used. He immediately recommended using larger valve to make all the size percentages to work as designed, then explained other issues with the overall configuration.
I guess my point is, unless you have a flow bench, or REALLY know what you're doing, you could be doing more harm than good.
Jmo.
P.S. I have yet to have a reputable porting shop, i.e Wilson Manifolds, Champion, recommend port matching unless the mismatch is significant. All of them said otherwise it's a waste of time.
December 5th, 2013, 06:59 PM
#37
Registered User
Thread Starter
Join Date: Apr 2010
Posts: 978
slow down
It is just my opinion, but not only is port matching the intake a waste of time, it can even hurt performance by slowing things down. Again, just my personal opinion.
No street port job should even come close to hitting water.
One thing I have not seen you mention. I apply machinist blue on the head around the chamber then bolt the head on the bare block, then scribe the bore on the bottom of the head and remove any material that is inside the bore. This is especially important on over bores like the SBC 4.125 dealio. That way no part of the head protrudes into the bore. Obviously, you must have the block prepared and mark the heads for the correct bank. Little tip.
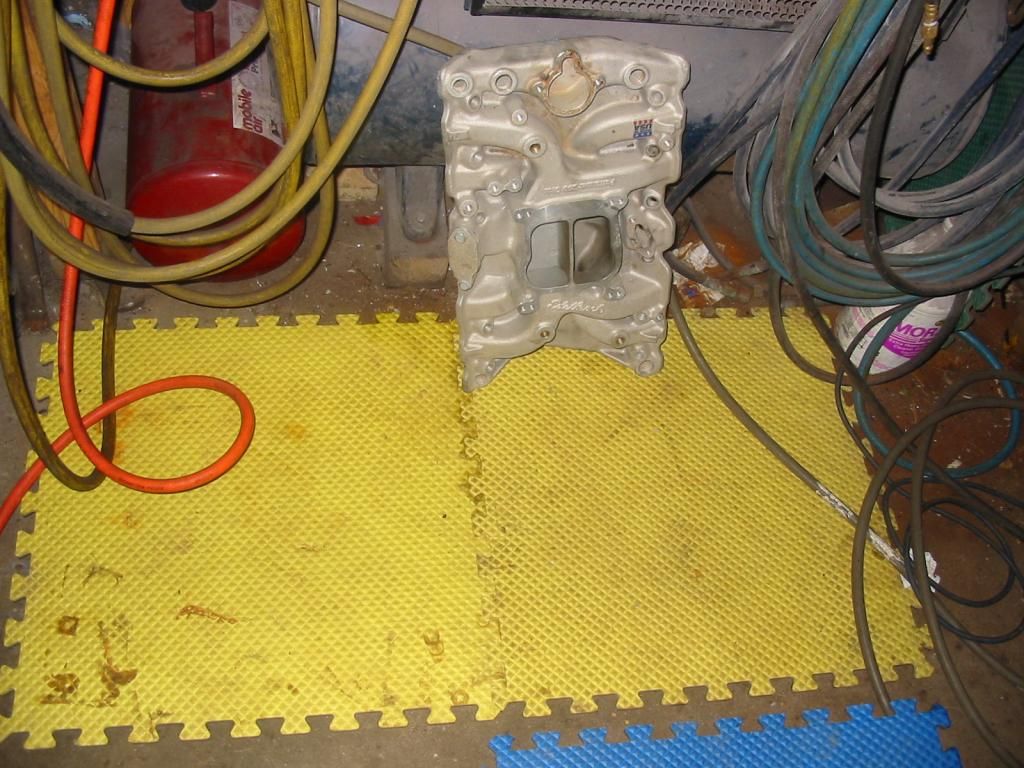
This photo shows how bad the port mismatch is on the Edelbrock performer intake manifold-
118-1837_IMG.jpg
As far as marking the block and head with machinist dye, on these Oldsmobiles there's really not much hanging over to grind off. I did set a head gasket on there to look at the possability of grinding some of the bowl away, to unshroud the bigger intake valve, but there is nothing there to work with. I don't have a custom bore specific head gasket here to work with, just tried and true blue Fel Pro. I was considering the posability of using the 403 gasket, but I'm not sure how that would work out.
118-1835_IMG.jpg
Last edited by 67 Cutlass Freak; December 14th, 2013 at 08:23 PM. Reason: spelling
December 5th, 2013, 07:20 PM
#38
Registered User
Thread Starter
Join Date: Apr 2010
Posts: 978
Not an expert?
For the record, I'm not an expert on port flow and porting in general.
However Tom Allen at Champion Race Heads in Palm Coast Florida is.
Here are few tidbits we recently discussed.
The problems with the Olds head configuration are multifold. The chamber roof is too flat, the valve angle is too flat. The port entry is too low. As mentioned the floor and roof need to be raised but with the combustion chamber being so flat you're only going to get so much flow out the current configuration anyway.
And the port entry, pushrod pinch, bowl area etc all have to be right proportionally for it to work correctly.
For instance he mentioned that after viewing a set of CNC ported Edelbrocks, that the pushrod pinch are was actually too large for the valve used. He immediately recommended using larger valve to make all the size percentages to work as designed, then explained other issues with the overall configuration.
I guess my point is, unless you have a flow bench, or REALLY know what you're doing, you could be doing more harm than good.
Jmo.
P.S. I have yet to have a reputable porting shop, i.e Wilson Manifolds, Champion, recommend port matching unless the mismatch is significant. All of them said otherwise it's a waste of time.
However Tom Allen at Champion Race Heads in Palm Coast Florida is.
Here are few tidbits we recently discussed.
The problems with the Olds head configuration are multifold. The chamber roof is too flat, the valve angle is too flat. The port entry is too low. As mentioned the floor and roof need to be raised but with the combustion chamber being so flat you're only going to get so much flow out the current configuration anyway.
And the port entry, pushrod pinch, bowl area etc all have to be right proportionally for it to work correctly.
For instance he mentioned that after viewing a set of CNC ported Edelbrocks, that the pushrod pinch are was actually too large for the valve used. He immediately recommended using larger valve to make all the size percentages to work as designed, then explained other issues with the overall configuration.
I guess my point is, unless you have a flow bench, or REALLY know what you're doing, you could be doing more harm than good.
Jmo.
P.S. I have yet to have a reputable porting shop, i.e Wilson Manifolds, Champion, recommend port matching unless the mismatch is significant. All of them said otherwise it's a waste of time.
Last edited by 67 Cutlass Freak; December 14th, 2013 at 08:25 PM.
December 5th, 2013, 07:37 PM
#40
Seasoned beater pilot.
Join Date: Jan 2007
Location: Chicago
Posts: 5,468
All of those 77-79 engines are Odd *****.
260, can only use 260 crap pretty much. They're Weird.
From my experience, The windowed 350 head gaskets do not fit the earlier 350 engines. The deck is different at the lower end. Coolant jackets are bigger, or a different shape if I remember correctly.


