Home Porting Techniques

 December 8th, 2013, 11:34 PM
#83
Registered User
Thread Starter
Join Date: Apr 2010
Posts: 978
5) Pocket porting and opening up the bowl area on the exhaust
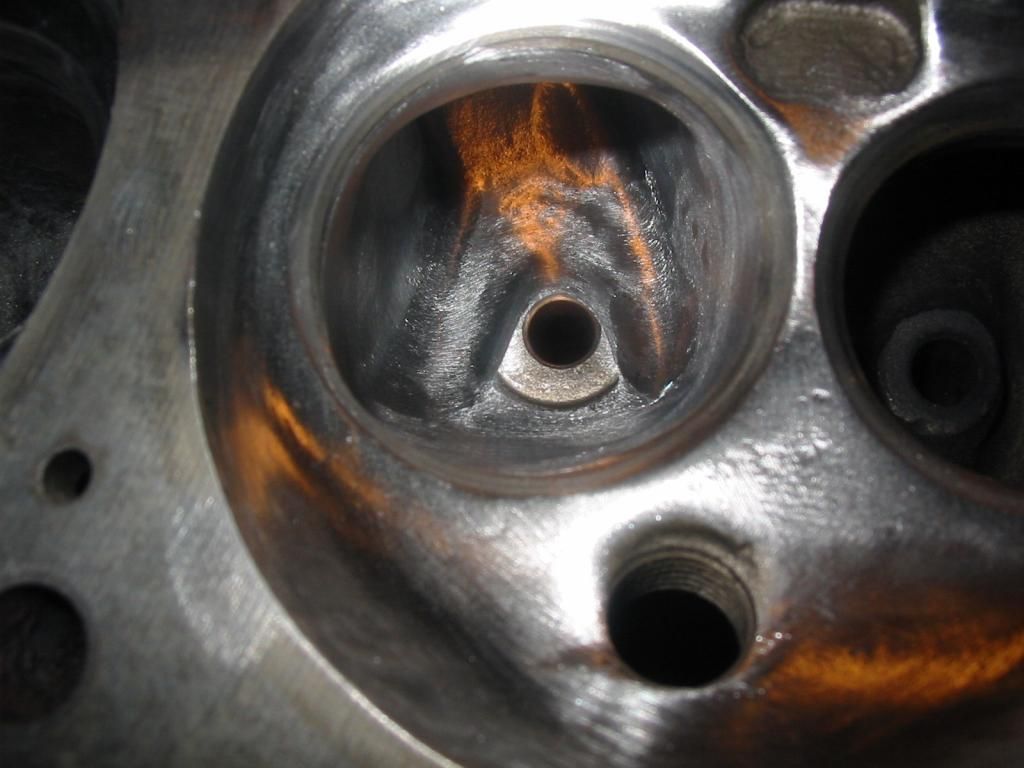
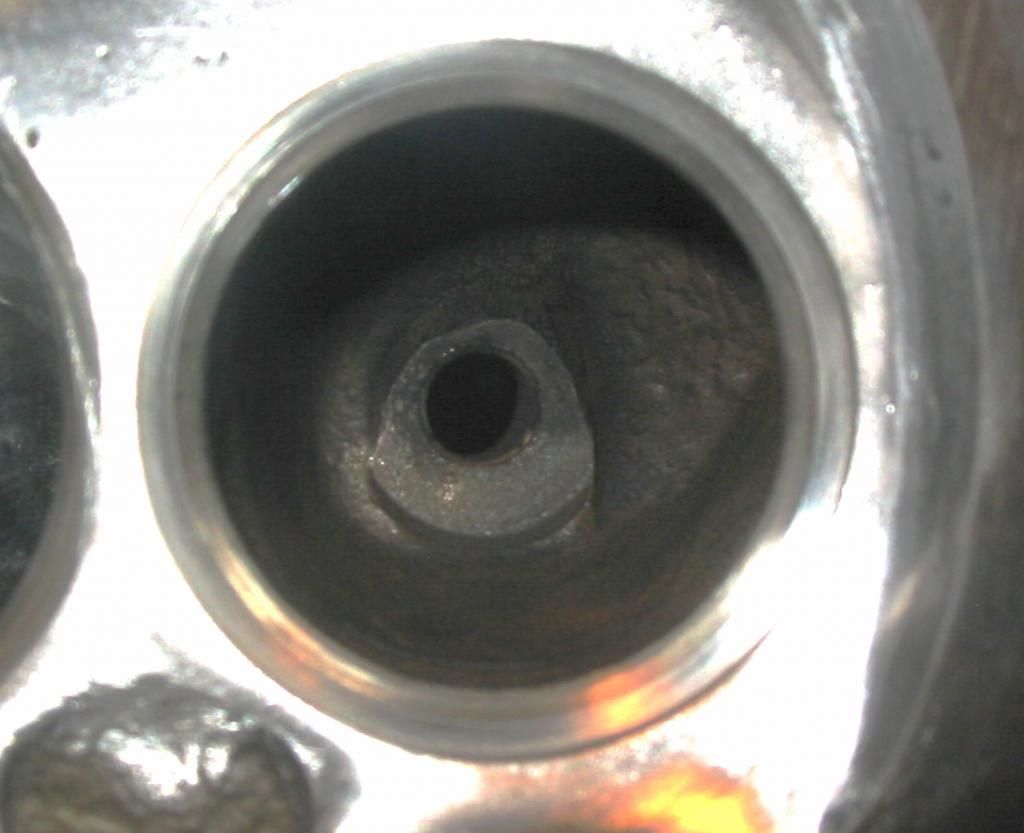
Well guys I spent most of the day porting. I finished up the last three intake bowls and did a little intake runner porting. So now I'm moving on to the exhaust bowls. Everyone sais that the exhaust is not as important to worry about, but my opinion is if you stop now you haven't even finished half the job. Granted the exhaust gasses will find their way out no matter what, but if we make the path easier to travel, I feel we are freeing up horse power. If you're following along and porting with me, only do the outside exhaust ports. Next week end we are going to fill the heat risers, then go back and port those bowls. I hope some of you guys are getting the itch to do some porting. Yeah it's time consuming, tedious and let's face it, a little crazy, but I think you can get into a rythm and try to have a good time with it. This is a type of release for me. Crank the tunes, drink a few beers, make some metal shavings. My body is pretty achey right now, I am spent. Last night I was porting in my sleep, talk about workmares. Maybe I've been grinding a little too much lately. Here's some crappy photos. Please share some of your work.
WE NEED MORE PHOTOS!
118-1840_IMG.jpg
118-1845_IMG.jpg
118-1844_IMG.jpg
118-1846_IMG.jpg
118-1848_IMG.jpg
118-1850_IMG.jpg
118-1851_IMG.jpg
118-1854_IMG.jpg
118-1855_IMG.jpg
118-1856_IMG.jpg
I tried to show some before and after shots, but the photos are out of order, sorry. Someone had started to do some porting on Copper's heads. They did'nt do too good of a job. They left some divets on the roof of the exhaust port. Shouldn't hurt anything. At least they did grind the EGR bumps out of the runners. I plan to cover that in more detail very soon.
WE NEED MORE PHOTOS!
118-1840_IMG.jpg

118-1845_IMG.jpg
118-1844_IMG.jpg
118-1846_IMG.jpg
118-1848_IMG.jpg

118-1850_IMG.jpg
118-1851_IMG.jpg
118-1854_IMG.jpg
118-1855_IMG.jpg
118-1856_IMG.jpg
I tried to show some before and after shots, but the photos are out of order, sorry. Someone had started to do some porting on Copper's heads. They did'nt do too good of a job. They left some divets on the roof of the exhaust port. Shouldn't hurt anything. At least they did grind the EGR bumps out of the runners. I plan to cover that in more detail very soon.
Last edited by 67 Cutlass Freak; December 9th, 2013 at 07:30 AM. Reason: spelling
December 11th, 2013, 09:58 AM
#84
Registered User
Join Date: Jul 2009
Location: Dewey AZ
Posts: 314
well it's my belief that there should be no sharp corners in any ports. On my latest port job, I removed the pushrod pinch points, teardroped the guides, bowl blend, removed the rocker arm boss bumps, removed egr bumps, gasket matched the heads and intake. I did not polish the CC for this 9.1 comp motor, but I did do a cc polish on my last 9.3 bbo. I even port matched the exhaust. We tried to get 3 angles on the intake seats but there wasn't enough meat there to get the 60 degree cut using stock valves. the intake valves were back cut but not the exhaust. I didn't raise the roof on any port just blended them. On the intake I tried to take the venture out of the port, and blend the short side radiouseseseses. I made a jig that i could stick into the port and eyeball size/taper of the port, the A4 port goes from short and wide to tall and skinny. so in theory the plenum runner volume stays the same, just changes shape.


Last edited by Lars; December 12th, 2013 at 06:10 AM.
December 11th, 2013, 05:12 PM
#85
Registered User
Thread Starter
Join Date: Apr 2010
Posts: 978
Thanks for posting up some photos Lars. I guess you get to move up to the head of the class. That intake manifold looks like it was a bitch to port with all the sharp turns. The heads look real good. I'm going to raise the roof a little on the intake and exhaust. What material did you use to fill the heat riser? How did these heads work out for you, was the butt dyno impressed?
December 11th, 2013, 06:00 PM
#86
Registered User
Join Date: Jul 2009
Location: Dewey AZ
Posts: 314
I cut up an old A5 intake and melted her down for the crossover fill, still tuning it on the stand, got no car to put it in. The intake wasn't to bad, I was only able to get in about 2- 1/2 inches with the bit I had. bleh good enough. ill send out the clips tomorrow.
I didn't like my rod bearing clearances on this build so I took some 220 sand paper and added some, same with the mains...
this is the same motor 6 years ago the first time I went throu it
I didn't like my rod bearing clearances on this build so I took some 220 sand paper and added some, same with the mains...
this is the same motor 6 years ago the first time I went throu it
Last edited by Lars; December 11th, 2013 at 06:16 PM.
December 11th, 2013, 06:16 PM
#87
Connoisseur d'Junque
Join Date: Sep 2010
Location: The Hudson Valley
Posts: 21,183
 I haven't heard of anyone doing that to anything after a Model A.
I ASSume you use some Prussian blue or something similar to try to find which part of the bearing was close, and then used the 220 on the steel underneath the bearing insert.
I am interested in knowing how it works out.
- Eric
December 11th, 2013, 08:33 PM
#88
Registered User
Join Date: Jul 2009
Location: Dewey AZ
Posts: 314
nope, sanded the surface. we'll save that one for another thred.
I forgot to mention that I blended both sides of the intake port in the heads, one side of the port has the pushrod pinch, and the other side has excess casting wave, basically creating another venture. my goal was to minimize all the venturi's from carb plenum to valve. i'll try to get a photo of what I'm talking about.


I forgot to mention that I blended both sides of the intake port in the heads, one side of the port has the pushrod pinch, and the other side has excess casting wave, basically creating another venture. my goal was to minimize all the venturi's from carb plenum to valve. i'll try to get a photo of what I'm talking about.
Last edited by Lars; December 11th, 2013 at 09:25 PM.
December 11th, 2013, 09:34 PM
#89
Registered User
Thread Starter
Join Date: Apr 2010
Posts: 978
clearence
I haven't heard of anyone doing that to anything after a Model A.I ASSume you use some Prussian blue or something similar to try to find which part of the bearing was close, and then used the 220 on the steel underneath the bearing insert.
I am interested in knowing how it works out.
- Eric
Thanks for your input Lars. Everyone likes the photos. I did a match port on some Hooker headers, then sent them out to be Jet Hot coated. When I got them back, they had pin holes around the flanges. I had ground them too thin.
December 11th, 2013, 09:56 PM
#90
Registered User
Thread Starter
Join Date: Apr 2010
Posts: 978
Question about reusing valves
olds 307 and 403 posted: This is interesting. I was looking at Milan's stock port build on ROP. He obiviously knows his stuff and has done out of the box and not cheap ways to overcome poor factory ports. I hav already seen some of the obsticles my #8's will need improved. I do not want to do more harm then good. I need to CC them and get a good C clamp spring compressor to pull them apart. I have a cheap broken spring compressor that is junk and hated the style Copper is using. I know J mentioned he has found most stock valves are unuseable, why is this? Straightness, pitting, valve face or what else to look for? If my #8's come anywhere near $1000 for parts and labor, they will not be used. I bet my machine shop price will be similar to Captjim's price. I want to use the 2" intake valves from my 4A's, I have the crossover plugs, won't weld the center divider and just want slightly improved flow. I want to set up the valve height my self when done, as a learning experience. I have assembled and tore down heads, just not for performance. As said track conditions very a lot, especially up here. If any issues can be found with any product, send me to the track with it, I will find it .
.
Sorry I didn't answer you sooner. Sometimes I just need to go back and review what others have commented on. I saw that build on ROP as well. Milan does know his ****. About the used valve condition, everything you mentioned are all factors in whether or not they should be used. Besides all the obvious visual things like pitting, trueness, tip mushrooming, wear by the keeper groove, the other thing that really determines usability is the margin thickness. The margin is the distance between the face and the grind where the seat contacts the valve. This distance gets smaller after every pass on the valve grinding machine. As was said, a decent valve job is usually about $300. A decent set of stainless steel valves will run close to $300. When you start to replace guides and seats it starts to ad up quickly. If you're planning on running an aggressive cam then purchase springs to match. I'm learning that setting up proper valve stem height when going with oversized valves is difficult. You may want to consider an adjustable valve train.
. Sorry I didn't answer you sooner. Sometimes I just need to go back and review what others have commented on. I saw that build on ROP as well. Milan does know his ****. About the used valve condition, everything you mentioned are all factors in whether or not they should be used. Besides all the obvious visual things like pitting, trueness, tip mushrooming, wear by the keeper groove, the other thing that really determines usability is the margin thickness. The margin is the distance between the face and the grind where the seat contacts the valve. This distance gets smaller after every pass on the valve grinding machine. As was said, a decent valve job is usually about $300. A decent set of stainless steel valves will run close to $300. When you start to replace guides and seats it starts to ad up quickly. If you're planning on running an aggressive cam then purchase springs to match. I'm learning that setting up proper valve stem height when going with oversized valves is difficult. You may want to consider an adjustable valve train.
December 11th, 2013, 10:22 PM
#91
Registered User
Thread Starter
Join Date: Apr 2010
Posts: 978
Research
Tonight it was too cold to do any porting so I decided to do a little research about porting threads so I could share some with all of you. I also wanted to suggest two books that I think every Olds guy needs. The first was written by Bill Travato-
http://highperformanceolds.com/phpbb...hp?f=28&t=2712
I found it easy to read and very informative. The second book was written by Joe Mondello-
http://highperformanceolds.com/phpbb...hp?f=28&t=2712
The Oldmobile Technical reference manual has a ton of good information and casting number reference charts. I really like his thoroughness about assembly techniques.
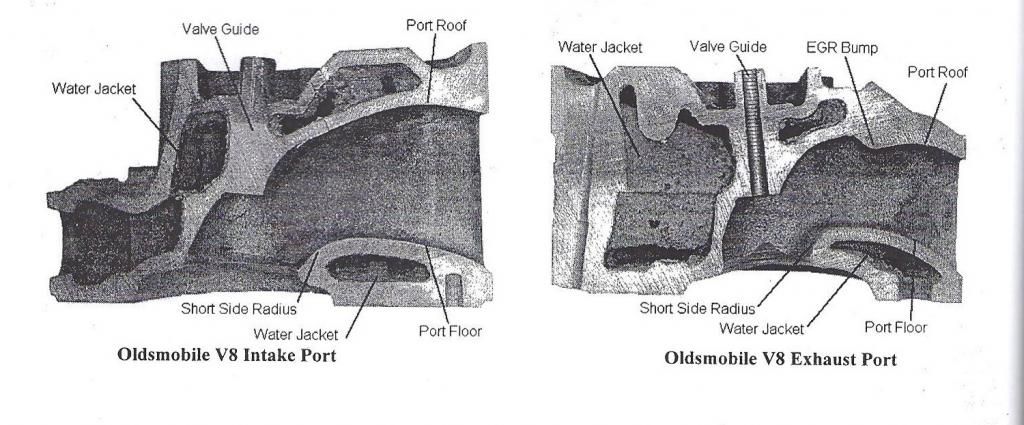
I really would like to encourage everyone to do there own research before going too crazy porting. You really can ruin a good set of heads by going too far in the wrong places. Here's a page from Joe's book that shows a cross sectioned Olds head-
59d616e0-a5b4-4f51-9d23-88c8e1109fe8.jpg
The most common areas to grind too far are: the push rod hole pinch points, the bottom of the bowl area, the exhaust center port head bolt hole and the intake port bump directly below the rocker bolt hole. If you do blast through any of these areas they can be repaired by an experienced welder or by using sleeves available from Rocket Racing or other speed shops. I will try to go into more detail about these areas a little later when we get close to each danger area. I found some threads and a couple web sites I'd like to share with you about porting your heads. I tried to look for ones with some good pictures-
http://www.members.shaw.ca/gregtsmith/Head_Porting.htm
http://www.angelfire.com/sports/hotrodder/
https://classicoldsmobile.com/forums/parts-sale/39441-ported-c-heads-ported-torker-intake.html
https://classicoldsmobile.com/forums/parts-sale/64615-ported-heads.html
https://classicoldsmobile.com/forums/racing-high-performance/55177-port-job-d-heads-mondello-1969-a.html
https://classicoldsmobile.com/forums/racing-high-performance/53428-cylinder-head-porting-rebuilding.html
http://nichibei.tripod.com/headflow.htm
This weekend we are planning to fill the heat risers so stay tuned. Here's a thread on HPO about filling-
http://highperformanceolds.com/phpbb...php?f=3&t=4423
Here's an alternative fill compound over on ROP-
http://realoldspower.prophpbb.com/topic815.html
http://highperformanceolds.com/phpbb...hp?f=28&t=2712
I found it easy to read and very informative. The second book was written by Joe Mondello-
http://highperformanceolds.com/phpbb...hp?f=28&t=2712
The Oldmobile Technical reference manual has a ton of good information and casting number reference charts. I really like his thoroughness about assembly techniques.
I really would like to encourage everyone to do there own research before going too crazy porting. You really can ruin a good set of heads by going too far in the wrong places. Here's a page from Joe's book that shows a cross sectioned Olds head-
59d616e0-a5b4-4f51-9d23-88c8e1109fe8.jpg
The most common areas to grind too far are: the push rod hole pinch points, the bottom of the bowl area, the exhaust center port head bolt hole and the intake port bump directly below the rocker bolt hole. If you do blast through any of these areas they can be repaired by an experienced welder or by using sleeves available from Rocket Racing or other speed shops. I will try to go into more detail about these areas a little later when we get close to each danger area. I found some threads and a couple web sites I'd like to share with you about porting your heads. I tried to look for ones with some good pictures-
http://www.members.shaw.ca/gregtsmith/Head_Porting.htm
http://www.angelfire.com/sports/hotrodder/
https://classicoldsmobile.com/forums/parts-sale/39441-ported-c-heads-ported-torker-intake.html
https://classicoldsmobile.com/forums/parts-sale/64615-ported-heads.html
https://classicoldsmobile.com/forums/racing-high-performance/55177-port-job-d-heads-mondello-1969-a.html
https://classicoldsmobile.com/forums/racing-high-performance/53428-cylinder-head-porting-rebuilding.html
http://nichibei.tripod.com/headflow.htm
This weekend we are planning to fill the heat risers so stay tuned. Here's a thread on HPO about filling-
http://highperformanceolds.com/phpbb...php?f=3&t=4423
Here's an alternative fill compound over on ROP-
http://realoldspower.prophpbb.com/topic815.html
Last edited by 67 Cutlass Freak; December 11th, 2013 at 10:28 PM. Reason: spelling
December 12th, 2013, 05:26 AM
#92
Registered User

Join Date: Aug 2007
Posts: 2,250
You have stumbled upon the pertinent issue. After many, many hours of grinding away, you will still need to spend almost $1,000 on the heads with valves, a valve job, guides, springs, and other hardware. Why would you do that when you can buy brand new aluminum heads that flow better with better chambers, solid divider and no crossover? They are lighter, look better, flow better, and will allow you to run more compression. It just makes no sense to dump that much time and money into the old iron, IMHO. It is fine from a hobby standpoint to leard how to do it or for the enjoyment, but from a time and cost effective standpoint, the aluminum heads make more sense.
http://www.ebay.com/itm/BERNARD-MOND...ht_1624wt_1105
December 12th, 2013, 09:39 AM
#93
Registered User

Join Date: Aug 2008
Location: Iowa
Posts: 1,130
OK maybe this has been brought up in previous posts. If you are putting the Pro Comps on a BB......that's fine. Don't they have BB runners? What about a SB? The ports are too big for anything but a Performer RPM or a Victor intake. That would be an added cost to the Pro Comps..........yes?.......no?
December 12th, 2013, 09:44 AM
#94
Registered User
Join Date: Jul 2012
Location: Vancouver BC
Posts: 2,788
Jim you are 100% right good post.
I also think if you are running well with factory iron it is so cool. If you did the work your self there is a pride and joy that comes with it.
When you run factory cast iron your engine is more Olds than if you were to run aluminum aftermarket heads.
I also think if you are running well with factory iron it is so cool. If you did the work your self there is a pride and joy that comes with it.
When you run factory cast iron your engine is more Olds than if you were to run aluminum aftermarket heads.
December 12th, 2013, 09:46 AM
#95
Registered User
Join Date: Jul 2012
Location: Vancouver BC
Posts: 2,788
Thanks for the post lots of good info. From those photos I can see why taking out the guide boss is a good mod and straitening out the top part of the port works well also.
Tonight it was too cold to do any porting so I decided to do a little research about porting threads so I could share some with all of you. I also wanted to suggest two books that I think every Olds guy needs. The first was written by Bill Travato-
http://highperformanceolds.com/phpbb...hp?f=28&t=2712
I found it easy to read and very informative. The second book was written by Joe Mondello-
http://highperformanceolds.com/phpbb...hp?f=28&t=2712
The Oldmobile Technical reference manual has a ton of good information and casting number reference charts. I really like his thoroughness about assembly techniques.
I really would like to encourage everyone to do there own research before going too crazy porting. You really can ruin a good set of heads by going too far in the wrong places. Here's a page from Joe's book that shows a cross sectioned Olds head-
The most common areas to grind too far are: the push rod hole pinch points, the bottom of the bowl area, the exhaust center port head bolt hole and the intake port bump directly below the rocker bolt hole. If you do blast through any of these areas they can be repaired by an experienced welder or by using sleeves available from Rocket Racing or other speed shops. I will try to go into more detail about these areas a little later when we get close to each danger area. I found some threads and a couple web sites I'd like to share with you about porting your heads. I tried to look for ones with some good pictures-
http://www.members.shaw.ca/gregtsmith/Head_Porting.htm
http://www.angelfire.com/sports/hotrodder/
https://classicoldsmobile.com/forums/parts-sale/39441-ported-c-heads-ported-torker-intake.html
https://classicoldsmobile.com/forums/parts-sale/64615-ported-heads.html
https://classicoldsmobile.com/forums/racing-high-performance/55177-port-job-d-heads-mondello-1969-a.html
https://classicoldsmobile.com/forums/racing-high-performance/53428-cylinder-head-porting-rebuilding.html
http://nichibei.tripod.com/headflow.htm
This weekend we are planning to fill the heat risers so stay tuned. Here's a thread on HPO about filling-
http://highperformanceolds.com/phpbb...php?f=3&t=4423
Here's an alternative fill compound over on ROP-
http://realoldspower.prophpbb.com/topic815.html
http://highperformanceolds.com/phpbb...hp?f=28&t=2712
I found it easy to read and very informative. The second book was written by Joe Mondello-
http://highperformanceolds.com/phpbb...hp?f=28&t=2712
The Oldmobile Technical reference manual has a ton of good information and casting number reference charts. I really like his thoroughness about assembly techniques.
I really would like to encourage everyone to do there own research before going too crazy porting. You really can ruin a good set of heads by going too far in the wrong places. Here's a page from Joe's book that shows a cross sectioned Olds head-

The most common areas to grind too far are: the push rod hole pinch points, the bottom of the bowl area, the exhaust center port head bolt hole and the intake port bump directly below the rocker bolt hole. If you do blast through any of these areas they can be repaired by an experienced welder or by using sleeves available from Rocket Racing or other speed shops. I will try to go into more detail about these areas a little later when we get close to each danger area. I found some threads and a couple web sites I'd like to share with you about porting your heads. I tried to look for ones with some good pictures-
http://www.members.shaw.ca/gregtsmith/Head_Porting.htm
http://www.angelfire.com/sports/hotrodder/
https://classicoldsmobile.com/forums/parts-sale/39441-ported-c-heads-ported-torker-intake.html
https://classicoldsmobile.com/forums/parts-sale/64615-ported-heads.html
https://classicoldsmobile.com/forums/racing-high-performance/55177-port-job-d-heads-mondello-1969-a.html
https://classicoldsmobile.com/forums/racing-high-performance/53428-cylinder-head-porting-rebuilding.html
http://nichibei.tripod.com/headflow.htm
This weekend we are planning to fill the heat risers so stay tuned. Here's a thread on HPO about filling-
http://highperformanceolds.com/phpbb...php?f=3&t=4423
Here's an alternative fill compound over on ROP-
http://realoldspower.prophpbb.com/topic815.html
Last edited by Bernhard; December 12th, 2013 at 09:52 AM.
 December 12th, 2013, 10:11 AM
#97
Registered User
Join Date: Aug 2007
Posts: 2,250
OK maybe this has been brought up in previous posts. If you are putting the Pro Comps on a BB......that's fine. Don't they have BB runners? What about a SB? The ports are too big for anything but a Performer RPM or a Victor intake. That would be an added cost to the Pro Comps..........yes?.......no?
It would, but if you are doing a performance port job on iron heads, you would need an upgrade to the intake. There is the extra work of matching the intake, but no big deal.
December 12th, 2013, 10:22 AM
#99
Registered User
Join Date: Aug 2007
Posts: 2,250
December 12th, 2013, 10:32 AM
#100
I would have bought the procomps , or had my 6's freshened up. I say this al the time. I spent 1565 on my #6's ferrea stainless valves. 2.07. In. Stock ex. Oversized springs all new retainers keepers , pushrods, guide plates , studs, roller tip rockers , milling the intake, ad 120 for the price of the used intake that's 1685 for the top end. That's no porting just widening the bowls.
Last edited by coppercutlass; December 12th, 2013 at 11:56 AM.
 . Smoothed the exhaust ports. No polishing.
December 12th, 2013, 02:15 PM
. Smoothed the exhaust ports. No polishing.
December 12th, 2013, 02:15 PM
#103
Out of Line, Everytime😉
Join Date: Dec 2006
Location: Melville, Saskatchewan
Posts: 8,911
Don't forget an electric fuel pump/block off, adjustable valve train and Cometic gaskets when running Procomp's. I can see getting stem height right being more difficult when cutting a new seat. I want to avoid the headache and cost of an adjustable valve train. Of course it means stem height and push rod length have to be right. I have a box full of extra rockers, bridges and push rods. I will post pictures when I pull the valves. I have a good idea what that area should look like on a valve.
 December 12th, 2013, 03:59 PM
#104
Registered User
Join Date: Aug 2007
Posts: 2,250
Don't forget an electric fuel pump/block off, adjustable valve train and Cometic gaskets when running Procomp's. I can see getting stem height right being more difficult when cutting a new seat. I want to avoid the headache and cost of an adjustable valve train. Of course it means stem height and push rod length have to be right. I have a box full of extra rockers, bridges and push rods. I will post pictures when I pull the valves. I have a good idea what that area should look like on a valve.
December 12th, 2013, 04:49 PM
#105
Registered User
Thread Starter
Join Date: Apr 2010
Posts: 978
You have stumbled upon the pertinent issue. After many, many hours of grinding away, you will still need to spend almost $1,000 on the heads with valves, a valve job, guides, springs, and other hardware. Why would you do that when you can buy brand new aluminum heads that flow better with better chambers, solid divider and no crossover? They are lighter, look better, flow better, and will allow you to run more compression. It just makes no sense to dump that much time and money into the old iron, IMHO. It is fine from a hobby standpoint to leard how to do it or for the enjoyment, but from a time and cost effective standpoint, the aluminum heads make more sense.
http://www.ebay.com/itm/BERNARD-MOND...ht_1624wt_1105
http://www.ebay.com/itm/BERNARD-MOND...ht_1624wt_1105
Jim, once again you are correct in your math and logic. An individual would have to be crazy to spend all this time, effort, labor, and money on some old junk cast iron heads, just to say I did the work. I ported them myself. The success or failure is all on me. My good friend is a Pro Comp dealer. I can purchase a bare pair of castings for $650. When you add valves, springs, keepers and labor that does put you over the $1,100 Bernard gets for a set. I agree it sounds like a good deal. On the other hand if you're a guy like me who has a lot of old used good junk laying around, rebuilding the old stuff sounds pretty good. If you didn't have to pay for new valves or a valve job and it's just your time, hell I'll work my *** off to save $ 1,100. The Pro Comp heads were based on Edelbrock's original castings which were pretty good. They were developed with Joe Mondello to be a good factory replacement. There flow in stock form is real close to the BB Olds stock castings. The real benefits were lighter weight and the ability to run higher compression ratios without detonation because of the aluminum. Anyone who is considering porting old cast iron heads should have their heads examined. Don't worry about me, I am certifiable.
Last edited by 67 Cutlass Freak; December 12th, 2013 at 04:57 PM.
December 13th, 2013, 09:32 AM
#106
Out of Line, Everytime😉
Join Date: Dec 2006
Location: Melville, Saskatchewan
Posts: 8,911
I am planning 9 to 9.25 to 1 with the #8 heads, easy with the bore and stroke on this build. The cam will be from Mark, what ever he recommends. These heads are going be a low cost venture to get the build done. Heads are easy to swap down the line. I only want an adjustable valve train that will move over to a set of aluminum heads.
December 13th, 2013, 04:36 PM
#107
Registered User
Join Date: Aug 2007
Posts: 2,250
I am planning 9 to 9.25 to 1 with the #8 heads, easy with the bore and stroke on this build. The cam will be from Mark, what ever he recommends. These heads are going be a low cost venture to get the build done. Heads are easy to swap down the line. I only want an adjustable valve train that will move over to a set of aluminum heads.
I agree, on a mild build like that a high lift cam and adjustable valve train are not necessary, and neither is extensive port work. IMHO.
December 13th, 2013, 10:10 PM
#108
Registered User
Thread Starter
Join Date: Apr 2010
Posts: 978
Port work
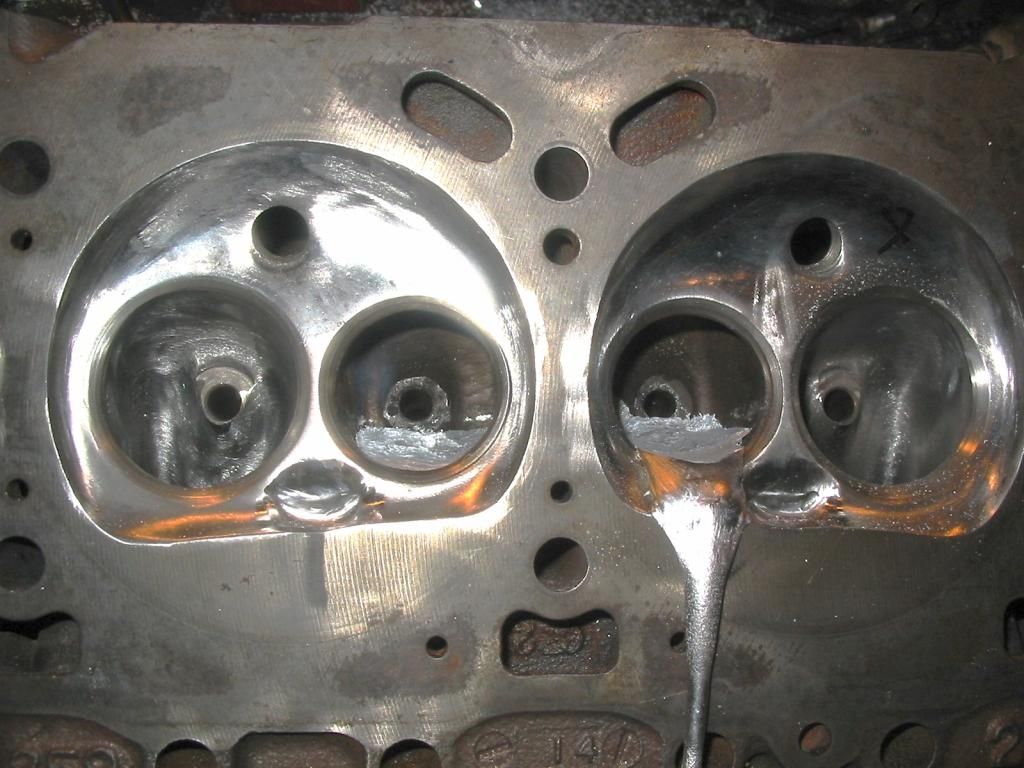
455man, how much time do you think you spent porting your heads? Just my opinion, but your bowl areas could use more work. Remember this is the biggest improvement you can get for the least amount of grinding time. Look straight down past the seat and you will see the restrictions that should be ground out. Looks like your ready for a valve job. Nice work on the divider. Later on in this thread I'm going to show a clip installation that saves a lot of time. Thanks for posting up your photos.
December 14th, 2013, 07:56 AM
#109
Out of Line, Everytime😉
Join Date: Dec 2006
Location: Melville, Saskatchewan
Posts: 8,911
Thanks Jim I always appreciate your input. I could go all on this build out but then the trans or rear will be left at the starting line. I am picking up a C clamp spring compressor today and will soon CC my heads.
December 14th, 2013, 09:04 PM
#110
Registered User
Thread Starter
Join Date: Apr 2010
Posts: 978
Teardrop shaping the exhaust guide
Last night I spent a few hours in the garage and got a lot done. I finished the exhaust bowls on the two outer cylinders of one head and started working the roof and short side radius. I didn't touch the floors much and didn't want to do any work on the center ports because tomorrow we're going to fill the heat risers. That's always fun. I received some clips from Lars today to correct the center divider issue. I will take plenty of photos.
118-1851_IMG.jpg
118-1851_IMG.jpg
December 15th, 2013, 08:26 PM
#111
Registered User
Thread Starter
Join Date: Apr 2010
Posts: 978
Filling the heat risers
Well guys Coppercutlass came up today and did some body work on the roof of my race car. I finished up porting the end exhaust bowls on the other head then we worked together to fill the heat riser on two sets of heads. When doing this operation it's really helpful to have an extra set of hands. Number one concern is safety. Protective eye wear and welding gloves are a must. Have your fire extinguisher handy. I put a metal sign under everything and a 1/4" thick piece of steel under the heat riser port on the intake side. I use a cast iron ladle, but I have heard of people using a cast iron skillet. I've also heard of people using a kiln to heat the aluminum. I have done this before with Zinc alloy and that does seem to melt at a lower temperature.
118-1861_IMG.jpg
118-1863_IMG.jpg
I use an oxy-acetylene torch to melt the aluminum. We started out with a chunk I cut off an old 3.1 liter intake manifold. The first pour went smooth. It's important to scrape the impurities off the top. I use a fork.
118-1864_IMG.jpg
Some people suggest you preheat the head in a gas grill, but I have never done that. It is important to make sure it is clean and carbon free.
118-1865_IMG.jpg
For the second pour we tried using what I thought was an aluminum lower control arm. It did not melt as easy, and looked very porous. It must have had magnesium or some other alloy in it, so we did not use it. We took a piston off a rod and melted it down. This was a good quality aluminum.
118-1865_IMG.jpg
118-1870_IMG.jpg
It's OK to have a little extra come out the port. It will grind off fast and easy. The idea here is to make the center two exhaust ports look like the outer bowls.
It's best to use a single cut carbide burr for porting aluminum so it will not clog up.
118-1872_IMG.jpg
118-1874_IMG.jpg
118-1875_IMG.jpg
118-1861_IMG.jpg
118-1863_IMG.jpg
I use an oxy-acetylene torch to melt the aluminum. We started out with a chunk I cut off an old 3.1 liter intake manifold. The first pour went smooth. It's important to scrape the impurities off the top. I use a fork.
118-1864_IMG.jpg
Some people suggest you preheat the head in a gas grill, but I have never done that. It is important to make sure it is clean and carbon free.
118-1865_IMG.jpg
For the second pour we tried using what I thought was an aluminum lower control arm. It did not melt as easy, and looked very porous. It must have had magnesium or some other alloy in it, so we did not use it. We took a piston off a rod and melted it down. This was a good quality aluminum.
118-1865_IMG.jpg
118-1870_IMG.jpg
It's OK to have a little extra come out the port. It will grind off fast and easy. The idea here is to make the center two exhaust ports look like the outer bowls.

It's best to use a single cut carbide burr for porting aluminum so it will not clog up.
118-1872_IMG.jpg
118-1874_IMG.jpg
118-1875_IMG.jpg
December 16th, 2013, 08:36 AM
#112
Registered User
Join Date: Nov 2010
Location: Wichita, Ks
Posts: 1,070
455man, how much time do you think you spent porting your heads? Just my opinion, but your bowl areas could use more work. Remember this is the biggest improvement you can get for the least amount of grinding time. Look straight down past the seat and you will see the restrictions that should be ground out. Looks like your ready for a valve job. Nice work on the divider. Later on in this thread I'm going to show a clip installation that saves a lot of time. Thanks for posting up your photos.
December 17th, 2013, 11:19 AM
#113
Out of Line, Everytime😉
Join Date: Dec 2006
Location: Melville, Saskatchewan
Posts: 8,911
Another question, what about back cutting valves? I know Jim mentioned the secret angle. I know CC did a bunch of different heads and back cut valves, 30, 32 and 35 deg tested. The angles made differences where the heads flowed. Some gained a huge amount, others not so much. The Olds RPM heads gained top to bottom on the intake, the exhaust nothing at all. Most were at lower lifts, should be a benefit to any street engine.
December 17th, 2013, 10:33 PM
#114
Registered User
Join Date: Jul 2012
Location: Vancouver BC
Posts: 2,788
Some ss intake valves are quite thin and you can't and really don't need to back cut them. I could see it helping on a stock thickness valve.
I would look into intake valves with necked down stem and a thin valve face that way you no you are not giving anything away.
I think adjustable rockers with guide plates is a good investment for any mild build.
I would look into intake valves with necked down stem and a thin valve face that way you no you are not giving anything away.
I think adjustable rockers with guide plates is a good investment for any mild build.
Last edited by Bernhard; December 17th, 2013 at 10:35 PM.
December 20th, 2013, 09:11 PM
#115
Registered User
Thread Starter
Join Date: Apr 2010
Posts: 978
Porting the intake runner
Pretty soon I will start going over a basic three angle valve job, and back cutting valves. We're just not there yet guys. Sorry but we need to finish porting first. Last night I spent a few hours on the intake runners. Between things I had a really good post about the steps I was taking with photos and all. I had an error message and it all got deleted. This time I'm using Microsoft Word so that doesn't happen again. I must have been typing too slow. Anyhow I was doing some work on the intake port. First thing I will work on is marking and laying out the port entrance. Some people will call this gasket matching. I will raise the roof .100" on these small block heads. That's not really too aggressive. The SB gaskets I have are pretty close to the stock port already. I will have to modify the gasket and open up the top on it as well by 1/10". There has been some discussion in this thread about match porting the intake manifold to the port entrance not being worth much of any gain. I agree, unless you port the intake runner as well. Not just the end, or one inch in. I realize this is very difficult, but if IMHO if you're not going to do the complete job, than why bother doing anything? Remember your port is only going to flow as well as the maximum point of restriction.
Here you can see three different intake gaskets I have on hand-
118-1893_IMG.jpg
[URL=http://s291.photobucket.com/user/Oldsnut1967/media/Parts/118-1896_IMG.jpg.html][IMG]

118-1898_IMG.jpg
The last one is a BB intake gasket I set on there for comparison purposes. Some people have hogged these SB heads out to BB intake port openings. For this particular build, I don't believe that would work too well. I think we would loose too much port velocity. This particular build will be for hot street strip use. I would not call this a max effort port job. Earlier in this thread I posted links to threads where guys running BB heads have raised the roof and filled the floor a full 1/2". Those guys have pushed their Oldsmobile's with cast iron heads, naturally aspirated, into the nines in the quarter mile. That is hard core cast iron porting. This SB build for Coppercutlass will be approximately 10.5:1 compression running on pump gas.
Here I'm going to modify the gasket and lay out the port entrance-
119-1901_IMG.jpg
119-1902_IMG.jpg
119-1904_IMG.jpg
119-1905_IMG.jpg
119-1906_IMG.jpg
December 20th, 2013, 09:47 PM
#116
Registered User
Thread Starter
Join Date: Apr 2010
Posts: 978
Intake port restrictions
When I'm porting the intake and exhaust runners I will start as far in as I can reach, close to the guide. You will notice on the roof of the intake port you will find a bump that corresponds with the rocker mount bolt hole above it. I like to remove this bump and widen the port wall to even up the entrance. I have heard some discussion that the engineers intentionally put this bump in to redirect the air fuel charge to the other side of the port which is more open. Without having a flow bench, it's hard to tell how much good this really does. The way I look at it is, you are removing a point of restriction. Be careful not to go too deep or you will find the bolt hole. If you do blast through, don't worry too much about it. You can either weld it back up or just use thread sealer on the rocker bolt to seal out any oil from above. The other option would be to fill the bottom of the hole with high temperature two part epoxy.
Another point of restriction in the intake port would be the push rod holes. Some of the heavy hitters have gone to some pretty big extremes to move the push rod holes and use off set rockers like these custom BTR modified Edelbrocks-
http://highperformanceolds.com/phpbb...hp?f=28&t=2725
Here you can see the pinch point pretty well, I've used some white paint to help identify this area-
118-1812_IMG.jpg
I will remove the casting slag on the walls and floor but be very careful not to remove too much material by the push rod hole or the head bolt hole further in. I'm always trying to straighten out the port with less curves. Try not to remove anything off the floor. Heavily modified heads will have the entire port raised up with the floor filled and raised up as well. Like I said before, work the port from inside out. That way you will have a smoother transition. Here are some of the tools I use to check my work and attempt to maintain consistency in each of the ports-
118-1899_IMG.jpg
Here you can see my roughed in port with the raised roof. I still need to tighten up the radius in the corners and dress the entire port-
119-1907_IMG.jpg
119-1910_IMG.jpg
December 22nd, 2013, 12:09 AM
#117
Registered User
Join Date: Jul 2012
Location: Vancouver BC
Posts: 2,788
`I have a question about port raising ?
Is it a good idea, if you look at the photos that were posted of the cut away head it looks like the port is already larger at the entrance to the head, are you not making more of a funnel by making the port entrance larger?
Is it to straighten out the port?
So this is the question is it better to raise the port and create more of a funnel?
Or is it better to make the runner as equal as you can and not touch the entrances?
Thanks again for posting
December 22nd, 2013, 12:39 AM
#118
Registered User
Join Date: Jul 2012
Location: Vancouver BC
Posts: 2,788
What do you think about cutting a head up straight down the middle of the intake ports. Mapping the port out then shaping the cut up port head to you desired shape. Copy this port on you good heads using snap gauges.
One concern I have is core shift and how thick one should leave the casting for any core shift. The other concern is this would not help with width mapping only the roof and the short turn could be done this way.
Thoughts?
One concern I have is core shift and how thick one should leave the casting for any core shift. The other concern is this would not help with width mapping only the roof and the short turn could be done this way.
Thoughts?
December 22nd, 2013, 07:37 AM
#119
Registered User
Thread Starter
Join Date: Apr 2010
Posts: 978
`I have a question about port raising ?
Is it a good idea, if you look at the photos that were posted of the cut away head it looks like the port is already larger at the entrance to the head, are you not making more of a funnel by making the port entrance larger?
Is it to straighten out the port?
So this is the question is it better to raise the port and create more of a funnel?
Or is it better to make the runner as equal as you can and not touch the entrances?
Thanks again for posting
Is it a good idea, if you look at the photos that were posted of the cut away head it looks like the port is already larger at the entrance to the head, are you not making more of a funnel by making the port entrance larger?
Is it to straighten out the port?
So this is the question is it better to raise the port and create more of a funnel?
Or is it better to make the runner as equal as you can and not touch the entrances?
Thanks again for posting
Bernhard you are thinking correctly about the funnel effect. That's why I tried to describe the porting should be equal from as far in as you can reach close to the guide all the way out to the entrance. Maybe I am not doing such a good job of trying to explain this, and the crappy pictures sure don't help much. Straightening out the port is the main objective. Later on today I'll try to get some photos of an intake attached to the head so you can see what the air fuel charge has to do, to enter the intake port on the head. Another thing about the funnel effect, no matter how big a valve you put in there, it will never be as large as the intake port entrance.
December 22nd, 2013, 07:51 AM
#120
Registered User
Thread Starter
Join Date: Apr 2010
Posts: 978
Great minds think alike
What do you think about cutting a head up straight down the middle of the intake ports. Mapping the port out then shaping the cut up port head to you desired shape. Copy this port on you good heads using snap gauges.
One concern I have is core shift and how thick one should leave the casting for any core shift. The other concern is this would not help with width mapping only the roof and the short turn could be done this way.
Thoughts?
One concern I have is core shift and how thick one should leave the casting for any core shift. The other concern is this would not help with width mapping only the roof and the short turn could be done this way.
Thoughts?
This is a great idea. Actually what I wanted to do was find a cracked BB head and go hog wild on it. Raise the roof and floor 1/2" cut the seat for the biggest valve I can fit in there. Then I wanted to have it flow tested to see what can be achieved from a cast iron head. Then I want to cut it right down the intake guide and the exhaust guide to see how much material is left. If you look at the cross section, it doesn't look like there is 1/2" of material there before I'm into the water jacket. We have a big industrial band saw at work so cutting it up will be easy. I know it sounds crazy but I was considering having this paper weight gold, or chrome plated, than turning it into a trophy and presenting it to the racer with the fastest Olds, naturally aspirated, running the cast iron heads at Norwalk. The hard part is coming up with a junk head. I don't want to cut up a good one. Thank you Bernhard for your interest, and input. I wish we could hear from some other porters that might have some tidbits of wisdom.


