Home Porting Techniques
 December 5th, 2013, 07:49 PM
#41
Seasoned beater pilot.
Join Date: Jan 2007
Location: Chicago
Posts: 5,468
Speaking of thinking outside the box.....To go on a tangent here, I just thought of a wacky experiment I'd like to attempt on dave's valve grinder........................................... ..... if the angles will match up. I don't remember what those #5's were 
using 307 intake valves for the exhaust side. I will have to pull a head apart and see if it may be thick enough to dissipate the heat.
I believe they're 1.75"
Worth a look anyway.
using 307 intake valves for the exhaust side. I will have to pull a head apart and see if it may be thick enough to dissipate the heat.
I believe they're 1.75"
Worth a look anyway.
 December 5th, 2013, 08:12 PM
#42
Registered User
Thread Starter
Join Date: Apr 2010
Posts: 978
Bowl work
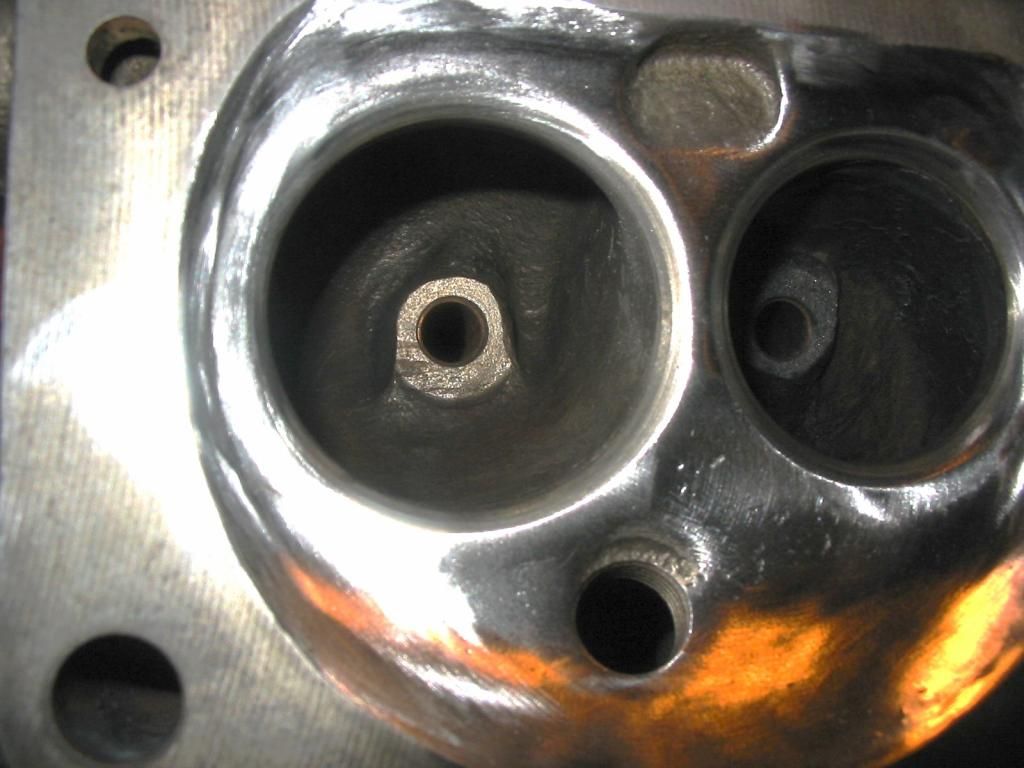
So this is where the experts say a little work goes a long way. If you put your eye directly over the bowl and look straight down into it, you can see the points of restriction. I have marked them here with some white paint.
118-1809_IMG.jpg
118-1810_IMG.jpg
I will work these areas hard with the long carbide bit first and around the entire bowl. When I'm porting I wear thin mechanics gloves, but it is good to take them off and feel your work. I am right handed but use my left hand to steady the nose of the grinder. You should check periodically to make sure the bit has not come loose in the collar. Try to be smooth with the tool. Don't let it bounce and use it on one wall at a time working back and forth from inside to outside. Do not start randomly grinding. Do it in a pattern kind of like mowing the grass. Shine a light into the bowl through the intake port so you can see what you're doing. I have some fancy head holders around here somewhere, but I'll be damned if I can find them. I just use 2X4s to prop the head and angle it toward me for easy access. It's important to make sure the head is steady, and not wobbling around. When I'm porting the bowl, I will also start shaping the short side radius which is the floor. Looking straight down into the bowl with the exhaust port toward you, the short side radius is up. After I've got a good start on shaping the bowl, I turn the head around and work the roof from the intake port runner. It's easier to transition the guide from this angle. The term "tear dropping the guide", is what you do to taper the roof around the guide allowing better air flow. Here's some photos that hopefully will help-
From left to right are the bits I will use in the bowl, in that order.
118-1823_IMG.jpg
Somebody started porting these heads but didn't get too far.
118-1824_IMG.jpg
118-1828_IMG.jpg
118-1829_IMG.jpg
118-1830_IMG.jpg
118-1809_IMG.jpg
118-1810_IMG.jpg
I will work these areas hard with the long carbide bit first and around the entire bowl. When I'm porting I wear thin mechanics gloves, but it is good to take them off and feel your work. I am right handed but use my left hand to steady the nose of the grinder. You should check periodically to make sure the bit has not come loose in the collar. Try to be smooth with the tool. Don't let it bounce and use it on one wall at a time working back and forth from inside to outside. Do not start randomly grinding. Do it in a pattern kind of like mowing the grass. Shine a light into the bowl through the intake port so you can see what you're doing. I have some fancy head holders around here somewhere, but I'll be damned if I can find them. I just use 2X4s to prop the head and angle it toward me for easy access. It's important to make sure the head is steady, and not wobbling around. When I'm porting the bowl, I will also start shaping the short side radius which is the floor. Looking straight down into the bowl with the exhaust port toward you, the short side radius is up. After I've got a good start on shaping the bowl, I turn the head around and work the roof from the intake port runner. It's easier to transition the guide from this angle. The term "tear dropping the guide", is what you do to taper the roof around the guide allowing better air flow. Here's some photos that hopefully will help-
From left to right are the bits I will use in the bowl, in that order.
118-1823_IMG.jpg
Somebody started porting these heads but didn't get too far.
118-1824_IMG.jpg

118-1828_IMG.jpg
118-1829_IMG.jpg
118-1830_IMG.jpg
Last edited by 67 Cutlass Freak; December 14th, 2013 at 08:29 PM.
December 5th, 2013, 08:18 PM
#43
Registered User
Thread Starter
Join Date: Apr 2010
Posts: 978
Bowl work
Next I will use the shorter tapered carbide bit. It's easier to control and get smoother results-
118-1831_IMG.jpg
Next I go over it real fast with a stone-
118-1832_IMG.jpg
Next is the tapered cartridge roll. They say that it's OK to leave a little roughness in the port to create some turbulance. Polishing looks nice, but I don't think it really ads to performance.
118-1833_IMG.jpg
118-1831_IMG.jpg
Next I go over it real fast with a stone-
118-1832_IMG.jpg
Next is the tapered cartridge roll. They say that it's OK to leave a little roughness in the port to create some turbulance. Polishing looks nice, but I don't think it really ads to performance.
118-1833_IMG.jpg
Last edited by 67 Cutlass Freak; December 14th, 2013 at 08:30 PM.
December 5th, 2013, 08:33 PM
#44
Registered User
Thread Starter
Join Date: Apr 2010
Posts: 978
#5s
Speaking of thinking outside the box.....To go on a tangent here, I just thought of a wacky experiment I'd like to attempt on dave's valve grinder........................................... ..... if the angles will match up. I don't remember what those #5's were
using 307 intake valves for the exhaust side. I will have to pull a head apart and see if it may be thick enough to dissipate the heat.
I believe they're 1.75"
Worth a look anyway.
using 307 intake valves for the exhaust side. I will have to pull a head apart and see if it may be thick enough to dissipate the heat.
I believe they're 1.75"
Worth a look anyway.
December 5th, 2013, 10:15 PM
#45
Seasoned beater pilot.
Join Date: Jan 2007
Location: Chicago
Posts: 5,468
I just went downstairs to the workbench and did some homework. Pulled out a 307 intake valve. It is a 45, and measures 1.75. Since it is an emissions engine, the valve is very thick, and I'd guess it would run just fine on the burn side. I'm no metallurgist though.
I also pulled a J head intake valve, it was a 1.995 on a 45 as well. I slipped them both into a small valve E head chamber and they don't even come close to hitting, so that combo is do-able in my opinion.
For fun, I also put in a 2.07 on a 45, with the 307 int. valve in the exhaust, and there is only .014 feeler gauge clearance between the 2, so if there is ANY slop in the guides, they will definitely clip each other.
That combo is no good.
So..... The question now is....
Is there room to unshroud the 1.995/1.75 combo in a #5 small block head?
It fits ok in the E head, but that's apples to oranges at the moment.
If it is too shrouded it will be a step backwards, even though it will look tougher. Sounds like a fun experiment to mock up next time I visit the land of cheese.
December 6th, 2013, 11:26 AM
#47
Registered User

Join Date: Aug 2007
Posts: 2,250
IMO, it does not matter, the 1.75 valve is too large for a SBO head, the port just won't flow enough. Personally, I went with a 2.02 intake and 1.560 ex on my last 355.
December 6th, 2013, 01:00 PM
#48
Seasoned beater pilot.
Join Date: Jan 2007
Location: Chicago
Posts: 5,468
I'm thinking this 1.75 is too big for pretty much all the olds heads.
It's not worth sacrificing the largest possible intake valve to run that big exhaust valve.
I'd rather have a 2.07 intake and a smaller exhaust any day.
It's fun to think out loud sometimes and get ideas going.
An invention that doesn't work is still an invention , and better than watching television I guess......
December 6th, 2013, 01:06 PM
#49
J now it was mentioned to lathe them down. How much is too much. I know you and dave went over the margin area and explained it to me. Now say you cut that valve down to 1.6xxx. Will the margin be too big ?. I say this because my buddy has a lathe and I'm sure we could have I'm do em if you wanted to.
December 6th, 2013, 01:16 PM
#50
Seasoned beater pilot.
Join Date: Jan 2007
Location: Chicago
Posts: 5,468
Lookin' good there Mr. Freak. I don't know where you found the motivation to take on 2 sets of small block heads at one time and actually want to port them.
You are one crazy s.o.b. that deserves credit for fighting in the trenches.
I usually do one pair per year, and that's plenty enough to last me for the other 11 months hahaha.
It gets old quick after the 3rd bowl and chamber.
13 more to go after that.....sheesh.
You are one crazy s.o.b. that deserves credit for fighting in the trenches.
I usually do one pair per year, and that's plenty enough to last me for the other 11 months hahaha.
It gets old quick after the 3rd bowl and chamber.
13 more to go after that.....sheesh.
December 6th, 2013, 01:17 PM
#51
Registered User
Join Date: Aug 2007
Posts: 2,250
Your engine ran just fine like that, too Jim.
I'm thinking this 1.75 is too big for pretty much all the olds heads.
It's not worth sacrificing the largest possible intake valve to run that big exhaust valve.
I'd rather have a 2.07 intake and a smaller exhaust any day.
It's fun to think out loud sometimes and get ideas going.
An invention that doesn't work is still an invention , and better than watching television I guess......
Not sure I understand why you would pose the question if you tjhought it was a bad idea??
December 6th, 2013, 01:21 PM
#52
Seasoned beater pilot.
Join Date: Jan 2007
Location: Chicago
Posts: 5,468
J now it was mentioned to lathe them down. How much is too much. I know you and dave went over the margin area and explained it to me. Now say you cut that valve down to 1.6xxx. Will the margin be too big ?. I say this because my buddy has a lathe and I'm sure we could have I'm do em if you wanted to.
Lars mentioned .05" just to buy a little bit of room for guide wear.
What was your exhaust seat angle and stock valve size? I'll check downstairs and see what else is laying around.
December 6th, 2013, 01:24 PM
#53
Jim I think sometimes we have to ask redicuolous questions so the info on why it's not a good idea is out there. This I think is why there is lack of info on this site. Guys ask about builds they say take this here have this guy make a cam buy these parts etc.
December 6th, 2013, 01:26 PM
#54
No j I was talking about cutting the 1.75 valve to work on the ex. I think dave was talking about doing those stainless valves but no word yet as to what the final plan was. From 1.75 to 1.6xx. Would that be too much ?. At just .15
Last edited by coppercutlass; December 6th, 2013 at 01:31 PM.
December 6th, 2013, 01:42 PM
#55
Seasoned beater pilot.
Join Date: Jan 2007
Location: Chicago
Posts: 5,468
The mission was semi successful, since the information is posted up here for all to see now. Every bit of helpful insight we document could save someone from re-inventing the wheel, or traveling down a dead end road. Thanks Jim, and anyone else helpful on here that loves Oldsmobiles.
December 6th, 2013, 01:48 PM
#56
Seasoned beater pilot.
Join Date: Jan 2007
Location: Chicago
Posts: 5,468
Is it worth you buying a set of 8 307 intake valves, lathing them down, and crossing your fingers that it might work? I'd say probably not, since you could just go buy the correct valves for 5 bucks and save the headache.
If you were running a big block head, I'd say "go for it" But Jim has already pointed out the fact that it's a waste of time for a SBO.
I have some crusty pitted valves here you could lathe down for the experiment if you want to do it anyway for research purposes. Just let me know.
December 6th, 2013, 01:51 PM
#57
Well then that's 5 bucks well spent lol. I was just trying to get an idea as far what can be done with a valve if say you had no options. Which we do . I'm not trying to put 307 valves in my crap. But like you said sometimes giving things thought will lead to useful info.
December 6th, 2013, 02:00 PM
#58
Registered User
Join Date: Aug 2007
Posts: 2,250
December 6th, 2013, 02:01 PM
#60
Registered User
Join Date: Aug 2007
Posts: 2,250
December 6th, 2013, 02:04 PM
#61
Seasoned beater pilot.
Join Date: Jan 2007
Location: Chicago
Posts: 5,468
December 6th, 2013, 02:05 PM
#62
What I mean by this. Is most people who rebuild an engine farm everything out and just assemble it. That's fine and dandy but things like what valves can I use to save some money or what should we look for on the valves to see if they are re useable is left out. I tink 70 percent of builds on here are more or less asking what do you think of these parts, what cam what clearances . Then the heads are in limbo since most peope just say farm em out or buy alums. I'm not gonna lie I didn't know jack **** about heads j and mr freak have showed me a lot of things and pointed out what to look for. I'm sure I got a ways to go but that info wasn't here. This is in no way is mean to poke fun but a lot of the questions aren't as deeply technical . Lots of beginner info what to pick how to pick what to run which is somewhat simple., I'm sure I'm no expert but I have picked well in the past for the most part. I like where this thread is going because it's the hands on approach to doing your own stuff.
Last edited by coppercutlass; December 6th, 2013 at 02:10 PM.
December 6th, 2013, 02:06 PM
#63
Registered User
Join Date: Aug 2007
Posts: 2,250
As far as marking the block and head with machinist dye, on these Oldsmobiles there's really not much hanging over to grind off. I did set a head gasket on there to look at the possability of grinding some of the bowl away, to unshroud the bigger intake valve, but there is nothing there to work with. I don't have a custom bore specific head gasket here to work with, just tried and true blue Fel Pro. I was considering the posability of using the 403 gasket, but I'm not sure how that would work out.
December 6th, 2013, 02:10 PM
#64
Seasoned beater pilot.
Join Date: Jan 2007
Location: Chicago
Posts: 5,468
I surmised he means lack of extremely detailed information on the site.
For example, someone will post something like: "Ported my heads, filled the floor and raised the roof, now they flow 300cfm."
.....and that's about all the info you get. There are no pictures of everything, or valve sizes, materials used to fill etc. etc.
So while everyone on the site is proud of their achievement, they are still in the dark as far as what they need to do to achieve the same result or better.
I suppose it's hard to learn from a book if it's missing half of the pages.
 December 6th, 2013, 07:21 PM
#67
Registered User
Thread Starter
Join Date: Apr 2010
Posts: 978
Cheese & Beer
I just went downstairs to the workbench and did some homework. Pulled out a 307 intake valve. It is a 45, and measures 1.75. Since it is an emissions engine, the valve is very thick, and I'd guess it would run just fine on the burn side. I'm no metallurgist though.
I also pulled a J head intake valve, it was a 1.995 on a 45 as well. I slipped them both into a small valve E head chamber and they don't even come close to hitting, so that combo is do-able in my opinion.
For fun, I also put in a 2.07 on a 45, with the 307 int. valve in the exhaust, and there is only .014 feeler gauge clearance between the 2, so if there is ANY slop in the guides, they will definitely clip each other.
That combo is no good.
So..... The question now is....
Is there room to unshroud the 1.995/1.75 combo in a #5 small block head?
It fits ok in the E head, but that's apples to oranges at the moment.
If it is too shrouded it will be a step backwards, even though it will look tougher. Sounds like a fun experiment to mock up next time I visit the land of cheese.
I also pulled a J head intake valve, it was a 1.995 on a 45 as well. I slipped them both into a small valve E head chamber and they don't even come close to hitting, so that combo is do-able in my opinion.
For fun, I also put in a 2.07 on a 45, with the 307 int. valve in the exhaust, and there is only .014 feeler gauge clearance between the 2, so if there is ANY slop in the guides, they will definitely clip each other.
That combo is no good.
So..... The question now is....
Is there room to unshroud the 1.995/1.75 combo in a #5 small block head?
It fits ok in the E head, but that's apples to oranges at the moment.
If it is too shrouded it will be a step backwards, even though it will look tougher. Sounds like a fun experiment to mock up next time I visit the land of cheese.
Man I missed a lot today while I was at work. Mr. Chicago I think you're forgetting the big problem with your heads is going to be valve stem height with the stock valves and stock rockers. Tomorrow I will get some photos of the exact problem we are having by going with the oversized valves so everyone can understand and be on the same page. I'm gonna set Copper up with the stainless steel valves I have, but we need to find a different intake for him. I really wasn't going to go into the valve fitment issue just yet, but it's probably not a bad idea to explain the situation to everyone, so they understand, throwing bigger valves in is not always so easy. It's too cold to work out there tonight. I think maybe I'm going to share some links and talk about the plan of progression.
December 6th, 2013, 07:33 PM
#68
Registered User
Thread Starter
Join Date: Apr 2010
Posts: 978
interesting
I did not explain what I meant very well, my apologies. Put dye on the bottom of the head near the edge of the chambers. Bolt the head on the engine block WITHOUT the gasket and crank or pistons. From the bottom, reach into each cylinder and scribe the bore. There may be slight portions that protrude into the cylinder. Grind these off. You are effective port matching the head to the block. You do not want any sharp metal edges in the chamber or cylinder. Obviously, you do this after all machine work.
Jim I see a couple problems with your idea. First I don't know if I am skilled enough with a die grinder to pull off what you are describing. Might be easier to accomplish with some type of boring fixture. Second I really don't want to make the combustion chamber any bigger. Third I don't have the blocks in my shop that these heads will be bolted onto. I don't know if they are going to be decked, but that should not matter for marking as you stated. After we're done with all the port work and valve job we are going to have the heads resurfaced. Jim have you seen a lot of wacked out bore spacing on Oldsmobiles? Do you think if one would do this procedure, it would make the heads less usable on a different short block?
December 6th, 2013, 08:12 PM
#69
Registered User
Thread Starter
Join Date: Apr 2010
Posts: 978
Steps to be taken
I think it's great that everybody is taking interest in all this grinding/ porting head work, but I thought I would take a minute to spell out how I'm going to proceed and the order in which I am going to tackle specific areas of porting on these heads. We can talk about what ever we want through out this hole thread, I think that's great, but people are talking about match porting and we are just not there yet. Let's all just slow down a little and take our time. Classic Olds has plenty of bandwidth and I can only grind so fast. Here's the steps I'm going to try to cover:
1) Deburring and smoothing the combustion chamber
2) Pocket porting and opening up the bowl area on the intake
3) Teardrop shaping the intake guide
4) Opening up and reshaping the short side radius of the intake port
This is where I am right now on the heads you are witnessing the porting of. I have about fifteen hours of work into them and 3 more cylinders to go.
5) Pocket porting and opening up the bowl area on the exhaust
6) Teardrop shaping the exhaust guide
7) Opening up and reshaping the short side radius of the exhaust port
8) Remove rocker boss hole bump in intake port
9) Shape intake port and raise the roof
10) match port intake to gasket/ may have to modify gasket
11) Fill heat risers with molten aluminum
12) Reshape exhaust ports
13) Weld up exhaust dividers or braze in clips
14) Do final clean up on exhaust ports
15) Grind valves
16) Grind seats
17) Use cutter tool to establish upper seat
18) Use cutter tool to establish lower seat
19) Measure installed valve stem height and adjust
20) Measure installed spring height and shim as needed
21) Lap valves and back cut
22) Resurface heads
23) Do final cleaning and assemble
24) Port intake manifold runners/ match port
25) Intake manifold plenum porting
That's about it for me guys. Puting the bottom end together, measuring everything, valve to piston clearance, custom push rod length, degree in camshaft - sorry but someone else can start a detailed thread about all that good stuff. This is plenty for me. Please be patient with me and my progress. Now let's have a show of hands, how many in the class are going to port with Dave? Remember this is not a race, that comes later.
Last edited by 67 Cutlass Freak; December 14th, 2013 at 08:36 PM.
December 6th, 2013, 10:34 PM
#71
Registered User
Join Date: Oct 2013
Location: Edmonton, Alberta
Posts: 63
I'm in your class. Your pictures are excellent and learning a few things. Years ago I did my 440 heads using Direct Connections porting templates that they had in the DC catalog and my Cuda's ET improved. They had die cut clear plastic templates that your slid into the valve guide and ground the head until the template fit. You had to mark the combustion chamber in 11 places for each template and blended everything together. It was pretty neat when everything was ground out.
Ready for the next lesson. Thanks
Ready for the next lesson. Thanks
December 6th, 2013, 10:40 PM
#72
Registered User
Thread Starter
Join Date: Apr 2010
Posts: 978
Back track
Very interested in this thread. I currently have my motor torn down and was working on cleaning up the intake (tri-carb). I noticed that all of the runners had a lot of small bumps and are very rough. Is there an advantage to smoothing them out as well as the head ports and combustion chambers?
Sorry Randy, I missed this question. It would not hurt to clean the casting slag from your intake runners, but you probably would not notice much gains from doing it. Actually there is some evidence that a slight amount of roughness in the intake ports can help with atomization. If you decided to port your heads, then match port the intake runners, that would help. The tricky part would be reaching way up into those runners with a carbide bit to make them all equally enlarged. The flow of your heads and intake will only be as good as the maximum restriction point. You definitely don't want the port going from smaller to bigger than smaller again. Keep following along and I will discuss these restrictions more when I get that far. Grab your porting tools and dig in.
Check out the second photo down in this topic-
http://realoldspower.prophpbb.com/topic3111.html
December 7th, 2013, 12:53 AM
#73
Registered User
Join Date: Jul 2012
Location: Vancouver BC
Posts: 2,789
I don't think you can really go wrong if you use modern porting practice's.
From what I have read and watched on head bytes.
Don't make funnels make the port as equal as you can and don't port the floor of the intake or exhaust port.
Map out the ports with a snap gauge or other and equalize the ports, you will not be able to make them completely equal with out hitting water or other.
I think having a sonic tester and cut up heads would be very usefull as a guild to how far a head can be equalized.
They also point out to keep the bowl round and equal.
I think starting with heads that have been looked after as in had antifreeze all there life would make the best cores as they would not have any thin spots except for casting flaws.
Increasing bowl volume looks like the way to go some even remove the valve guild boss and use solid bronze wall guilds. I have seen this mod done back in the 80's on a set of heads that I had ported.
I have also had a set of 5 with the exhaust face milled flat so that there was no need to weld or braze. The headers fit fine, hookers in a 69 cutlass S.
I think using good SS valves with a necked down steam that is thin would net a few hp tq over stock with out any other mods.
Great thread thanks for posting
Last edited by Bernhard; December 7th, 2013 at 08:44 AM.
December 7th, 2013, 05:21 AM
#74
Registered User

Join Date: Nov 2008
Location: Central Fl
Posts: 7,827
Jim I see a couple problems with your idea. First I don't know if I am skilled enough with a die grinder to pull off what you are describing. Might be easier to accomplish with some type of boring fixture. Second I really don't want to make the combustion chamber any bigger. Third I don't have the blocks in my shop that these heads will be bolted onto. I don't know if they are going to be decked, but that should not matter for marking as you stated. After we're done with all the port work and valve job we are going to have the heads resurfaced. Jim have you seen a lot of wacked out bore spacing on Oldsmobiles? See link below. Do you think if one would do this procedure, it would make the heads less usable on a different short block?
And I wouldn't worry about the fact that you'll make the chamber bigger. You can mill a pretty fair amount off the stock irons without any issues. Plus that can help intake manifold alignment making it favor the top of the runner. Not a bad thing.
 December 7th, 2013, 06:27 AM
#75
Out of Line, Everytime😉
Join Date: Dec 2006
Location: Melville, Saskatchewan
Posts: 8,916
This is interesting. I was looking at Milan's stock port build on ROP. He obiviously knows his stuff and has done out of the box and not cheap ways to overcome poor factory ports. I hav already seen some of the obsticles my #8's will need improved. I do not want to do more harm then good. I need to CC them and get a good C clamp spring compressor to pull them apart. I have a cheap broken spring compressor that is junk and hated the style Copper is using. I know J mentioned he has found most stock valves are unuseable, why is this? Straightness, pitting, valve face or what else to look for? If my #8's come anywhere near $1000 for parts and labor, they will not be used. I bet my machine shop price will be similar to Captjim's price. I want to use the 2" intake valves from my 4A's, I have the crossover plugs, won't weld the center divider and just want slightly improved flow. I want to set up the valve height my self when done, as a learning experience. I have assembled and tore down heads, just not for performance. As said track conditions very a lot, especially up here. If any issues can be found with any product, send me to the track with it, I will find it .
.
.
Last edited by olds 307 and 403; December 7th, 2013 at 06:35 AM.
December 7th, 2013, 07:42 AM
#76
Registered User
Join Date: Aug 2007
Posts: 2,250
Jim I see a couple problems with your idea. First I don't know if I am skilled enough with a die grinder to pull off what you are describing. Might be easier to accomplish with some type of boring fixture. Second I really don't want to make the combustion chamber any bigger. Third I don't have the blocks in my shop that these heads will be bolted onto. I don't know if they are going to be decked, but that should not matter for marking as you stated. After we're done with all the port work and valve job we are going to have the heads resurfaced. Jim have you seen a lot of wacked out bore spacing on Oldsmobiles? Do you think if one would do this procedure, it would make the heads less usable on a different short block?
I still think you are not understanding me. All you are grinding off is the tiny edge that protrudes into the cylinder. If you really overbore, like the 4.125 sbc, this is pretty important. It only takes a few minutes. As for res-using the heads on a different engine, to me these "little" things are part of blueprinting and "building" an engine. The little things add up....
Last edited by captjim; December 7th, 2013 at 07:47 AM.
December 7th, 2013, 08:39 AM
#77
Registered User
Join Date: Jul 2012
Location: Vancouver BC
Posts: 2,789
It isn't an "idea", it is the way the shop did it. I'm not making stuff up or suggesting what I "think might work". These are proven procedures.
I still think you are not understanding me. All you are grinding off is the tiny edge that protrudes into the cylinder. If you really overbore, like the 4.125 sbc, this is pretty important. It only takes a few minutes. As for res-using the heads on a different engine, to me these "little" things are part of blueprinting and "building" an engine. The little things add up....
I still think you are not understanding me. All you are grinding off is the tiny edge that protrudes into the cylinder. If you really overbore, like the 4.125 sbc, this is pretty important. It only takes a few minutes. As for res-using the heads on a different engine, to me these "little" things are part of blueprinting and "building" an engine. The little things add up....
December 7th, 2013, 09:15 AM
#78
Registered User
Join Date: Nov 2008
Location: Central Fl
Posts: 7,827
A lot of people did it. BTR did it primarily because of a smaller bore. To some degree that's why they all did it.
Look at 326-455 Pontiacs as well as 366-454 BBC. As the bore gets bigger the notches get smaller. Eventually you reach a point of diminishing returns for various reasons.
Look at 326-455 Pontiacs as well as 366-454 BBC. As the bore gets bigger the notches get smaller. Eventually you reach a point of diminishing returns for various reasons.
December 7th, 2013, 04:07 PM
#79
Registered User
Thread Starter
Join Date: Apr 2010
Posts: 978
Deep breath
It isn't an "idea", it is the way the shop did it. I'm not making stuff up or suggesting what I "think might work". These are proven procedures.
I still think you are not understanding me. All you are grinding off is the tiny edge that protrudes into the cylinder. If you really overbore, like the 4.125 sbc, this is pretty important. It only takes a few minutes. As for res-using the heads on a different engine, to me these "little" things are part of blueprinting and "building" an engine. The little things add up....
I still think you are not understanding me. All you are grinding off is the tiny edge that protrudes into the cylinder. If you really overbore, like the 4.125 sbc, this is pretty important. It only takes a few minutes. As for res-using the heads on a different engine, to me these "little" things are part of blueprinting and "building" an engine. The little things add up....
Ok Jim I will ask the owners of the heads I am working on if they would like me to do this for them. It sounds pretty easy and straight forward. I know Jeromy's short block is already assembled. I believe Copper still needs to have his bored. I do have a standard bore bare block in my storage trailer, but it sounds like this procedure should be done after boring and like you said "mark the heads left and right". I really do appreciate your input and this procedure was someone's idea, just not yours. My machine shop did not do this for my race car engine. I kind of understand why it could be an improvement, especially when it comes to unshrouding the valves. I was looking into how much room we had to work with before coming too close to the head gasket. My friend Dane Luling, from Mild to Wild Racing suggested I use a large seat cutter stone to remove as much of the chamber as I can up to the gasket. I am going to cover this later on when I get closer to doing the actual valve job. You are a good man Jim for suggesting I finish this area now in the chamber before moving on. I'll leave it up to the owners of these heads.
December 7th, 2013, 05:00 PM
#80
Registered User
Join Date: Aug 2007
Posts: 2,250
Ok Jim I will ask the owners of the heads I am working on if they would like me to do this for them. It sounds pretty easy and straight forward. I know Jeromy's short block is already assembled. I believe Copper still needs to have his bored. I do have a standard bore bare block in my storage trailer, but it sounds like this procedure should be done after boring and like you said "mark the heads left and right". I really do appreciate your input and this procedure was someone's idea, just not yours. My machine shop did not do this for my race car engine. I kind of understand why it could be an improvement, especially when it comes to unshrouding the valves. I was looking into how much room we had to work with before coming too close to the head gasket. My friend Dane Luling, from Mild to Wild Racing suggested I use a large seat cutter stone to remove as much of the chamber as I can up to the gasket. I am going to cover this later on when I get closer to doing the actual valve job. You are a good man Jim for suggesting I finish this area now in the chamber before moving on. I'll leave it up to the owners of these heads.
Every shop has their little secrets and tricks. At ours, the boss had a "secret" back cut angle that he found to be effective. I had to take an oath of secrecy before he told me. Seriously.


