Home Porting Techniques
 April 11th, 2014, 08:29 AM
#561
Tree Row Hunter in N.D.
Join Date: Oct 2013
Location: Great white north ND
Posts: 200
Very interesting thread reading, True old school hot rodding!! Just wondering if you had to do any pre heat to the head prior to your pour? If so what temp, sorry if it was already posted and I missed it.
 April 11th, 2014, 09:12 AM
#562
Registered User
Join Date: May 2013
Location: Newtown CT
Posts: 221
George that is some great info thank you. It sounds like a quart kit would be enough to do my crossovers and attempt the center divider too.
Did you take any pics of how it turned out? Whats that stuff like for porting does it act like regular cast or is it much softer?
Did you take any pics of how it turned out? Whats that stuff like for porting does it act like regular cast or is it much softer?
I'll post some pics in a short while.
My technique was not to pour so much that it needed a lot of grinding after.
Get the right tilt on the head when you fill the crossover. The stuff is pretty hard. reminds me of ceramic floor tile.
George
April 11th, 2014, 09:31 AM
#563
Registered User
Join Date: Dec 2013
Posts: 354
Great thanks George.
I've seen the flame test on another thread for the Resbond looked like it stood up to it just fine. I wonder how strong it is, if you had a small piece and hit it with a hammer does it just dent like metal or does it break to pieces?
I've seen the flame test on another thread for the Resbond looked like it stood up to it just fine. I wonder how strong it is, if you had a small piece and hit it with a hammer does it just dent like metal or does it break to pieces?
April 11th, 2014, 09:44 AM
#565
Registered User
Join Date: May 2013
Location: Newtown CT
Posts: 221
Bainer,
I put a glob on a screwdriver as a test for dry time.
I'll try to remember and smack it tonight.
Also, check the websight of the manufacturer for more info on its intended uses.
The company is Cotronics. The material to use is 940HT.
George
I put a glob on a screwdriver as a test for dry time.
I'll try to remember and smack it tonight.
Also, check the websight of the manufacturer for more info on its intended uses.
The company is Cotronics. The material to use is 940HT.
George
April 11th, 2014, 09:49 AM
#566
Registered User
Thread Starter
Join Date: Apr 2010
Posts: 978
Preheat?
Smitty275 wrote: The question I have is how does the Resbond handle a large multitude of heating and cooling cycles?
I wondered the same thing. This stuff really hasn't been used until recently.
Last edited by 67 Cutlass Freak; April 11th, 2014 at 09:59 AM.
April 11th, 2014, 10:16 AM
#568
Registered User
Join Date: May 2013
Location: Newtown CT
Posts: 221
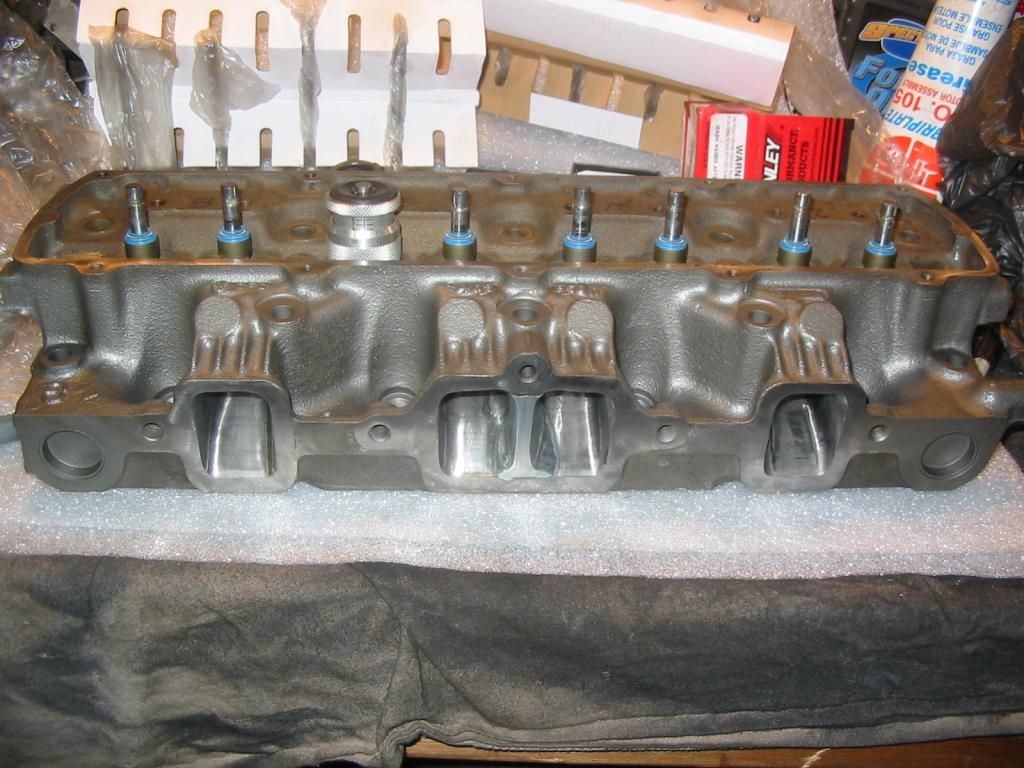
I have more photos of the resbond pour I did on photobucket.
http://s1348.photobucket.com/user/ro...over%20filling
AfterPourandcleanup_zpse5aced3e.jpg
George
http://s1348.photobucket.com/user/ro...over%20filling
AfterPourandcleanup_zpse5aced3e.jpg
George
April 11th, 2014, 11:46 AM
#569
Seasoned beater pilot.
Join Date: Jan 2007
Location: Chicago
Posts: 5,468
I told him we were shooting for the stock sleeper look. If anyone can make two tons of crap fly, with old junk parts, it's J(Chicago). He's our resident seasoned beater pilot. The day I met Jeremy he was racing his Delta 88 with zip ties around the rear bumper. Man that was a blast at Byron for the Olds nationals.
But I put a bunch of zip ties on it because I was entering the bracket race, and wanted to get into people's heads. It totally looked like it was just zip tied on there. You'd be amazed how many people break out because they're overdetermined to not lose to a piece of crap. All I did was run the same and spot drop. Nothing fancy. They all broke out, or broke down. I think I only really had to race one guy that race.
April 11th, 2014, 04:57 PM
#570
Registered User
Join Date: May 2013
Location: Newtown CT
Posts: 221
I whacked a glob that I had let cure on a screw driver.
When given 4 firm raps with a hammer it did break a piece off.
So I'd say it has strength but is like ceramic not metal.
George
April 11th, 2014, 06:26 PM
#572
Its a far stretch but the sell mapp acetalyne kits at the home depot and they go a long way and do get pretty hot. Just a thought. Over time wouldn't ceramic become brittle and crumble ?
April 11th, 2014, 08:03 PM
#573
Registered User
Join Date: Dec 2013
Posts: 354
I've read elsewhere that the za12 can be melted with a propane stove, like a coleman, people have done it. Those stoves give off some pretty good heat if you turn them on full. Probably takes a little longer than a torch but hey it still works.
April 11th, 2014, 08:13 PM
#574
This is a far stretch but get a few buddies and some beer and have a bonfire and just go a head and throw a section of that za12 in a cast iron ladle and hang it in the fire and let it melt then grab your gloves when its ready and before you all end up drunk
take care of the doing the pour work.
take care of the doing the pour work.
 April 11th, 2014, 09:16 PM
#578
Registered User
Thread Starter
Join Date: Apr 2010
Posts: 978
Copper, I picked up your heads tonight. They only had to shave them .004". They look real good. He said they were pretty straight. I still think it was smart to have them cleaned up. I know that when porting the chamber it's pretty difficult to not touch the head surface ever. Just from handling/ transporting the heads you can mark up the surface if you're not careful. Now we will have a better gasket sealing surface to work with.
CIMG4556.jpg
CIMG4556.jpg
April 12th, 2014, 07:22 AM
#580
Registered User
Thread Starter
Join Date: Apr 2010
Posts: 978
We discussed briefly installed spring height and stem height. I told Jeremy that I wanted to get the stem height perfect on his heads. He was originally wanting to run stock rockers, but now he will be using adjustable roller tip rockers from Comp Cams. The reason I wanted to get the heights correct was in case he decided to sell these heads. The heights came out real even across each head. These valves started out .100" taller than stock. As installed they are .050" higher than the stock position. So now I was going to grind the tips. WAIT A MINUTE. These heads were just wacked .050". By doing that we also raised the pushrod .050" where it contacts with the rocker. So now you also have to take into consideration the aftermarket head gasket will be thicker than stock original. Jeremy's block was not decked. All these things play a huge role in valve train geometry. That's one of the reasons you can order custom length push rods. This needs to be checked upon assembly with an adjustable rod. IMHO any performance build should have an adjustable valve train. I will post some pictures later of my measuring and the setup for grinding the tips. I decided not to take any off because it did not make sense to me. Captjim mentioned coil bind and spring pressure. Maybe later I will touch on this a little.
April 12th, 2014, 07:57 AM
#581
Tree Row Hunter in N.D.
Join Date: Oct 2013
Location: Great white north ND
Posts: 200
Ok yous guys are starting to scare me a bit. Have you checked out
http://www.alloyavenue.com/vb/forum.php
Lots of good info if your looking to do some foundry type pours.
http://www.alloyavenue.com/vb/forum.php
Lots of good info if your looking to do some foundry type pours.
April 12th, 2014, 10:17 AM
#582
Out of Line, Everytime😉
Join Date: Dec 2006
Location: Melville, Saskatchewan
Posts: 8,917
I won't be doing the head swap till Summer. I will post pics when I build up the divider. I wonder if my exhaust side was also milled, just about even. I may just grind a bit and build up. Supposedly good till 550F intermittently and 450F constant.
April 12th, 2014, 12:46 PM
#583
I got Jeremy's intake all done and cleaned up. Well pops cleaned it up atleast. I guess im going to bring this up but another part of doing all this is parts cleaning. Now I may have built and slapped together some engines but cleanliness is a big part of what I do. Im lucky enough to have a dad who has been working in the metal stripping, de rusting, degreasing industry for almost 40 years with the same company so I get to clean my junk for free. Im going to show the difference in a few cleaning methods most machine shops cannot clean a block like I have had and I have had machine shops ask me how the heck I got it so clean. There is ways to de grease our own stuff on the cheap at home ., now it wont look like the block im going to show which imo is the best way but only an industrial shop can achive that and even then I cant anymore . The intake looks like what you get at most machine shops.
Here is what Jeremy's intake looks like this is a new formula the shop uses and its clean but it looks dark. usually most cleaning methods machines shops use look close to this.


here is what the cylinder heads looked with just a degreasing bath. Essentially a huge drano bath. Most guys can degrease they cylinder heads with a big plastic tub as some drano. Keep it in a well ventilated area then take em down to the local self carwash and power wash em. This is what they will look like.

Now this is what they would look like if the shop my dad works for still used the same chemical they had for 35 years but the EPA said no more with that . This is the finish most machines shops would ask me where I did the cleaning.
Notice how bright and white the finish is compare to the intake.

Now it cant clean a block like this anymore. Which is was purely looks partially ., but it was a deeper clean which was non etching or weaken the metal no acids. A big part of how I clean it is we power wash all the parts and passages we made a special fitting to fit into all the oil passages and we make sure we wash them until the water comes out clean then we usually dunk em in the oil bath. The drano tank and power washing goes a long way specially for the guys at home. Hope this touches a portion of the thread if not I just wasted a lot of froum space lol.
EDIT : here is what it looks like for some comparison. This was my frankenstien 350 with cast flat tops with #6 heads by rrp this is what was in my car previous to my current 355 with the same heads. Notice how much darker the heads are. I gave them to rrp all gunked up and rusty. They did a nice job of cleaning them and they where rust and grease free but they didn't compare to the block finish. Really not a big deal but There's levels of cleanliness the block got a much deaper clean vs. the bake.

Here is what Jeremy's intake looks like this is a new formula the shop uses and its clean but it looks dark. usually most cleaning methods machines shops use look close to this.
here is what the cylinder heads looked with just a degreasing bath. Essentially a huge drano bath. Most guys can degrease they cylinder heads with a big plastic tub as some drano. Keep it in a well ventilated area then take em down to the local self carwash and power wash em. This is what they will look like.
Now this is what they would look like if the shop my dad works for still used the same chemical they had for 35 years but the EPA said no more with that . This is the finish most machines shops would ask me where I did the cleaning.
Notice how bright and white the finish is compare to the intake.
Now it cant clean a block like this anymore. Which is was purely looks partially ., but it was a deeper clean which was non etching or weaken the metal no acids. A big part of how I clean it is we power wash all the parts and passages we made a special fitting to fit into all the oil passages and we make sure we wash them until the water comes out clean then we usually dunk em in the oil bath. The drano tank and power washing goes a long way specially for the guys at home. Hope this touches a portion of the thread if not I just wasted a lot of froum space lol.
EDIT : here is what it looks like for some comparison. This was my frankenstien 350 with cast flat tops with #6 heads by rrp this is what was in my car previous to my current 355 with the same heads. Notice how much darker the heads are. I gave them to rrp all gunked up and rusty. They did a nice job of cleaning them and they where rust and grease free but they didn't compare to the block finish. Really not a big deal but There's levels of cleanliness the block got a much deaper clean vs. the bake.
Last edited by coppercutlass; April 12th, 2014 at 01:06 PM.
April 13th, 2014, 01:25 PM
#584
Engine Builder
Join Date: Jan 2010
Location: Louisville, ohio
Posts: 552
Say a guy made a drano tank large enough to hold a pair of heads. How many times could it be used before replacing the drano? How would one dispose of the used drano if they are not connected to a sewer system?
April 13th, 2014, 01:36 PM
#585
That's a good question the drano will lose its cleaning power and it will become less powerful so it wont clean as much and only use will be able to gauge that. A small 4x4 plastic storage bin from walmart like for clothes will hold a pair you fill it half way and flip the heads occasionally that way you have less drano to dispose of. drano is safe to dispose of in the garbage since they make garbage disposal solution products. You can also just use plain sand to soak it. You can also buy caustic soda powder which will go further than a bunch of drano bottles all you have to do is add water to the powder and it becomes a cleaner . If you where to build an operation for say a small work shop and it will have lots of use like other car parts that would be the ticket.
Edit: I edited out the soda ash info I had because I know they use something to neutralize the waste at my dads work but I cant remember if it was lime or soda ash. Since drano is a base and not an acid I want to make sure what they use but I know its one of those two . I think the shop has to use soda ash or lime as a safety precaution for the epa since they clean many different industrial machines and what not. I think for us we are fine with sand. I have never personally used drano but I know a lot of guys have and it's been mentioned on other car forums.
Edit: I edited out the soda ash info I had because I know they use something to neutralize the waste at my dads work but I cant remember if it was lime or soda ash. Since drano is a base and not an acid I want to make sure what they use but I know its one of those two . I think the shop has to use soda ash or lime as a safety precaution for the epa since they clean many different industrial machines and what not. I think for us we are fine with sand. I have never personally used drano but I know a lot of guys have and it's been mentioned on other car forums.
Last edited by coppercutlass; April 13th, 2014 at 02:06 PM.
April 13th, 2014, 03:35 PM
#586
Registered User
Thread Starter
Join Date: Apr 2010
Posts: 978
I would think you could pour it down the toilet. Being a base, I don't think you would hurt anything in your septic system.
April 13th, 2014, 03:38 PM
#587
The only issue I see is the grease from the engine parts. Im not a pro a septic systems but I would imagine of the grease is not broken down it can cause blockage.
Edit. filtering it with something like paint strainers for automotive paint will probably catch all the chunks and blobs of grease that aren't fully broken down. I know some of the gunk on cylinders heads will take forever to break down but will fall off in chunks when cleaned.
Edit. filtering it with something like paint strainers for automotive paint will probably catch all the chunks and blobs of grease that aren't fully broken down. I know some of the gunk on cylinders heads will take forever to break down but will fall off in chunks when cleaned.
Last edited by coppercutlass; April 13th, 2014 at 03:43 PM.
April 13th, 2014, 04:00 PM
#588
Registered User
Thread Starter
Join Date: Apr 2010
Posts: 978
Finishing the #6 heads
Well everything is looking real good on Copper's heads. I did have to clean up a little surface rust that built up from the machine shop. I'm sure the lube they use with their cutter is a water base. No big deal. I cleaned them very thoroughly in my parts wash after the final port buff. Then I used a soapy water solution for a final wash. Then a water rinse and dried with compressed air. I installed the valves using Lubriplate #105 motor assembly grease. Then I installed the seals. They helped to hold the valves up while I checked the installed spring height. I only had to use a single .015" shim on one exhaust valve. I really need to do some more research about coil bind which Jim mentioned. This would really only come into play with higher lift cams. If your installed spring height is a lot lower than the specification, coil bind would become even more of an issue. Basically whatever cam you choose will also dictate what spring you will need to use. Oldsmobile heads used many different combinations; deep pockets, shallow pockets, rotators. You get my point. It's very important that your machinist knows all about these various combinations and what will work best for your heads, for your application.
119-1996_IMG.jpg
119-1998_IMG.jpg
119-1999_IMG.jpg
I used Goodson Cast Iron Last Blast paint to coat the exterior to provide a good base and prevent rust. I coated all the internal ports with PB Blaster light oil and bagged them to keep them fresh. They are ready for the flow bench than a serious track flogging. If you guys want to know the final cost of all parts and machine shop services on these heads, I would be happy to share that with you. Provided it's OK with Coppercutlass.
119-1996_IMG.jpg

119-1998_IMG.jpg
119-1999_IMG.jpg
I used Goodson Cast Iron Last Blast paint to coat the exterior to provide a good base and prevent rust. I coated all the internal ports with PB Blaster light oil and bagged them to keep them fresh. They are ready for the flow bench than a serious track flogging. If you guys want to know the final cost of all parts and machine shop services on these heads, I would be happy to share that with you. Provided it's OK with Coppercutlass.
April 13th, 2014, 04:10 PM
#590
Dave im ok with you sharing the cost. Im gonna be doing body work on your car so this is in true barter fashion but I know for accuracy purposes a price needs to be shared. initial cost of heads was 120 but I also got a studded ad strapped and aling honed std. block with the deal so we can call the cores 60 buck, the Viton seals where under 20 bucks. the zinc I think was 25 . The cleaning was free but a shop will charge about 60 to do em at a machine shop. The rest of the figures are all you.
BTW the heads look awesome !
BTW the heads look awesome !
April 13th, 2014, 05:10 PM
#591
Registered User
Thread Starter
Join Date: Apr 2010
Posts: 978
Total cost of #6 heads
Alright guys here's what I have into these heads:
1) 1.995" intake valve set $156
2) 1.625" exhaust valve set $156
3) seals $20
4) Zinc alloy $25
5) resurface heads $60
total= $417
Wait 'til you see the cost on doing Jeremy's #5s. That will really show you why the added expense of replacing guides might very well make this impractical.
I'm not going to ad the core head price or cleaning because that can vary. For example I have seen core heads sell from $50-$400. My machine shop charges $80 to clean and check for cracks.
If someone wanted me to do this complete port job and valve job to their heads I would charge them $750. So without the core charge or cleaning we would be at $1167. Since this thread was started I have found a better source for good quality valves at a reasonable price through Bernard Mondello. I guess the Pro Comps are looking better all the time. Although you do have to take into consideration milling them and the fuel pump issues. I'm looing forward to seeing how well these heads will perform on the flow bench and track. I think I'm going to port a set of "C" castings next. I just need to finish the valve job on the "GA's" and assemble J(Chicago)'s heads as soon as he sends me his springs.
I will continue to post here including the results of our flow bench testing. I just wanted to say THANKYOU to everyone that has participated in this thread and made it so popular. We have had over 20,000 views, and we have had our share of drama. Please continue to post up your techniques and any photos you may have. Everybody likes the pictures, that's why I tried to show so many.
I forgot that I was going to show some of measuring stem height and the tip grinding fixture. Here you go-
CIMG4553.jpg
CIMG4554.jpg
CIMG4555.jpg
April 13th, 2014, 05:48 PM
#592
Registered User

Join Date: Aug 2007
Posts: 2,250
Just to be clear, that price of $1167 was without guides, correct? Forget even the port work, the cost of the valves, valve job, guides, etc will be pretty close to the Pro-Comps, which have numerous advantages. You stated this in your last post,
"I guess the Pro Comps are looking better all the time".
and I give you props for being objective and fair. From a cost-effective standpoint they are tough to beat, especially on a BBO. But if a guy wants to do all that work on irons and enjoys it as part of the hobby, that's great.
"I guess the Pro Comps are looking better all the time".
and I give you props for being objective and fair. From a cost-effective standpoint they are tough to beat, especially on a BBO. But if a guy wants to do all that work on irons and enjoys it as part of the hobby, that's great.
April 13th, 2014, 05:52 PM
#593
Registered User
Join Date: Aug 2007
Posts: 2,250
Coil bind "stuff"
Basically, if the spring compresses to the max and bottoms out, things can hit each other at REALLY fast speeds! LOL This can NOT be overlooked on a high HP application.
"Coil clearance is the distance between the valve spring coils when the valve is it maximum lift (fully open). A minimum of 0.060" must exist between the coils at maximum lift. Coil bind is when the valve spring is compressed fully-to the point that all of the coils are "stacked up" on top of each other. For high RPM applications, .100" is recommended . Coil bind is a catastrophic condition that will result in valve train failure"
From here,
http://www.lunatipower.com/Tech/Valv...pringTech.aspx
April 13th, 2014, 06:09 PM
#594
Registered User
Thread Starter
Join Date: Apr 2010
Posts: 978
I do understand a bit about coil bind. Thanks for sharing that link Jim. I have not had a high lift cam or high revving Olds build yet, so it never applied. I will still do some research and post my findings.
Back to the cost factor of doing cast irons. The total that I posted would include my labor charge. If Coppercutlass decided to port these heads himself and then send them out for a $275 valve job, then he would have less than $700 into them including the core price. My machine shop resurface is included in the valve job. It gets even better though Jim. I can purchase good stainless steel valves, 2.07"/ 1.68" for $120 for both sets. So the next set I do, ad $80 for machine shop - clean/ check cracks/ resurface, $20 for seals and I will have a whopping $220 into them plus my time. So it can work out well, if you have the time/ pacience, equipment, good reasonable source for parts, and the key factor - GOOD core heads.
Back to the cost factor of doing cast irons. The total that I posted would include my labor charge. If Coppercutlass decided to port these heads himself and then send them out for a $275 valve job, then he would have less than $700 into them including the core price. My machine shop resurface is included in the valve job. It gets even better though Jim. I can purchase good stainless steel valves, 2.07"/ 1.68" for $120 for both sets. So the next set I do, ad $80 for machine shop - clean/ check cracks/ resurface, $20 for seals and I will have a whopping $220 into them plus my time. So it can work out well, if you have the time/ pacience, equipment, good reasonable source for parts, and the key factor - GOOD core heads.
April 14th, 2014, 11:11 AM
#595
Registered User
Join Date: Nov 2010
Location: Wichita, Ks
Posts: 1,070
I had too much time on my hands so I got an old pair of Ga heads and bolted some wood to the intake side and filled the crossover with water. It took a little less than 1/2 cup to fill one head. That might help with the Resbond guys.
April 15th, 2014, 08:21 PM
#596
Registered User
Thread Starter
Join Date: Apr 2010
Posts: 978
Well I discovered some depressing information about my GA heads. I trial fitted the new valves in the second one, and it looks like my friend ported too far into the two center exhaust seats. Now I'm considering replacing all of the exhaust seats. These heads have had a lot of port work. These heads do not have induction hardened seats. Which means the exhaust seats were pressed in, and are not part of the head casting. I was trying to do some research, and I found this FAQ-
http://oldsjunction.classicoldsmobil...sfaq/ofhed.htm
http://oldsjunction.classicoldsmobil...sfaq/ofhed.htm
April 16th, 2014, 05:30 AM
#599
Engine Builder
Join Date: Jan 2010
Location: Louisville, ohio
Posts: 552
If in fact some one already had hardened inserts put in the head
Only change the ones that need changed. Removal is easy. Weld a bead on the I.D.of the seat insert. Really only needs to be about 1/3 of the way around. Let cool off and the seat will fall out. Then heat the head, while chilling the seat insert, and press the new seat in.
A 30� seat can be cut to a 45� seat with out sinking the valve. You can't go the other way.
Last edited by Smitty275; April 16th, 2014 at 05:33 AM.
April 16th, 2014, 02:59 PM
#600
Registered User
Thread Starter
Join Date: Apr 2010
Posts: 978
If in fact some one already had hardened inserts put in the head
Only change the ones that need changed. Removal is easy. Weld a bead on the I.D.of the seat insert. Really only needs to be about 1/3 of the way around. Let cool off and the seat will fall out. Then heat the head, while chilling the seat insert, and press the new seat in.
A 30� seat can be cut to a 45� seat with out sinking the valve. You can't go the other way.
Only change the ones that need changed. Removal is easy. Weld a bead on the I.D.of the seat insert. Really only needs to be about 1/3 of the way around. Let cool off and the seat will fall out. Then heat the head, while chilling the seat insert, and press the new seat in.
A 30� seat can be cut to a 45� seat with out sinking the valve. You can't go the other way.
Last edited by 67 Cutlass Freak; April 24th, 2014 at 06:34 AM.


