Home Porting Techniques


 April 5th, 2014, 04:35 PM
#524
Registered User
Thread Starter
Join Date: Apr 2010
Posts: 978
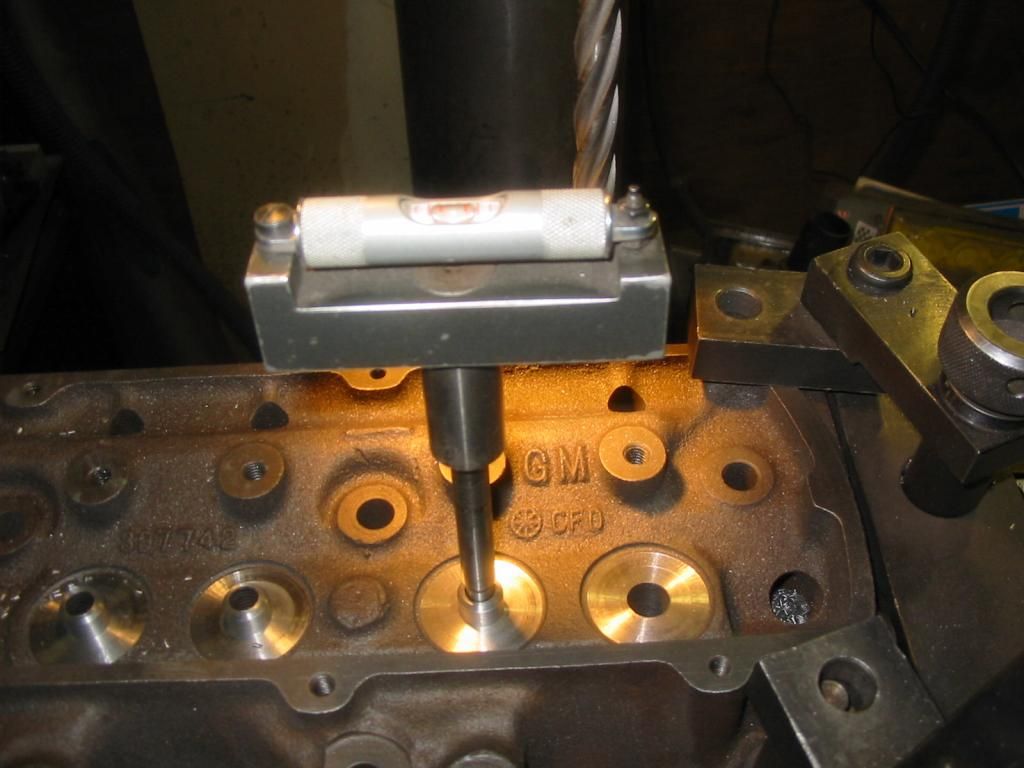
Installing bronze valve guides
Well I stopped by the machine shop to have a look at the #5 heads having the guides installed. We're using Dixon Automotive in Gurnee, Il. They're very meticulous and fair on pricing. I asked them to snap off a couple photos of the process so here they are-
119-1978_IMG.jpg
119-1980_IMG.jpg
119-1981_IMG.jpg
119-1982_IMG.jpg
119-1983_IMG.jpg
119-1984_IMG.jpg
119-1987_IMG.jpg
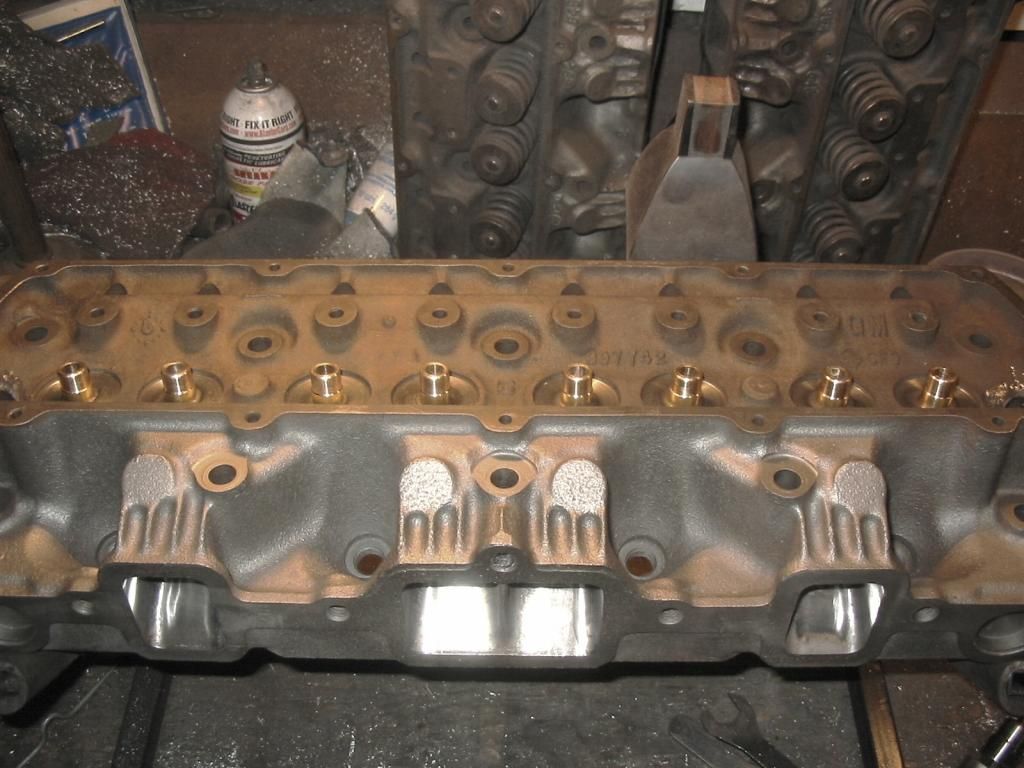
One of the owners "Dave", yes I know another Dave, told me that the original guides on both heads had inconsistancy in trueness from both outers to the inner guides. I found that interesting. They also shaved .050" off the surface. Here's a photo taken after the first pass that shows some varience of the head surface. They use a sharpy marker to help show the low spots.
mill5head.png
Dave told me these were pretty straight to begin with. After the second pass the only low spots visible were near the water jackets. The only thing left will be cutting down the guide in the chamber. I want to say THANKYOU to Bernard Mondello for setting me up with the guides, seals and valves for these heads. Everything fit excelant and the pricing was reasonable.
119-1978_IMG.jpg

119-1980_IMG.jpg
119-1981_IMG.jpg
119-1982_IMG.jpg
119-1983_IMG.jpg
119-1984_IMG.jpg
119-1987_IMG.jpg
One of the owners "Dave", yes I know another Dave, told me that the original guides on both heads had inconsistancy in trueness from both outers to the inner guides. I found that interesting. They also shaved .050" off the surface. Here's a photo taken after the first pass that shows some varience of the head surface. They use a sharpy marker to help show the low spots.
mill5head.png
Dave told me these were pretty straight to begin with. After the second pass the only low spots visible were near the water jackets. The only thing left will be cutting down the guide in the chamber. I want to say THANKYOU to Bernard Mondello for setting me up with the guides, seals and valves for these heads. Everything fit excelant and the pricing was reasonable.
April 5th, 2014, 06:05 PM
#525
I told my neighbor to use Dixon after you mentioned their pricing on another thread and he looked high and low and they where the best price and he was really happy with them.
On another note. How much did they mill to get the surface truly flat. You mentioned they made a .050 cut but im curious to know how bad the low spots where or if they machined it tru flat then proceeded to keep cutting . I guess the quick question would be how "heavy" was their cut for them to achive straightness in 2 passes.
On another note. How much did they mill to get the surface truly flat. You mentioned they made a .050 cut but im curious to know how bad the low spots where or if they machined it tru flat then proceeded to keep cutting . I guess the quick question would be how "heavy" was their cut for them to achive straightness in 2 passes.
April 7th, 2014, 08:23 PM
#526
Registered User
Thread Starter
Join Date: Apr 2010
Posts: 978
On another note. How much did they mill to get the surface truly flat. You mentioned they made a .050 cut but im curious to know how bad the low spots where or if they machined it tru flat then proceeded to keep cutting . I guess the quick question would be how "heavy" was their cut for them to achive straightness in 2 passes.
April 7th, 2014, 08:32 PM
#527
I was just curious as to how much material had to be removed for them to be "true" or flat . I remember in machining and tool class it was the same method when using the old mills with a fly cutter. .003 cuts then a final .001 cut at slower speed to leave a nice finish surface. We where usually milling aluminum though thoe old mills had seen better days.
April 7th, 2014, 08:40 PM
#528
Registered User
Thread Starter
Join Date: Apr 2010
Posts: 978
When I got the heads home there was some real light surface rust so I cleaned them up and coated everything with oil. I also did a little clean up where the guide comes into the chamber. The valves fit beautiful now. I'm going to try to do the valve job on these Wednesday night.
119-1988_IMG.jpg
119-1989_IMG.jpg
I also opened up the oil return holes just slightly by tapering the edges leading in with a large carbide. Maybe after I'm done with these heads we can talk about some of the other areas on the Olds engine block that can be ported. Like the oil drain near the timing cover and the oil pump to main cap area.
119-1990_IMG.jpg
119-1988_IMG.jpg
119-1989_IMG.jpg

I also opened up the oil return holes just slightly by tapering the edges leading in with a large carbide. Maybe after I'm done with these heads we can talk about some of the other areas on the Olds engine block that can be ported. Like the oil drain near the timing cover and the oil pump to main cap area.
119-1990_IMG.jpg
April 8th, 2014, 10:31 AM
#532
Registered User
Thread Starter
Join Date: Apr 2010
Posts: 978
I agee with you Brad. (J)Chicago will be running the Comp Cams roller tip rockers with stock size studs. He was going to run stock rockers, but we got him to upgrade (slightly). Coppercutlass is looking for a set of Harland Sharps. He does not have those in hand. I have never drilled and tapped the rocker stand holes myself. I do have a nice drill press with a stop adjustment, but I would be concerned with breaking off a tap. We might let the machine shop do this service. In any case we need to have parts in hand. I am probably going to drill and tap my GA's. I do have HS rockers. I have to purchase a bottoming tap yet.
April 8th, 2014, 10:34 AM
#533
I think I have stock size studs for the prw roller tips which will work for the hs I think I'm running I don't think I'm runing enough lift to worry about it. 540 lift area. Or I might run the same 512. You guys let me know.
April 8th, 2014, 10:37 AM
#534
Registered User
Thread Starter
Join Date: Apr 2010
Posts: 978
Jim, I did cover measuring installed spring height and valve stem height, but I haven't discussed coil bind or spring pocket machining. Please post up any good info you can pass along. I don't have a way to test spring pressure, and I haven't discussed that yet either. I will say that anyone porting their heads should have the guides installed first. I have found with J's heads, now that they are straight, the centering on the seat is slightly different. It's a good thing I left a lot of room when I first ground them.
April 8th, 2014, 01:17 PM
#535
Registered User

Join Date: Aug 2007
Posts: 2,250
Jim, I did cover measuring installed spring height and valve stem height, but I haven't discussed coil bind or spring pocket machining. Please post up any good info you can pass along. I don't have a way to test spring pressure, and I haven't discussed that yet either. I will say that anyone porting their heads should have the guides installed first. I have found with J's heads, now that they are straight, the centering on the seat is slightly different. It's a good thing I left a lot of room when I first ground them.
I remember the spring height part, I should have said something then. Installed height, pressure, and coil bind are VERY important on big cams. I really don't have picr or anything, just thought I would mention it.
April 8th, 2014, 08:01 PM
#536
Registered User
Join Date: Dec 2013
Posts: 354
Lots of really good porting info in this thread guys.
Got a set of G heads I am doing similar too, have a light port/polish job done to them at this point. The previous owner put some nice Milodon 2.07/1.71 valves in them, still need to do a valve job to them.
Trying to figure out how to easily block the exhaust crossovers and the center dividers. I like the idea of the Resbond 940HT for the crossovers and I wonder if it would hold up in place of the melted aluminum for the center divider? Anyone attempted this or see any major faults with trying it?
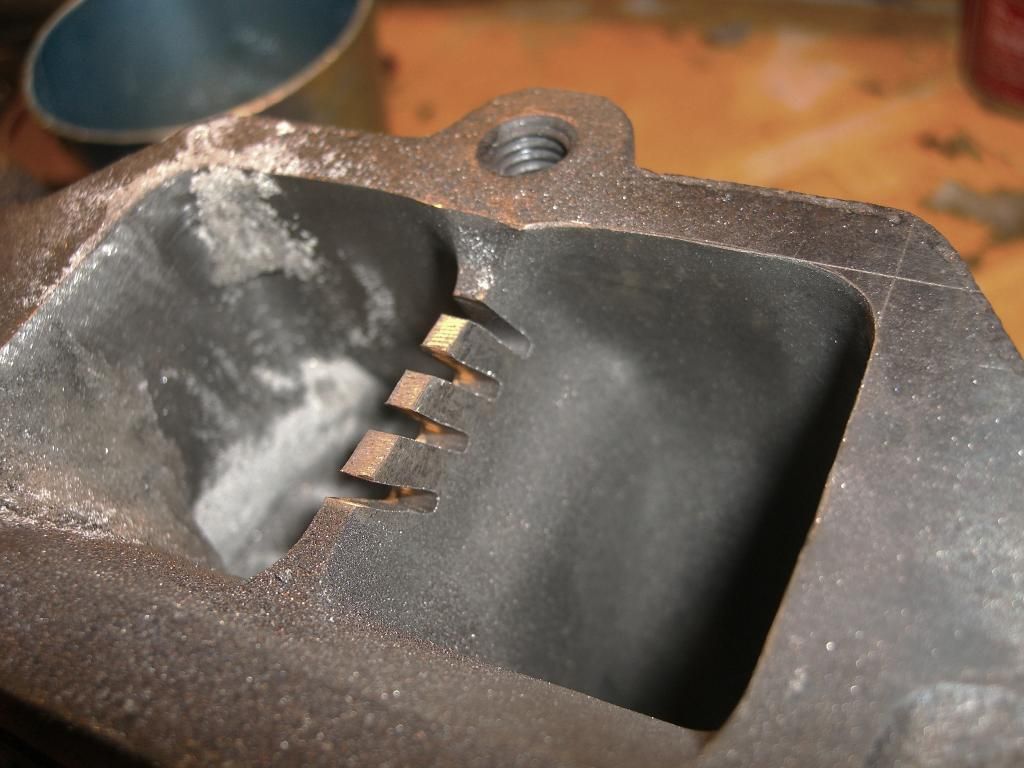
Well Coppercutlass came up last night and we did the pour for the dividers on his heads. A big thanks to Smitty for setting us up with the Zinc ingot. It was a lot easier to use than melted pistons or intake manifold. It poured nice and smooth. Seamed to melt down easier, at a lower temp. We started by cutting some angled slots in the divider to create an anchor point for the pour.
We used some custom fit sheet metal to form the sides of the divider mold. We started with cardboard for patterns to get the contour right before we made the actual sheet metal pieces. If you decide to do this leave about 1/2" extra material sticking up over the head. Pour it high, because it will shrink down. We used duct tape over the valve hole & silica sand to hold the sheet metal in place. We put a little water on the sand to firm it up. We also made sure there was no sand where we were going to pour.
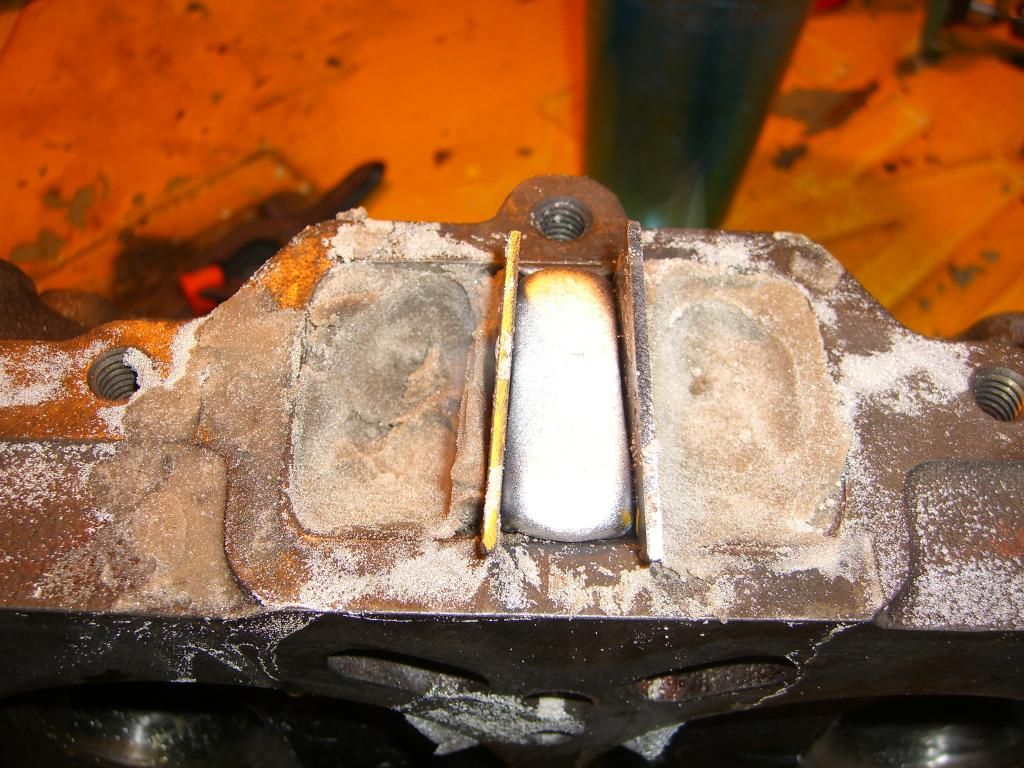
We made the divider extra wide so we could have nice rounded corners after grinding. I used a 40 grit sanding disk on a dye grinder to knock down the top close to the head surface. Then I finished with a file to get it flat and square. I used a gasket to mark where the divider needed to be ported back to. I just used a marker and scribe. This stuff grinds off real easy with an open bit.

Last edited by bainer1290; April 8th, 2014 at 08:05 PM.
April 8th, 2014, 11:52 PM
#537
Seasoned beater pilot.
Join Date: Jan 2007
Location: Chicago
Posts: 5,468
Just to clarify, This is a plain Jane street 350, for a cruiser car. .485 lift and around 225 duration at .050.
All of this extra work Dave and I are sponsoring, is just to help people learn all of the pitfalls in the process from start to finish.
This engine would have run better with just a bowl blend, and a touch up on an ol' stone grinder.
Never hurts to have a nice set of heads if I decide to get frisky in the future.
I love the entertainment provided when everyone gets all worked up over this project though.
I'm going to stuff the cam into a stock 76 98, bolt these heads on it and cruise.
Seems like a waste not blasting these down the track all day, and it kind of is, but It's just old junk to have fun with to me.
I like tinkering and solving problems, and so does Dave. You'll just have to understand that It's a disease we are infected with. The entire point lies in the processes, and not the final complete engine.
The engine already runs fine with the stock #8 heads on it, we just decided to have a little "fun" with it. Keep in mind that our idea of "fun" may be a bit lopsided to most sane folks.
April 9th, 2014, 09:08 AM
#538
Registered User
Thread Starter
Join Date: Apr 2010
Posts: 978
Trying to figure out how to easily block the exhaust crossovers and the center dividers. I like the idea of the Resbond 940HT for the crossovers and I wonder if it would hold up in place of the melted aluminum for the center divider? Anyone attempted this or see any major faults with trying it?
Copper, I'm with Smitty on this one. I also think you should go with the 3/8" studs for strength. There's a lot of pressure on that stud.
Last edited by 67 Cutlass Freak; April 9th, 2014 at 07:56 PM.
April 9th, 2014, 09:32 AM
#540
Registered User
Join Date: Dec 2013
Posts: 354
bainer, I have not used the resbond 940HT for anything yet, but I think it should work just fine. The heat will not be an issue, but I you may want to anchor it to the divider somehow, like slots or holes. I would be just a little worried about it pealing off from the exhaust gasses rushing by. At least the pieces will just blow out and not down into your engine. Of course you will have to make a mold and grind some back. Please let us know how it works out for you and post up some pictures.
Any other suggestions? or is there another product that woudl work other than the resbond like maybe furnace cement or an epoxy?
April 9th, 2014, 10:33 AM
#543
Registered User
Join Date: Dec 2013
Posts: 354
Thought they could not be welded because they were cast? The only option was brazing which was also tough as the heads needed to be heated and could crack, distort, etc...
Or am I wrong on this? What did you ahve to do to weld them did you pre-heat?
Other thought is to make a spacer clip like Lars but out of Aluminum, shape it to fit, then assemble with the headers holding it in place, thoughts on this option??
Or am I wrong on this? What did you ahve to do to weld them did you pre-heat?
Other thought is to make a spacer clip like Lars but out of Aluminum, shape it to fit, then assemble with the headers holding it in place, thoughts on this option??
Last edited by bainer1290; April 9th, 2014 at 10:36 AM.
April 9th, 2014, 10:35 AM
#544
Guys, Its soooo much easier to TIG weld the exhaust, I can do this in 30 minutes on each head. Have some local welder do this if you don't have the skill or equipment.

Last edited by Wise Performance; April 9th, 2014 at 11:29 AM.
April 9th, 2014, 11:08 AM
#545
Registered User
Join Date: Aug 2007
Posts: 2,250
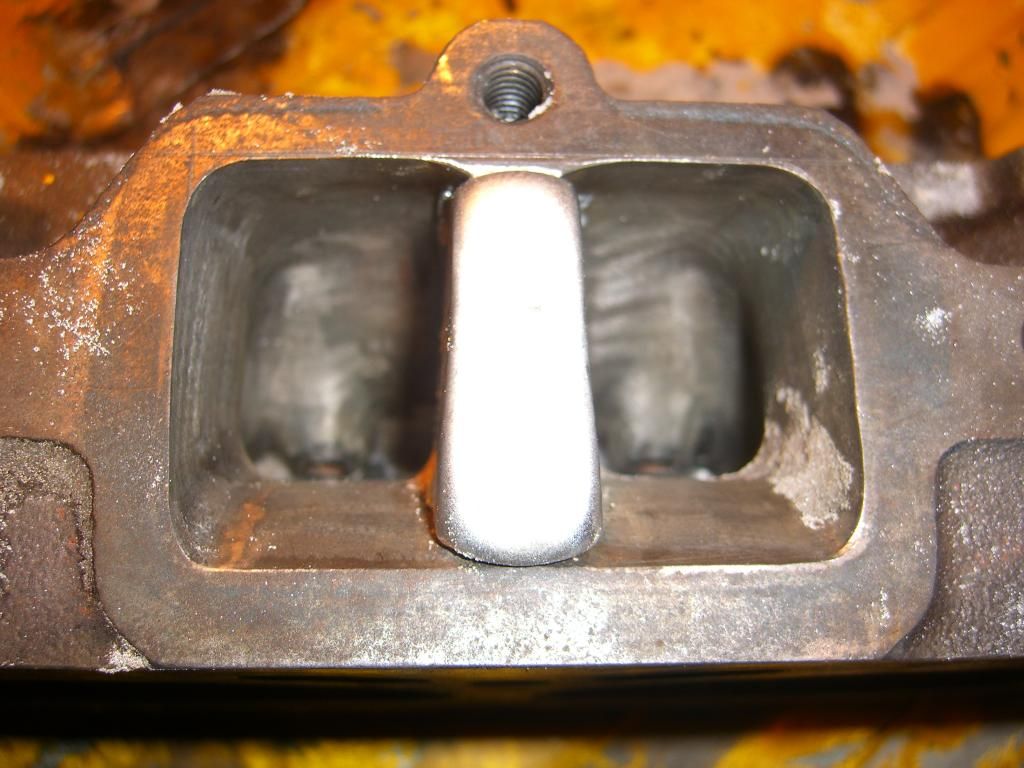
Just to be clear, both "divider" and "crossover" have been used. Bainer mentioned "filling the crossovers" then Brad showed a pic of the center divider but called them crossovers. The center divider on the center exhaust port is welded so that it is flush with the head, resulting in better scavenging with headers. The crossovers are on the intake side of the head and are generally "filled" to block up that area.
April 9th, 2014, 11:57 AM
#547
Any welding shop imo will probably charge about 50 bucks per hour and probably rate each head at minimum 1 hr. Each. So that's 100 bucks. The zinc alloy bar I bought I think for 25 bucks or so . Now it is a little tricky to do the pour I don't know if 67 cutlassfreak mentioned it but he had issues with the zinc shrinking so there is a technique to pouring the alloy you must pour it higher than the head so that when it cools and shrinks you have enough to overcome the divet that is created once it cools down.
April 9th, 2014, 12:08 PM
#548
Registered User
Join Date: Dec 2013
Posts: 354
Any welding shop imo will probably charge about 50 bucks per hour and probably rate each head at minimum 1 hr. Each. So that's 100 bucks. The zinc alloy bar I bought I think for 25 bucks or so . Now it is a little tricky to do the pour I don't know if 67 cutlassfreak mentioned it but he had issues with the zinc shrinking so there is a technique to pouring the alloy you must pour it higher than the head so that when it cools and shrinks you have enough to overcome the divet that is created once it cools down.
Where did you get the ZInc Alloy from I see DMR, Mondello and a few others have it. How much would a guy need to do the full crossovers and pour the dividers for a pair of heads?
April 9th, 2014, 12:53 PM
#550
Registered User
Join Date: Jul 2009
Location: Dewey AZ
Posts: 314
since this is HOME PORTING TECHNIQUES, grind the clip to fit and glue it in with resbond, at the same time ya could fill the crossovers . OR take it somewhere other than HOME and let somebody else do it... and Brad is that center devider a little thin? I know the gasket and header flange are thicker than that. isn't that a harsh transition into the header?
ps I have a whole box of cut up A5 intake laying around for someone if needed, works perfict.
. OR take it somewhere other than HOME and let somebody else do it... and Brad is that center devider a little thin? I know the gasket and header flange are thicker than that. isn't that a harsh transition into the header?ps I have a whole box of cut up A5 intake laying around for someone if needed, works perfict.
Last edited by Lars; April 9th, 2014 at 12:58 PM.
April 9th, 2014, 01:18 PM
#551
Registered User
Join Date: Dec 2013
Posts: 354
Thanks for all the ideas guys, sorry for hi-jacking the thread, I will share my resbond build once I get it going in another thread.
If anyone wants to go in on some Resbond 940HT a quart is $104 and a gallon is $290 + shipping. I hear a quart will do 4 heads so PM me if you want to split some.
If anyone wants to go in on some Resbond 940HT a quart is $104 and a gallon is $290 + shipping. I hear a quart will do 4 heads so PM me if you want to split some.
April 9th, 2014, 02:55 PM
#552
Registered User
Thread Starter
Join Date: Apr 2010
Posts: 978
bainer you can post your results here if you want. That's what this thread is all about. I have stick welded the dividers before, that was difficult for me, but I'm not a good welder. I may try to braze the divider on the "E" head I have here, just to mess around. That Resbond stuff is pretty expensive. I had no idea. By the way, the Zinc alloy melts at a slighty lower temperature than aluminum and works very well. I like it better than the melted pistons we used.
April 9th, 2014, 03:13 PM
#553
Registered User
Join Date: Dec 2013
Posts: 354
Sounds good, I am on the fence about the Resbond vs the zinc alloy. The zinc alloy being cheaper and having a good track record and the Resbond is more expensive and really has no guarantee. I have no torch so would have to attempt to melt the zink on the bbq side burner and/or with a propane torch, not sure if thats enough heat...
April 10th, 2014, 06:49 PM
#554
Registered User
Thread Starter
Join Date: Apr 2010
Posts: 978
bainer1290 that's not going to be enough heat to melt the Zinc alloy. You could try map gas. My father had a propane setup for sweating plumbing pipes that put out a fair amount of heat. You might consider taking it to your local auto shop. Throw them a couple bucks and you're good to go. Just be well prepared. By the way, on page 11 of this thread a member here George, goes by Rootney mentioned he wanted to do a pour using the Resbond. You should give him a PM to see if he wants to go in on some. The other option for the divider is to use Lars clips or make your own. Anyway, bainer earlier you mentioned that you thought you were hijacking. Absolutely not. This thread has become a hit because of guys like you that want to feel warm and fuzzy about their heads.
April 10th, 2014, 07:32 PM
#555
Registered User
Thread Starter
Join Date: Apr 2010
Posts: 978
Finished the valve job on the #5s
Last night I worked until almost 1:00 and finished doing the valve job on J(Chicago)'s heads. As you know we put even bigger valves into his heads. The intakes are 2.07" and the exhaust are 1.71". I did this valve job with all stones. No cutter to establish the valve to seat contact area. It was more time consuming, but I think they turned out awesome. The problem I was having with the cutter was some areas of the seat had more material being removed than others. So it was hard to vary the pressure and make a perfect cut. It would have been next to impossible to use with these big valves. Near the walls of the combustion chamber a lot more material had to be removed. I didn't take any photos while I did these because I thought it would be redundant. I'm real interested in the flow rates of these heads Vs Copper's #6s with the smaller valves. I went over to my buddy Dane's today and we cc'd one of these heads. The combustion chamber came in at 61CCs. That should make Jeremy a happy camper. His short block is a low compression stocker. Sounds like he's going to put together a drag car for his girlfriend. When I told Dane he was planning on running a stock cast iron manifold, he got a chuckle out of that. I told him it's been modified. I told him we were shooting for the stock sleeper look. If anyone can make two tons of crap fly, with old junk parts, it's J(Chicago). He's our residant seasoned beater pilot. The day I met Jeremy he was racing his Delta 88 with zip ties around the rear bumper. Man that was a blast at Byron for the Olds nationals.
Last edited by 67 Cutlass Freak; April 10th, 2014 at 07:55 PM.
April 10th, 2014, 08:50 PM
#557
Registered User
Join Date: Dec 2013
Posts: 354
Thanks 67 Cutlass I am now chatting to Smitty about the ZA12 still not sure what will i will endup going. Will keep you guys posted.
Chicago's heads sound similar to mine, valve sizes are the same as what I will be running 2.07/1.71. Here's a few pics of the light port job, don't bust my ***** too bad I'm still learning to port
Chicago's heads sound similar to mine, valve sizes are the same as what I will be running 2.07/1.71. Here's a few pics of the light port job, don't bust my ***** too bad I'm still learning to port
April 11th, 2014, 06:15 AM
#558
Registered User
Join Date: May 2013
Location: Newtown CT
Posts: 221
bainer1290 that's not going to be enough heat to melt the Zinc alloy. You could try map gas. My father had a propane setup for sweating plumbing pipes that put out a fair amount of heat. You might consider taking it to your local auto shop. Throw them a couple bucks and you're good to go. Just be well prepared. By the way, on page 11 of this thread a member here George, goes by Rootney mentioned he wanted to do a pour using the Resbond. You should give him a PM to see if he wants to go in on some. The other option for the divider is to use Lars clips or make your own. Anyway, bainer earlier you mentioned that you thought you were hijacking. Absolutely not. This thread has become a hit because of guys like you that want to feel warm and fuzzy about their heads.
I did my heads a week ago.
I bought the smaller amount of Resbond and did 2 heads. I mixed it all based on advice from another thread on CO.
I had a fair amount of paste left, which was waste, but not enough for 2 more heads. I was very happy with the mixing and application. My method was;
1. Taped off the crossover port (Gorilla tape).
2. Put the intake side down on a flat surface.
3. Tilt the head back and "sight" from the bottom of the valve seat, to the
valve guide and adjust the tilt to get the level of resbond where you want it.
When your happy, weigh and mix the resbond. I reserved a small amount of the powder and liquid, to make a final adjustment of the "Viscosity", if needed. Mix thouroghly but don't waste time un-necessarily. At the end, You'll find yourself cleaning the valve seat/ and top most part of the bowl (with damp cloth) as the stuff is drying. I did both heads at the same time.
4. Spoon in the resbond into one of the valve bowls and let it migrate to the other bowl. Poke it with a pencil or similar to get trapped air out. Don't waste too much time on neatness. Clean up at the end will be needed anyway.
5. Feeding from one bowl eliminates the damp cloth clean up of the second valve guide/bowl. I did the resbond after the valve job was done, so I was keen not to leave any residue on the valve seats.
Leave in place overnight. Mine was damn hard in 24 hours. Other have said they had to oven heat the heads. Perhaps they mixed too thin?? Room temp cold ??
I had my dividers welded along with the valve job at the shop.
Good luck.
George
April 11th, 2014, 06:42 AM
#559
Out of Line, Everytime😉
Join Date: Dec 2006
Location: Melville, Saskatchewan
Posts: 8,909
I am going to attempt extending the center divider on the ported, milled to 55cc with dual springs and 2"/1.625" valves #6 heads. I am thinking hi temp JB weld and a flat piece of metal. Been told 15 to 20 HP on filled crossover's.
 April 11th, 2014, 07:40 AM
#560
Registered User
Join Date: Dec 2013
Posts: 354
George that is some great info thank you. It sounds like a quart kit would be enough to do my crossovers and attempt the center divider too.
Did you take any pics of how it turned out? Whats that stuff like for porting does it act like regular cast or is it much softer?
Did you take any pics of how it turned out? Whats that stuff like for porting does it act like regular cast or is it much softer?


