Home Porting Techniques


 February 25th, 2014, 06:02 PM
#364
Registered User
Thread Starter
Join Date: Apr 2010
Posts: 978
Details
I don't see a problem with this?
Simply showing our iron port work, before and after.
if someone wants details, I'll gladly post.
If your talking about our new heads, I build them custom for EACH application and require a down payment to start the process. If thats unfair then I can suggest other aftermarket heads. NO B.S.!
Simply showing our iron port work, before and after.
if someone wants details, I'll gladly post.
If your talking about our new heads, I build them custom for EACH application and require a down payment to start the process. If thats unfair then I can suggest other aftermarket heads. NO B.S.!
1) What is the maximum you have raised the roof on the SB or BB heads?
2) What size valves do you use?
3) Do you have any flow numbers?
4) Do you port the irons all by hand, or do you use a bowl hog or CNC?
5) How much time does it take you to fully max port a set of cast irons?
6) Do you think a stock set of BB cast iron, big valve heads, with a good valve job, will perform close to out of the box Edelbrock or Pro-Comp heads?
7) What do you think is the maximum amount you can safely mill off the cast iron heads?
8) What is your opinion about the different valve guides that are available?
9) What's your opinion about the non-hardened seats used in the earlier heads?
Thanks for taking the time to post here Brad. I know you're a busy guy. For the rest of you guys, feel free to answer any of these questions, I'm just trying to learn all I can from these guys that have been into Oldsmobiles for most of their lifes.
By the way Brad, I think you should start a thread about your heads or just post up some details in the other thread about aftermarket heads. I would like more details about them myself. I don't have the money for a set right now, but I sure would like to hear about some of the builds you have going on.
February 26th, 2014, 04:25 PM
#365
Ahh.. let me start by saying, there are a lot of different methods and ideas to porting, but following basic examples will keep you out of trouble.
1st off, I/we(my guys) port heads/intakes to the engines needs and customers goals. I design the cam according to quality of head work, and many other factors being realistic about those needs,(bigger isnt always better).
From my experience Iron heads make more power to equalivant aluminum heads, to clairfy; If you had a set of iron and a equal set made of aluminum, the iron heads always run better, atleast in my experience to be true, Im sure many others will agree and maybe a good topic to ponder?
~My Maximum roof height~ Well I see things a little different and being there are a lot better heads then factory iron, I don't spend a whole lot of time maximizing on old iron these days, BUT to answer your question, I mostly scribe and gasket match but I raise our special sized(1.5x2.5) gaskets to the bottom of the port which raises the port about .250 more and grind that path as close to the pinch point as possible WITHOUT going into the bolt area.
The flow killer on iron is the pinch, not much you can do, I try to avoid any unnessassary welding/epoxy, just a clean straight port, fill the nessassary exhaust/EGR areas and make it clean.
Our BBO irons have flowed in the 286cfm range with usual tricks without going crazy and feel this is a safe no issue range for most.
~Valve sizes~ This is a good one, most people think you need the biggest exhaust valves you can fit, well I'm hear to debunk that myth with some fact.
The surface area of a 1.60 valve has enough area to support 1200+ HP N/A, and there is no need to go bigger. Now take that 1.60 valve and measure YOUR specific bore and order the largest intake valve you can fit in there without shrouding and thats the max you have to work with.
~Flow Numbers~ I have flow data from the 80's on all the heads I ever finished, mostly back to back data. Its not all about flow, BUT you must be able to see a number to know where that head stands on the capibility of making power, for instance; To make 700hp you will need a head that can roughly see 340+cfm, its a mathimatical formula, something like this. (cfm x .257 -.320 x 8) =696hp. Now that equation changes with the efficiency of the (air pump), more efficient= more power. there are other formulas, but this one works for my applications.
~Hand or CNC port~ I personally hand grind every port when I R&D, then if its worthy, It gets CNC'd. (all iron get hand ported).
~Time of porting~ I port till I cant feel my hands anymore, then its time to quit. IDK, usually takes me 1 hour to do one port roughed out then go back and finish so, roughly 8 ports = 8 hours then finish work, valve job, blend. 16 hours just in port work if your good. then add all the other nessassary tricks/welding/epoxy...time adds up. most will not pay to have quality work done on irons.
~BBO irons finished vs.E-brocks~ Good question, depends on budget and overall desire. Iron have the capibility to make great power in the right hands, e-brocks and like are basically aluminum versions of iron with a better chamber and flow a little better, much easier to work with and way lighter.
~Milling irons~ IDK, I take off only whats needed for desired CR or to achieve correct RA.
~Valve guides~ Bronze liners or bronze guides are usually what I use in irons with SS valves.
~Hardened seats~ I prefer, You can put a good quality valve job on them.
Its all the time I have without geting all tech on ya, everybody has their own way, hopefully I helped clarify/answer your questions.
Thank you,
Brad @ WPE
 February 26th, 2014, 06:48 PM
#367
Yes I do, but this thread is for home porting so I'll answer quick.
4 stages of cnc port work available
stage 1. 340 cfm
Stage 2. 360 cfm
Stage 2.5 380 cfm (turbo, blower, nos)
Stage 3 400+ max effort
I will start a new thread if interested.
Thanks,
Brad @ WPE
4 stages of cnc port work available
stage 1. 340 cfm
Stage 2. 360 cfm
Stage 2.5 380 cfm (turbo, blower, nos)
Stage 3 400+ max effort
I will start a new thread if interested.
Thanks,
Brad @ WPE
February 26th, 2014, 08:12 PM
#368
Registered User
Thread Starter
Join Date: Apr 2010
Posts: 978
1st off, I/we(my guys) port heads/intakes to the engines needs and customers goals. I design the cam according to quality of head work, and many other factors being realistic about those needs,(bigger isnt always better).
I agree, wish I new more about the relationship of volume versus air fuel charge velocity.
From my experience Iron heads make more power to equalivant aluminum heads, to clairfy; If you had a set of iron and a equal set made of aluminum, the iron heads always run better, atleast in my experience to be true, Im sure many others will agree and maybe a good topic to ponder?
I don't think I've ever heard anyone say that, but it is somewhat encouraging to the home grinders trying to breath some life into these old castings.
~My Maximum roof height~ I mostly scribe and gasket match but I raise our special sized(1.5x2.5) gaskets to the bottom of the port which raises the port about .250 more and grind that path as close to the pinch point as possible WITHOUT going into the bolt area.
This is exactly what I was looking for. I think I will call you about purchasing a set of your gaskets and also inquire about some SB gaskets with a raised roof.
Our BBO irons have flowed in the 286cfm range with usual tricks without going crazy and feel this is a safe no issue range for most.
That's pretty impressive for cast iron junk.
~Valve sizes~ This is a good one, most people think you need the biggest exhaust valves you can fit, well I'm hear to debunk that myth with some fact.
The surface area of a 1.60 valve has enough area to support 1200+ HP N/A, and there is no need to go bigger. Now take that 1.60 valve and measure YOUR specific bore and order the largest intake valve you can fit in there without shrouding and thats the max you have to work with.
I have heard this before. It does make sense. I know there's a formula for determining what size exhaust valve is needed to flow for a corresponding intake valve. It seems like this is pretty standard for the top engine builders to stuff the biggest intake valve you can fit in there, and then put a tiny exhaust valve in until it almost touches. I still don't understand how you get around the shrouding issue on the intake side of the chamber. Do you open it up out to the gasket mating point?
~Flow Numbers~ I have flow data from the 80's on all the heads I ever finished, mostly back to back data. Its not all about flow, BUT you must be able to see a number to know where that head stands on the capibility of making power, for instance; To make 700hp you will need a head that can roughly see 340+cfm, its a mathimatical formula, something like this. (cfm x .257 -.320 x 8) =696hp. Now that equation changes with the efficiency of the (air pump), more efficient= more power. there are other formulas, but this one works for my applications.
This formula is very interesting. I'm assuming it will give a max HP in a naturally aspirated engine operating at peak efficiency. Disregard when using power adders.
~Time of porting~ I port till I cant feel my hands anymore, then its time to quit. IDK, usually takes me 1 hour to do one port roughed out then go back and finish so, roughly 8 ports = 8 hours then finish work, valve job, blend. 16 hours just in port work if your good. then add all the other nessassary tricks/welding/epoxy...time adds up. most will not pay to have quality work done on irons.
I wish I could port that fast. It takes me at least an hour to do each bowl and probably more than an hour to do each port. Maybe it's time for me to invest in a new carbide.
~BBO irons finished vs.E-brocks~ Good question, depends on budget and overall desire. Iron have the capibility to make great power in the right hands, e-brocks and like are basically aluminum versions of iron with a better chamber and flow a little better, much easier to work with and way lighter.
I think you misunderstood my question about Cast iron vs E-brocks. I was just curious of your opinion of stock cast irons with a good vave job vs E-brocks out of the box. Let's say same size valves.
~Milling irons~ IDK, I take off only whats needed for desired CR or to achieve correct RA.
The reason I asked this was because my machinist milled a set of BB heads .060, and the customer had head gasket sealing issues. I didn't get all the details, but he felt the head deck was more prone to warpage. He recomended not milling more than .050"
~Valve guides~ Bronze liners or bronze guides are usually what I use in irons with SS valves.
The reason I asked about this was because Jeremy's heads have a broken guide. I purchased a set of steel replacement guides from Rock Auto. They were dirt cheap. I'm considering having all the guides replaced. Most of the cost is in the labor. I'm not opposed to using bronze guides. They aren't that expensive. I was under the impression bronze guides were preffered for race aplication. These heads will see hard street usage and some track time. Which do you guys think will last longer?
~Hardened seats~ I prefer, You can put a good quality valve job on them.
Its all the time I have without geting all tech on ya, everybody has their own way, hopefully I helped clarify/answer your questions.
Thank you,
Brad @ WPE
February 27th, 2014, 01:56 AM
#369
Registered User

Join Date: Aug 2008
Location: Iowa
Posts: 1,130
A few yrs ago, I was talking with a pro head porter. He told me 2.2 X CFM = HP. Works out damn close for a crude figure. Milan and I talk a lot and he has a Pipe Max program that is the most accurate on the planet! We are always very close on HP est. But that program gets into so much more. I don't know why more pro engine builders don't use it more.
Last edited by oldcutlass; February 28th, 2014 at 06:39 AM. Reason: posting rules violation
February 27th, 2014, 06:36 AM
#370
Registered User
Join Date: Dec 2008
Location: Out here in the fields...
Posts: 83
CFM aint all that its supposed to be...
I can tell you my Bulldog BS heads flow something like 330 cfm, I forget, maybe even more and big exhaust flow like 250 cfm.... They never made more than 600 HP on a 10.3 to 1 496 Olds.... Not impressed at all and I bet a nicely ported set of irons would out perform them...
I think its the chamber that sucks on these heads... I think the stock Olds chamber is probably close to as good as it gets with the Olds valve angle, like a hemi kinda...
I also have two very similar 468 Olds motors with the Old and the new Edelbrock heads and I dont see much difference with the new "improved" chamber.... My RR heads made 830 HP with the stock chamber and put my car in the 9.40's...
I like a nicely ported iron head for a street strip car
I love this thread, makes me want to dig out my carbides and grind on some junk
Last edited by Steve O; February 27th, 2014 at 06:39 AM.
February 27th, 2014, 07:15 AM
#372
Registered User

Join Date: Sep 2013
Posts: 71
I really appreciate this thread.
I pulled off my heads to replace the gaskets, and I was replacing most of the valvetrain. This thread has given me the confidence to at least clean up the interior and surfaces of the heads, and has also shown me what I should avoid (lest I end up buying oversized valves).
So thanks for posting all this information!
February 27th, 2014, 04:33 PM
#374
Seasoned beater pilot.
Join Date: Jan 2007
Location: Chicago
Posts: 5,468
Steveo just said 360cfm......x2.2 = 792hp
If I remember right, it dynoed at 808hp

But as steveo said, what if you change the chamber? or the exhaust ports? Tends to throw that simple formula out of wack
February 27th, 2014, 04:47 PM
#375
Seasoned beater pilot.
Join Date: Jan 2007
Location: Chicago
Posts: 5,468
Math and real world data are the best techniques, because math doesn't really lie......unless it's statistics. 75% of olds guys believe that 200% of olds guys are doing it wrong on 50% of their builds 25% of the time on cloudy days below 20 degrees fahrenheit 
February 27th, 2014, 04:57 PM
#377
Registered User
Join Date: Dec 2008
Location: Out here in the fields...
Posts: 83
829 HP... Its turn key just sitting there, only about 30 passes on a total refresh including new rods, cam, lifters and springs.... Just needs gas ($17.00 per gallon here, 1 gallon per pass), tires (too small and about $500) and oil (10 qts $75.00)...
Id rather do something fun like grind on some 7A heads to BB size and put them on a good junky old 76 455 short block still running the original pistons and put in my ancient trusty and a little rusty old reliable generic 214/224 cam into its 6th or 7th engine
Id rather do something fun like grind on some 7A heads to BB size and put them on a good junky old 76 455 short block still running the original pistons and put in my ancient trusty and a little rusty old reliable generic 214/224 cam into its 6th or 7th engine
February 27th, 2014, 05:21 PM
#378
Seasoned beater pilot.
Join Date: Jan 2007
Location: Chicago
Posts: 5,468
Hahahaha. If you think about it, That's not any crazier of an idea than packing 829 horse horse back into that old crusty 455 block from my rot box 72 convertible. It's supposed to be fun.
February 27th, 2014, 05:41 PM
#380
Registered User
Thread Starter
Join Date: Apr 2010
Posts: 978
Stevo you gotta make it out to Byron this year, we all miss you. My car is getting real close now. The rear brakes came in yesterday.
Last edited by 67 Cutlass Freak; February 27th, 2014 at 06:18 PM.
February 27th, 2014, 05:50 PM
#381
Registered User
Join Date: Dec 2008
Location: Out here in the fields...
Posts: 83
Yea its a good block though I remember asking the guy that put it together to use it and he said he had another one already at the machine shop... Did all the work on the oil system, all the machine work and I think even filled the lifter valley with devcon....
We went to put it together and the thrust surface on the block was wasted, OOPS")
Well he just had to eat all that then we used your block
Anyway back on the topic here...
These are some Ka heads I picked up already ported really nice... They have the sharp edge of the "quench" pad ground down and radiused in the chamber, more hemi like I guess and no sharp edges....
I cant say if this helps or hurts but the 468 they went on runs really strong
I remember asking the guy that put it together to use it and he said he had another one already at the machine shop... Did all the work on the oil system, all the machine work and I think even filled the lifter valley with devcon.... We went to put it together and the thrust surface on the block was wasted, OOPS
Well he just had to eat all that then we used your block
Anyway back on the topic here...
These are some Ka heads I picked up already ported really nice... They have the sharp edge of the "quench" pad ground down and radiused in the chamber, more hemi like I guess and no sharp edges....
I cant say if this helps or hurts but the 468 they went on runs really strong
Last edited by Steve O; February 27th, 2014 at 07:30 PM.
February 27th, 2014, 06:14 PM
#383
Registered User
Join Date: Dec 2008
Location: Out here in the fields...
Posts: 83
About the only thing I miss about Ill is Byron
February 27th, 2014, 09:00 PM
#386
Registered User

Join Date: Jun 2008
Location: Chicago
Posts: 1,394
Yea its a good block though I remember asking the guy that put it together to use it and he said he had another one already at the machine shop... Did all the work on the oil system, all the machine work and I think even filled the lifter valley with devcon....
We went to put it together and the thrust surface on the block was wasted, OOPS
Well he just had to eat all that then we used your block
Anyway back on the topic here...
These are some Ka heads I picked up already ported really nice... They have the sharp edge of the "quench" pad ground down and radiused in the chamber, more hemi like I guess and no sharp edges....
I cant say if this helps or hurts but the 468 they went on runs really strong
I remember asking the guy that put it together to use it and he said he had another one already at the machine shop... Did all the work on the oil system, all the machine work and I think even filled the lifter valley with devcon.... We went to put it together and the thrust surface on the block was wasted, OOPS
Well he just had to eat all that then we used your block
Anyway back on the topic here...
These are some Ka heads I picked up already ported really nice... They have the sharp edge of the "quench" pad ground down and radiused in the chamber, more hemi like I guess and no sharp edges....
I cant say if this helps or hurts but the 468 they went on runs really strong
I had taken pics and measurements for future reference, but don't remember where they went. Woops.
 March 7th, 2014, 07:37 AM
#388
Registered User
Join Date: May 2013
Location: Newtown CT
Posts: 221
CutlassFreakDave,
I'm jumping in the water also (not literally).
We had a brief PM conversation recently and you encouraged me to post, so here it is;
I've completed the combustion chamber polish on my C heads.
Next on to the intake bowls.
My process is a little backward as the valve jobs been done already.
Head progress pics attached taken from the kitchen table (Wife's a peach).
Just a quick background on the whole project.
I've assembled my short block 455, .030 over, Crank .010 under, Icon 14cc pistons, Eagle Rods, zero deck block , Compression around 10.4;1, Lunati roller cam 238/248 @ .050 .640 lift with 1.7 Scorpion roller rockers.
3.42:1 posi, TH400, Ultimate converter 3400 stall.
I bought my '72 about a year ago right after I quit smoking. The idea was a project to keep the mind occupied. So far it's working very well and I'm having a complete blast.
I'll be more brief on future posts and stay to the topic.
Thanks to all you guys documenting this stuff.
George
I'm jumping in the water also (not literally).
We had a brief PM conversation recently and you encouraged me to post, so here it is;
I've completed the combustion chamber polish on my C heads.
Next on to the intake bowls.
My process is a little backward as the valve jobs been done already.
Head progress pics attached taken from the kitchen table (Wife's a peach).
Just a quick background on the whole project.
I've assembled my short block 455, .030 over, Crank .010 under, Icon 14cc pistons, Eagle Rods, zero deck block , Compression around 10.4;1, Lunati roller cam 238/248 @ .050 .640 lift with 1.7 Scorpion roller rockers.
3.42:1 posi, TH400, Ultimate converter 3400 stall.
I bought my '72 about a year ago right after I quit smoking. The idea was a project to keep the mind occupied. So far it's working very well and I'm having a complete blast
.I'll be more brief on future posts and stay to the topic.
Thanks to all you guys documenting this stuff.
George
March 7th, 2014, 12:46 PM
#389
Registered User
Thread Starter
Join Date: Apr 2010
Posts: 978
Anybody else with progress?
Thanks for sharing George. Looks like you used a bowl hog to start the porting. Very smart. You might want to cut some 1/4" strips of duct tape to try to protect the seats. It might help a little, even if it saves you from one little nick. It's better than nothing.
March 7th, 2014, 01:07 PM
#390
Registered User
Join Date: May 2013
Location: Newtown CT
Posts: 221
Thanks for sharing George. Looks like you used a bowl hog to start the porting. Very smart. You might want to cut some 1/4" strips of duct tape to try to protect the seats. It might help a little, even if it saves you from one little nick. It's better than nothing.
The machine shop did the bowl hog.
On the duct tape yes. I have also been playing with all kinds of ideas to protect the seats.
Liquid tape, aluminum flashing, the best so far is ribbon cable. This is the kind you see inside your old desktop computer. It's surprisingly tough against a bur. Run a 1/4 to 3/8" strip around the seat and duct tape in place.
More pics to follow soon. Out of town this weekend. Don't expect to make much headway.
George
March 7th, 2014, 07:13 PM
#391
Registered User
Thread Starter
Join Date: Apr 2010
Posts: 978
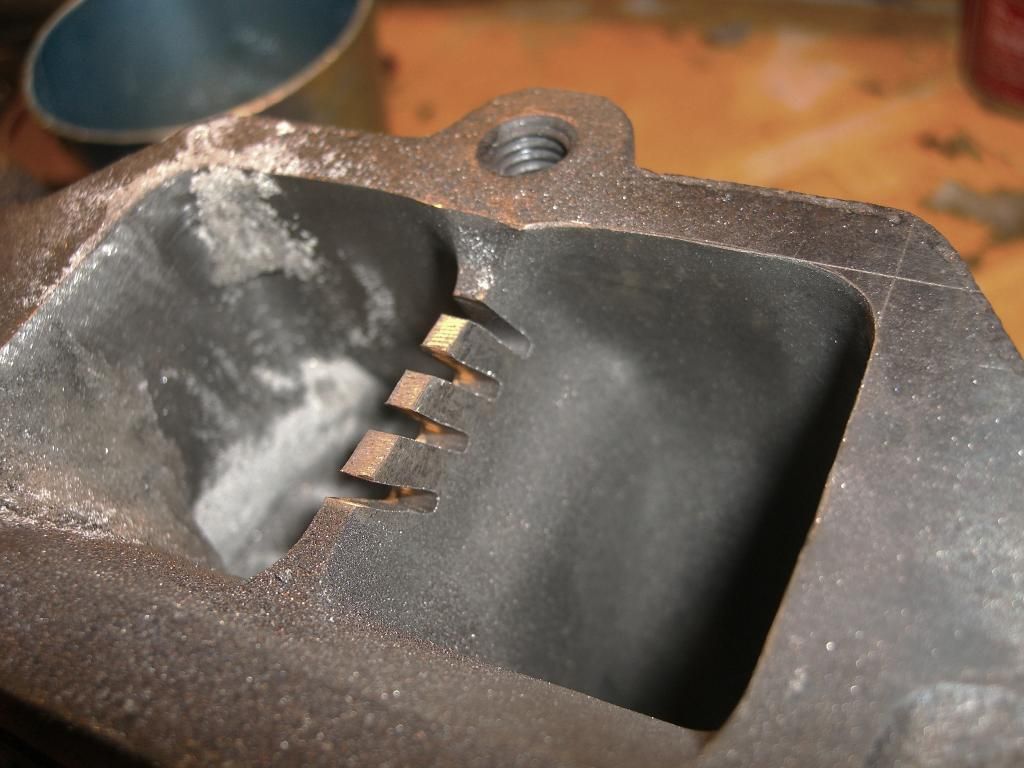
Divider
Well Coppercutlass came up last night and we did the pour for the dividers on his heads. A big thanks to Smitty for setting us up with the Zinc ingot. It was a lot easier to use than melted pistons or intake manifold. It poured nice and smooth. Seamed to melt down easier, at a lower temp. We started by cutting some angled slots in the divider to create an anchor point for the pour.
CIMG4441.jpg
CIMG4440.jpg
We used some custom fit sheet metal to form the sides of the divider mold. We started with cardboard for patterns to get the contour right before we made the actual sheet metal pieces. If you decide to do this leave about 1/2" extra material sticking up over the head. Pour it high, because it will shrink down. We used duct tape over the valve hole & silica sand to hold the sheet metal in place. We put a little water on the sand to firm it up. We also made sure there was no sand where we were going to pour.
CIMG4442.jpg
CIMG4444.jpg
CIMG4443.jpg
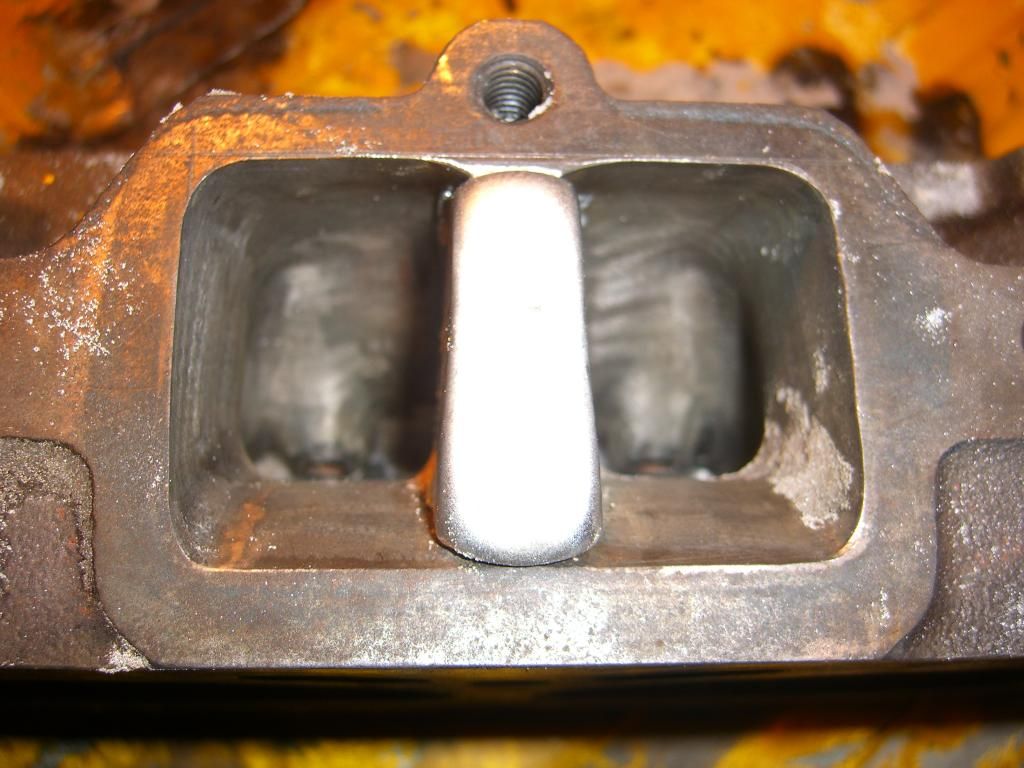
We made the divider extra wide so we could have nice rounded corners after grinding. I used a 40 grit sanding disk on a dye grinder to knock down the top close to the head surface. Then I finished with a file to get it flat and square. I used a gasket to mark where the divider needed to be ported back to. I just used a marker and scribe. This stuff grinds off real easy with an open bit.
CIMG4453.jpg
CIMG4454.jpg
CIMG4455.jpg
CIMG4459.jpg
Looking in the port at the divider, the material blends so nice it's hard to tell it's two different metals. I'm glad we used this alloy instead of Aluminum. Lars I hate to say it, but I don't think I'm going to use your clips. I really wanted to weld them in to show everyone different options, but this was so much easier than welding and grinding the welds back down. I really need to do this on J-Chicago's heads as well.

CIMG4441.jpg
CIMG4440.jpg
We used some custom fit sheet metal to form the sides of the divider mold. We started with cardboard for patterns to get the contour right before we made the actual sheet metal pieces. If you decide to do this leave about 1/2" extra material sticking up over the head. Pour it high, because it will shrink down. We used duct tape over the valve hole & silica sand to hold the sheet metal in place. We put a little water on the sand to firm it up. We also made sure there was no sand where we were going to pour.
CIMG4442.jpg
CIMG4444.jpg
CIMG4443.jpg
We made the divider extra wide so we could have nice rounded corners after grinding. I used a 40 grit sanding disk on a dye grinder to knock down the top close to the head surface. Then I finished with a file to get it flat and square. I used a gasket to mark where the divider needed to be ported back to. I just used a marker and scribe. This stuff grinds off real easy with an open bit.

CIMG4453.jpg
CIMG4454.jpg
CIMG4455.jpg
CIMG4459.jpg
Looking in the port at the divider, the material blends so nice it's hard to tell it's two different metals. I'm glad we used this alloy instead of Aluminum. Lars I hate to say it, but I don't think I'm going to use your clips. I really wanted to weld them in to show everyone different options, but this was so much easier than welding and grinding the welds back down. I really need to do this on J-Chicago's heads as well.
March 8th, 2014, 08:14 AM
#394
Registered User
Thread Starter
Join Date: Apr 2010
Posts: 978
Slots
I really don't think it would matter. This material isn't going anywhere. You could drill holes for anchor points. This was real easy. Less than a minute to cut the slots in each head. Don't cut too far down into the head bolt hole. Funny thing we almost forgot to cut the slots on both heads. We were getting ahead of ourselves and started pouring the sand in. Talk about a brain fart. I blaim Ulises, because I had a few beers in me already when he got there. Jeremy, I only have two more exhaust ports to go on your heads. Are you sure you don't want me to do up the divider? It's really no problem, it was real easy. I promise no extra charge - LOL.
March 8th, 2014, 11:04 AM
#395
Blame me ! Lol. I think the shape of the pour itself will hold the filler material in since it's like a half moon shape it might rock a little if it breaks loose. The material actually holds very well I chipped a piece of slag off and it actually took a little bit of force for a thin little piece.
March 8th, 2014, 12:22 PM
#396
Registered User

Join Date: Nov 2008
Location: Mass
Posts: 1,119
If you are looking for mechanical grip, slots pointing toward each other would mean the poured "fins" would fight the opposite pointing ones if the piece tried to move.
Start towards the outside and point in.
It may not matter but it would bite better than parallel fins as you are only getting what I call surface grip.
Start towards the outside and point in.
It may not matter but it would bite better than parallel fins as you are only getting what I call surface grip.
March 8th, 2014, 12:24 PM
#397
Not worried about it . I know what you mean you could also drill holes at the bottom of the slots to creat a peg grip .
Last edited by coppercutlass; March 8th, 2014 at 12:30 PM.
March 9th, 2014, 12:54 PM
#398
Seasoned beater pilot.
Join Date: Jan 2007
Location: Chicago
Posts: 5,468
I wanted to chime in here and teach you guys how to use the picture system on this website.
Below every posting window when you are creating a post, there is a "MANAGE ATTACHMENTS" button.
Click that button, and a new window will open.
Click the "BROWSE" button, and find the picture you want to post on your computer.
Once you find the picture, double click it, and then click the "UPLOAD" button.
Now......for the important part..... once the image uploads to the site, the file name will appear in blue
right click the blue text of your file name and select: "COPY LINK LOCATION"
now type this in a new sentence in your text box: [img]
then immediately after the pair of brackets, right click and select "PASTE"
A bunch of info about your picture will paste into your text box.
immediately after all of that information, you must type: [/img] to end the sequence.
Then just submit your reply like any other post you make on here.
It should look something like this before you submit. I purposely put 2 $ signs into the brackets so it wouldn't work, and so you can see the example instead of the picture.
You just need [img]picture info[/img]
[$img]https://classicoldsmobile.com/forums/attachment.php?attachmentid=86908&stc=1&d=13943944 42[$/img]
March 9th, 2014, 12:56 PM
#399
Seasoned beater pilot.
Join Date: Jan 2007
Location: Chicago
Posts: 5,468
Notice how the picture in my previous post is really small and in a different bubble window because my [img] code was incorrect. (because of the dollar signs i purposely stuck in there).
If I delete the $ signs from the brackets, it will be full size.

If I delete the $ signs from the brackets, it will be full size.


