When you click on links to various merchants on this site and make a purchase, this can result in this site earning a commission. Affiliate programs and affiliations include, but are not limited to, the eBay Partner Network.
This first post is to establish the "back-story" of my car and myself. The second post will be the start of LS-swap story. Skip this section and go to the second post, if you are only interested in the swap info.
July 11, 1982, 5 days after I turned 16 and got my license, I got my 1972 Oldsmobile Cutlass Supreme convertible. 350/4bbl, single exhaust, 14" Rally wheels with belted whitewalls, Saddle Bronze Metallic with white/black upholstery and white top. It had about 46,000 miles on it at the time.
Other than when it was down for repairs, I drove that car daily for the next 6 years, logging right at 100,000 (odometer to 146,000). I was having some electrical issues, had a job, bought a CRX for daily use and parked the Cutlass. My dad bought it off of me shortly thereafter, and it became sort of out "project" car. My dad SOOOOO wanted to put a big block chevy in it, and tried to for several years to talk me into agreeing to it - I always told him to do what he wanted, but *I* would not assist or ever work on it again if he put a rat motor in it.
I drag raced fairly often at the time, and SAW what most actual pump gas motors ran, and to this day feel that BBC's ONLY offer a performance advantage when built for racing gas compression ratios.
So, we built a 455 Olds, and installed H-O Racing springs & rear sway bar, and KYB shocks. First trip to the track, with a mild CompCam 270, homeport G heads, 3.23's, and stock exhaust manifolds resulted in some 13.4's - and the track officials informing us that a convertible running those times would have to have a rollbar installed! The original plan was to make a street/strip car out of it, set up to run low-12's - that plan was now blown.
We added Baer disc brakes all around, and a 700R4 conversion. I played around with a few different carbs, too, just making it a FUN street car. My dad took an early retirement about 8 years ago, liquidated everything he had and moved to Costa Rica - I bought the Cutlass back from him at that time. The old Centerline Convo-Pros never really fit right, and it was getting hard to get decent 15" tires, so I had Boze make me some custom 17" wheels.
About 2 years ago, I picked up a DynoJet 224x chassis dyno - THE coolest toy I've ever had!! A little over a year ago, I decided to knock the dust off of the Cutlass, put it on the dyno and get it straightened out (I knew it felt a little "off"). Sure enough, the dyno graphs were REALLY bad, with the power peaking abnormally low (about 275 at 4000rpm). After talking with my dad, we realized the mufflers (Flowmasters) had been on the car for 19 years! I replaced them with some Pypes RacePros, and put it back on the dyno. Peak power was about 317, and occurred at 5000 - over a 40hp gain from peak to peak, but about a 80hp gain at 5000rpm!
I know there was more power to be found, but the transmission died. I had to put the Cutlass back in mothballs for the time, as I needed to concentrate on getting my other car ready for the 2011 Hot Rod Power Tour.
Fate stepped in, when I rented my dyno out to a guy that was tuning a lot of late model trucks. I watched first-hand as a 5.3 liter truck, with stock exhaust manifolds, put 360hp to the wheels! Granted, his torque was WAY less than the 455's, but the power shocked me. I ended up leasing the dyno to this gentleman, and assisted with some of his projects. Over the last several months, I've seen LS motors making all sorts of power, from a stock 4.8 tuned to put 215 to the wheels, to a turbocharged stockblock, stock head motor putting 815 to the wheels.
Not only do the LS-series motors make power, they run clean, barely ever leak, they are STRONG, they are light, and they are surprisingly efficient. IMHO, these motors are the future of hot rodding. As such, I am committing to making such a swap into my own car, and will report the horsepower, MPG's, overall performance, and even the costs.
Last edited by Lee_A; October 14th, 2011 at 04:29 PM.
The goals are:
- Make the Cutlass usable as a near-daily driver
- Over 22MPG on hwy, over 16 city
- Over 400rwhp
- Run a low-12 at the track, and get kicked off again
I have now sold the 455 that was in my Cutlass, and have nearly all the parts for the LQ4 swap. In the coming weeks, I'll add some pictures and more details. Here is what I have so far
- Acquired an LQ4 6.0 motor
- Heads ported by Greg Good to flow ~300cfm, and milled to get the CR into the mid-10's
- Patriot Gold valve springs
- Custom (my specs) cam, 228/232, nearly .630 lift
- FAST 90 intake
- BRP engine/tranny mounts
- Heddman headers to match the BRP mounts
- H3/Colorado oil pan (to match the BRP mounts)
Tranny will be a 4L60, with a lock-up higher-stall converter. Based upon the many other LS motors we've dyno'ed this year, rwhp should easily be over 400.
I am changing the dash/gauges as well. The gauges are hear, and the dash panel should be here in a week or so. I'll post pics when I get it.
Thanks! I've also bought a RobMac gas tank pickup assembly, giving me a new tank sending unit, as well as 1/2" pickup and return lines. I'll use an external pump, but have not decided upon wich one yet.
Many years ago, when I was playing with a lot of Pontiacs, I picked up a Vintage Air system. I had planned on putting it on my low-11 second Firebird, but ended up sellling that car (divorce) - I kept the VA system, though. I'm planning on installing it in the Cutlass, and hooking it to the LQ4.
It has been over 20 years since I drove the Cutlass on a daily basis, and it is a little scary to think about doing it again. I'm committed at this point, though, so let's see what happens
I think you are cutting yourself short on the HP goal. The last time I built one it was a 346 and and it made 408 to the tires. You have more CI and better heads. The 3600 car I had went 7.1x in the 1/8 so 10.9-11.00 would have been realistic in the 1/4
I bet you are more in the 450 range with a car that will run 12.0's with decent traction.
Not only do the LS-series motors make power, they run clean, barely ever leak, they are STRONG, they are light, and they are surprisingly efficient. IMHO, these motors are the future of hot rodding. As such, I am committing to making such a swap into my own car, and will report the horsepower, MPG's, overall performance, and even the costs.
I am glad more people are realizing the benefits of these engines too. I dont' think I want EVERYONE
to think that yet......because then we wouldn't be able to score them as cheap as we can currently.
So it's good to let the purists stay purists for our benefit......for now until they
catch on to the new wave.
My 6.0L LY6 / T-56 is almost complete as we speak.
Finally got my new slave, and mated the trans and engine together yesterday.
Now it goes in. If you need any info on swaps, Gary's 68 did one already and I'm
nearly complete. He saved me a few $$ on some parts recommendations over what
I planned on using.
Sounds like you read Alockers Chevelle build thread over on LS1tech since you have just about
almost the same components and expectations. My guess is you're going to be closer to
low 12's easily if you can get the power down.
Alocker didn't do well enough at the track for traction IMO. He should have easily been in the 11's.
Another member with ~450hp put a 12.1ET down at the track on his first run. I want to say Stealth71.....
Last edited by Aceshigh; October 15th, 2011 at 10:32 AM.
Mike, thanks! Glad you liked the wagon, I have a lot of fun with it. There is a truck/suv race coming up, and I've been invited to run the wagon in it. We may put a small nitrous shot on it, and shoot for low-10's.
Richard, your numbers are actually pretty close to what I am "expecting" :-) The "goals" are just the minimum I'll be happy with.
Aces, I have not seen that build, thanks for the link! I think I'll do pretty well with traction, as the 455 even hooked up pretty well on the street. M&H drag radials. IMG_2462.jpg
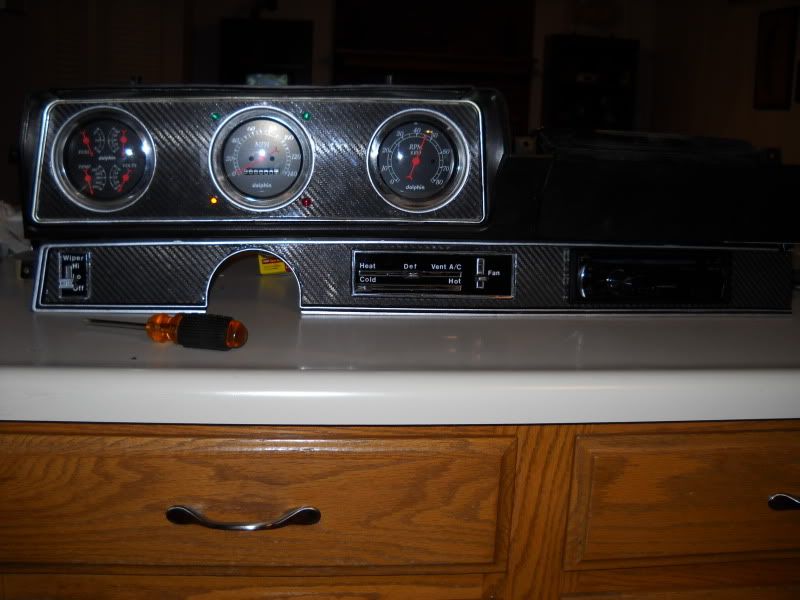
Here are the gauges I'll be using, "1969" series from New Vintage. Well, they are based on the 1969 series, but are semi-custom. All the gauges have domed lenses and the spun-aluminum hub covers. The tach and speedo that come with the 1969 are "10,000 rpm" and "160mph" - and I felt those scales were rather silly for this car/motor. So, the tach & speedo are actually 8k/140mph units from another series, but with custom faceplates to make them look like the 1969's. They are all back-lit, and since I was paying for custom faces anyway I had them add the yellow and red areas to the tach.
The fuel, temp & pressure gauges are all full-sweep "stepper motor" gauges. They do a little "self diagnostic dance" when you turn the car on. They also have a built in warning system that you custom set, where an amber backlight will start flashing if the reading goes over/under wherever you set it.
Last edited by Lee_A; October 15th, 2011 at 03:03 PM.
How about a few pics of the car.
Also, love the gauges, but doesn't you dash have the oil, temp, fuel in 1 gauge?
Gary, the original dash DID have the 3-hole combo set up. If anyone wants those gauges, make me an offer For about a decade I've been mentally designing a different gauge panel, made some mockups, priced different gauges, considered newer "combo" gauges, etc.... I needed an electronic speedo for the new engine/tranny, so this prompted me to go ahead and pull the trigger. Once the new panel gets here and I get the gauges fitted, I'll post pics.
I'm doing a "neighbor Wilson" with the car so far, I guess! You can kinda see it behind the Cutlass in the first pic. I'll post something in a bit
I'd REALLY like to see your next gauge bezel if you have one made.
I'm also going to be going aftermarket as well and I need a new gauge layout.
Originally Posted by LeeA
Here I have the light hooked up, so you can see the backlighting.
Next to impossible to see night time illumination in the daylight.
I'd like to see these in the dark to see how bright they could be.
I've been strongly considering the Autometer Ultra Lite II's.
Another thing I've noticed, is when you do a direct 12V hookup it's much brighter.
Then when you put it on the actual circuit, it gets less voltage and it's dimmer.
There's 40 years of corrosion built up in these old circuits and it increases attenuation unfortunately.
Been strongly considering rewiring my entire car with another American Autowire Highway 22 kit.
Link above has more pictures of the new dash panel/gauges. I still need to do some mods to the bracing behind the dash opening, and won't have much/any free time for the next few weeks.... Probably be December before this project is back on the road, realistically...
Ack, didn't notice Australia either.
I went with generic LEDs but would have liked the arrows, brake, bright, CEL insignia.
There are a few other options in this thread: http://www.pro-touring.com/showthrea...ash-indicators
Ack, didn't notice Australia either.
I went with generic LEDs but would have liked the arrows, brake, bright, CEL insignia.
Gary, I took your link and posted it on my Chevy forum.
There's a member there who runs a business making custom gauge faces.
He's got contracts with the guys who make the new Trans Ams.
Very cool. You know if someone made those emblems on a dry transfer sheet anyone could make very professional looking panels. I used dry transfer on my heater and wiper controls in the 442.
I've done dry transfer lettering on a lot of boat dashes too by sanding the surface with 400 grit, putting on the dry transfer letters, then clearcoating. They looked better than some original.
And I ALWAYS put a switch labelled "Ejection Seat"
Off topic (but hey, it IS my thread!) but here is the latest dyno chart for the Falcon station wagon (in the picture up above aways). Small block Ford that I built myself, and had the cam custom ground to my specs.
Very cool. You know if someone made those emblems on a dry transfer sheet anyone could make very professional looking panels. I used dry transfer on my heater and wiper controls in the 442.
I've done dry transfer lettering on a lot of boat dashes too by sanding the surface with 400 grit, putting on the dry transfer letters, then clearcoating. They looked better than some original.
And I ALWAYS put a switch labelled "Ejection Seat"
How do you do this stuff ???
You still have to cut out the very small letters don't you ?
If that's the case, it must take a VERY good eye and trained hand.
I'm curious because I would really like to have these symbols done. Any pics ??
The heater/AC and wiper controls on my 442 are white dry transfer over black.
Dry transfer are letters on clear plastic. Put it in place with the letter down, rub on the back of the plastic, letter is transferred. Clear over that, they're permanent. Light sanding helps with adhesion.
There are some symbols but nothing like brights, brake, etc
Last edited by garys 68; October 27th, 2011 at 07:52 AM.
I lost over a year's worth of progress when I took on some projects for others, which turned into nightmares. Got them straightened out though, and off the books!
1. The BRP mounts move the engine WAY back. Now, that does not cause ANY problems with the motor, but it DOES for the transmission.
I spent most of two days installing the motor/tranny, marking areas that interfered with the tranny, removing the engine/tranny, beating the ever-loving **** out of the tranny tunnel, RE-installing m/t, RE-marking areas of interference,.... I finally beat on the tunnel enough to start splitting metal. Ended up taking a cut-off wheel to the tunnel.... It now FITS!
I was so disgusted that I had to cut up the tunnel, that I basically walked away from the project for about 6 months.
2. The Heddman headers, which are designed for the BRP mounts, fit GREAT!! Nice smooth bends, THICK flanges, nice coating, great welds, MUCH better product than what I used to see from Heddman. But, I had picked up a slightly larger than stock Pro-Comp starter - it does NOT fit. I'll have to get a stock-sized starter.
I started to plumb the new fuel system, and happened to see the new "Tanks" fuel tank system. Has anyone tried this?? http://www.tanksinc.com/index.cfm/pa...rod/prd387.htm
I'm seriously considering getting this system, and selling off the external pump system I had bought!
A few weeks before the last "update", in 2013, I had been out jogging and had a "pop" in my hip. A few days after the same post, my son suffered major shoulder damage, and had to have major surgery to reattach tendons, remove debris, etc.
Since then, I had to have 3 major surgeries, including having both hips replaced (I just turned 50, and am in fairly good shape, btw). My son has had to have two more major surgeries to his shoulder.
With all of that, "car stuff" took a back seat. I sold the Falcon. A buddy took the Cutlass to his place, and has been working on it for me as he had time, as I just have not been physically able to do the work.
FINALLY, a few weeks ago, we were able to start it! Now, I've designed 40-something different LS cams since this started (one of the few things I've been able to do), and realized that the cam I put in my own motor is THE mildest of any I've designed/sold for LS's! The first dyno session had both the HP and TQ at the wheels being just a bit under 400. But the torque came up quick and early, and powerband is broad.
I'll probably design another cam for it, to take better advantage of the heads and intake, but will drive it as-is for awhile. It still is not ready for the street, but I'm finally able to work it again myself, and progress is being made.
Sorry to hear of your health issues. Glad to hear your back at it. Any new pictures?
Not yet, it needs a LOT of clean up! I'm hoping to take it for the first drive in YEARS next week, so we can work on the "normal driving" aspects of the tune. Once I have time to tidy it up a bit, I'll get some pictures
Well, my son has reinjured his shoulder, and I've got another problem with my hip... The car has not been the primary concern, BUT I've made some progress on it :-)
While at my buddies' shop, the car had to sit outside for much longer than expected, and it ended up with some paint/body damage. My friend hired another guy to help, and they made the body better than before, and we shot the new paint on Saturday.
We pulled off the old repro OAI hood (anyone on Houston want to buy it?) and installed a non-OAI hood from a 442. We'll let it dry for a week, and start putting it back together next week.
Lots of detail work to do, install the new gauges, neaten up wiring, door panels, etc... But drove the car home today, under its own power, and have it back in my garage!
Congrats been a long time coming. Can you post a couple pics of car , interior an engine when u get a chance? Nice collection in the driveway.
I'll probably be ordering the VintageAir stuff in the next week or so. Right now the interior is semi-gutted. The engine compartment is so-so, but I need to do a lot of cleaning and tidy-up the wiring and such.
I will probably have the engine compartment ready for some pictures soon, but the interior will have to wait a bit :-) As soon as I get them looking decent though, I'll post them.
DANG!!! I lost the old account somehow, just started this one. Dug around, and found this old thread of mine.
I had a second round of health issues & an accident after my last reply above (in 2016). Five more major surgeries, nearly lost use of my right hand (took about a year to regain use of it), wife changed jobs, kids got married, moved, flying to South America to take care of my dad's health issues, dad dying in S.A. .... the Cutlass was effectively AGAIN mothballed from '16 until last year.
Last weekend was the FIRST time I had the Cutlass sufficiently enough in working order to put some real miles on it. The wife and I drove 100 miles in it last Saturday. Took it to a small car show that a friend put on. The T/A belongs to a friend of mine. 28,000 original miles on it, 403 with 2.73 gears. Through the totally stock exhaust, including the original catalytic converter, it put 178hp to the wheels, and ran 15.4 at the track.
My son is now starting to appreciate the car, and has come over twice (an hour drive to my house from his) to help me work on it. As it had once been a project for my own dad and myself, I'm hoping this will now be a project that my son will be involved in.
I moved all your old threads and posts to this account. Glad you're still at it and motivated after all the setbacks.
Thank you Eric! Didn't know you could do that :-)
The motivation was gone for a long time. I got talked into a few projects for other people in recent years. Those ate up my free time, but DID serve to get me back into "car guy" mode
Until I found this thread, I did not fully remember just how long ago this project started. geez...
 October 14th, 2011, 03:50 PM

 It had about 46,000 miles on it at the time.


 My guess is you're going to be closer to


