Need some 70-72 Console Advice
 October 7th, 2014, 12:54 PM
#1
Registered User
Thread Starter

Join Date: May 2009
Posts: 1,452
Need some 70-72 Console Advice
So I took the console out of my car today because it's been a little loose and the lid is broken.
I don't have a ton of money to buy a new one, and I don't want to pay to ship it out and have it fixed, because at the point I might as well try and find a good used one around.
First Question: Are there supposed to be two, or three brackets to mount it to the floor? Fusick only shows 2 here(but I have two and it wobbles a bit): http://www.fusickautomotiveproducts....?number=CB7072
Secondly, What do I do about the broken console Lid? I though I could find/but the insert part, but it doesn't look like it can come out.
20141007_144909_zpsc8474066.jpg
The lid itself, and the hinge appear to be okay, albeit they have different sized screws, but that's easy enough to fix.
Third, there is a 'u shaped' brace near the front of the console which is plastic, and only attaches to the console(no hole for floor mounting) which has stamped 409521 into it. It's got a crack, and I'll probably just superglue it, but what is this for?
 October 8th, 2014, 09:22 PM
#2
Registered User

Join Date: May 2008
Location: Austin, Texas
Posts: 3,133
What, AS BEST AS YOU CAN DESCRIBE, do you mean when you say "the insert part"???
>Floor mounting bracket - The Fusick link shows 2 brackets...forward mount and rear mount. There is typically ANOTHER bracket used but the bracket is usually part of the regular auto floor shifter parts. It's a somewhat rectangular steel piece that attaches to the back of the shifter steel bracket. It travels rearwards and lines up (usually with a lot of test fitting) with the forward mounting plastic holes in the floor of the console glove box. Yes, it does add quite a bit of stability. I recently made one for a customer as part of an interior install job and I'll try to find one here that I can post pics of.
>Console door breakage - That is repairable but it's hard to describe. Basically you need to fashion/make a new plastic strip to replace the one that's broken off of yours (UNLESS you happen to have the broken off piece...in which case you can re-attach it). To re-attach the broken off strip you will have to get a bit ingenious....the console hinge is spring loaded and can put a bit of stress on this strip. Ideally, it should be plastic welded back in place. Some glues MAY (or may not)hold it well enough to withstand the stress but my bet is it will eventually break off again unless you REALLY clean the area well and use A LOT of glue....build up extra glue to really support the re-attached strip.
Another method of repair involves attaching the console door hinge to the OUTER console plastic....thus the broken off strip becomes a cosmetic piece that just hides part of the console hinge. Too involved to really describe here.
>Brace across front/underside of console - it's just that....a brace to help stiffen things up a bit. Yes, glue it, etc and you can cut some extra flat ABS plastic pieces to also GLUE OVER the crack to add further support. The number is just the GM part number for the particular part.
October 8th, 2014, 09:35 PM
#4
Registered User
Join Date: Feb 2013
Location: Phoenix, AZ
Posts: 13,755
I have this repair procedure archived somewhere. I can dig it up if Patton doesn't have it handy.
Last edited by Fun71; October 8th, 2014 at 09:38 PM.
October 9th, 2014, 09:54 AM
#6
Registered User
Join Date: Feb 2013
Location: Phoenix, AZ
Posts: 13,755
This is what I grabbed off ROP many years ago. I knew this would come in handy some day.
70post
Joined: 09 Mar 2005
Posts: 1393
Location: austin,tx
Posted: Fri Jun 02, 2006 8:52 am Post subject: Console Repair
________________________________________
Heres a couple pics...of an unbroken console.
The blue tape points to the areas where I drill holes in the outer PLASTIC WALL of the upper console. NOTE:On this upper part of the console the outer surface that you actually see (when the console is installed in the car) is vinyl covered metal....the plastic I drill into is BEHIND or UNDERNEATH this vinyl-clad metal. SO--you only want to drill the new holes in this approx 3/16 thick upper console plastic area AND NOT ALL THE WAY THROUGH THE METAL---otherwise you'll have holes showing on the outside The blue tape is stuck to the "approx 3/16" thick plastic" that I mention above.
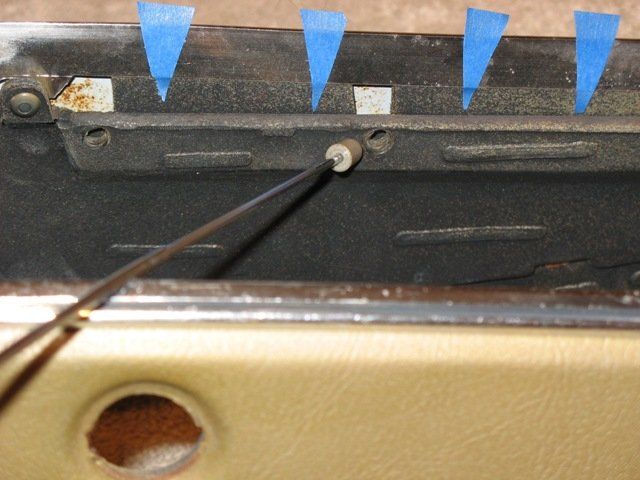
The grey pointer tip in the pic above is pointing to the piece that broke off of your console with the hinge attached....when you have remounted the hinge to the OUTER PLASTIC you can just glue this strip back into place to hide your repairs. You will probably need to clearance the backside of this snapped off strip so it will clear the heads of the screws that will be used.
After you have finished the repair you can glue or otherwise attach your original mounting screws into the 3 holes on the piece that the grey pointer is touching....that way when you look at it, it will look like the original mounting screws are still in place.
Using a drill : I don't know how much mechanical experience you have so just drill SLOW----drills aren't made for trying to break RPM World Records. Naturally, a variable speed drill is the way to go since you can keep it at LOW RPMs. You will probably have to drill at a slight upwards angle also unless you have some fancy right angle drill.
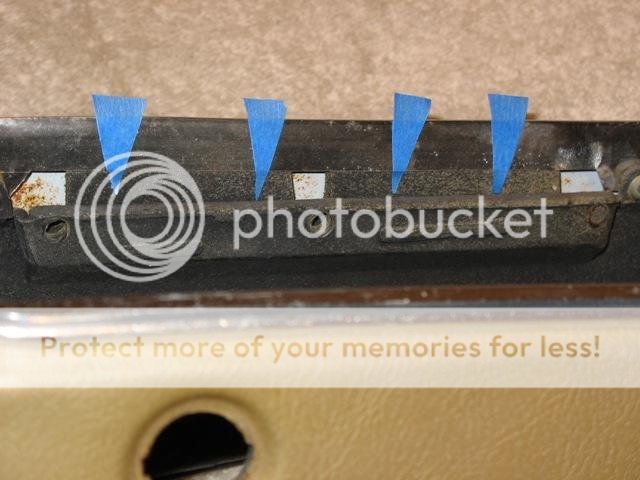
The pic below just shows the same thing...the idea is to hide the screws/new holes in the outer plastic down inside this channel. NOTE: You can see the vinyl-clad metal--the backside of it in the pics--it is the white metal with little rust spots showing through the clearance holes in the outer plastic...shown in three areas in the pics. Also--the gold part you see in the pic (where the hole for the console door latch is removed)is the vinyl/clad metal....the textured gold surface.
Finally--use 4 #8 x 3/8 SHEET METAL SCREWS to attach the hinge to the OUTER PLASTIC WALL- Paint the heads of these flat black so they won't be so visible once they are installed.
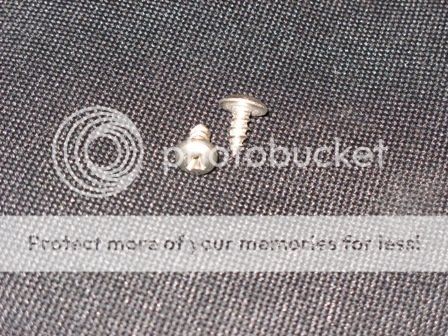
You will need to select a drill bit SMALLER than the #8 screw---then SLOWLY use the screw to cut the threads into to now-drilled outer plastic. GO SLOW!!!! screw it in a little and back it out....DON'T JUST screw it in one motion--you may stress and crack the outer plastic.
BEFORE DRILLING THE OUTER PLASTIC: You need to set your hinge in this area and mark it so you can drill new holes into the hinge. They need to generally correspond to the areas where the blue tape is pointing.
Take your time and find some patience....don't hammer on the drill and punch through or ding the outer vinyl-clad metal.
_________________
Patton Glade Austin,TX
Joined: 09 Mar 2005
Posts: 1393
Location: austin,tx
Posted: Fri Jun 02, 2006 8:52 am Post subject: Console Repair
________________________________________
Heres a couple pics...of an unbroken console.
The blue tape points to the areas where I drill holes in the outer PLASTIC WALL of the upper console. NOTE:On this upper part of the console the outer surface that you actually see (when the console is installed in the car) is vinyl covered metal....the plastic I drill into is BEHIND or UNDERNEATH this vinyl-clad metal. SO--you only want to drill the new holes in this approx 3/16 thick upper console plastic area AND NOT ALL THE WAY THROUGH THE METAL---otherwise you'll have holes showing on the outside The blue tape is stuck to the "approx 3/16" thick plastic" that I mention above.

The grey pointer tip in the pic above is pointing to the piece that broke off of your console with the hinge attached....when you have remounted the hinge to the OUTER PLASTIC you can just glue this strip back into place to hide your repairs. You will probably need to clearance the backside of this snapped off strip so it will clear the heads of the screws that will be used.
After you have finished the repair you can glue or otherwise attach your original mounting screws into the 3 holes on the piece that the grey pointer is touching....that way when you look at it, it will look like the original mounting screws are still in place.
Using a drill : I don't know how much mechanical experience you have so just drill SLOW----drills aren't made for trying to break RPM World Records. Naturally, a variable speed drill is the way to go since you can keep it at LOW RPMs. You will probably have to drill at a slight upwards angle also unless you have some fancy right angle drill.
The pic below just shows the same thing...the idea is to hide the screws/new holes in the outer plastic down inside this channel. NOTE: You can see the vinyl-clad metal--the backside of it in the pics--it is the white metal with little rust spots showing through the clearance holes in the outer plastic...shown in three areas in the pics. Also--the gold part you see in the pic (where the hole for the console door latch is removed)is the vinyl/clad metal....the textured gold surface.

Finally--use 4 #8 x 3/8 SHEET METAL SCREWS to attach the hinge to the OUTER PLASTIC WALL- Paint the heads of these flat black so they won't be so visible once they are installed.

You will need to select a drill bit SMALLER than the #8 screw---then SLOWLY use the screw to cut the threads into to now-drilled outer plastic. GO SLOW!!!! screw it in a little and back it out....DON'T JUST screw it in one motion--you may stress and crack the outer plastic.
BEFORE DRILLING THE OUTER PLASTIC: You need to set your hinge in this area and mark it so you can drill new holes into the hinge. They need to generally correspond to the areas where the blue tape is pointing.
Take your time and find some patience....don't hammer on the drill and punch through or ding the outer vinyl-clad metal.
_________________
Patton Glade Austin,TX
Last edited by Fun71; October 9th, 2014 at 09:57 AM.
October 29th, 2014, 02:17 PM
#7
It's a Cutlass.

Join Date: May 2014
Location: Colorado
Posts: 265
I found a different way to get mine to a reasonable condition. I was able to slip a screw and washer behind the console holes, through the hinge holes and got a nut on this side. I think this method is only good when you have more of the holes left on the console part, meaning good support for the washer. Anyway, it seems to be working so far.

Thread
Thread Starter
Forum
Replies
Last Post
jpaulwhite
Big Blocks
7
March 4th, 2011 04:14 AM
eddieunderground
Brakes/Hydraulic Systems
0
January 12th, 2011 06:32 PM


