dash trim
 July 10th, 2013, 10:39 PM
#1
Registered User
Thread Starter

Join Date: Mar 2011
Posts: 100
dash trim
I just went through hours of hell removing and painting my dash plus re-install. I will be resting for the rest of the day I think I need it. lol I need help with the little chrome trim that around the upper part of the dash pad. I have the little plastic ribbets that came with it be I need help installing it.
 July 11th, 2013, 12:56 PM
#3
Just an Olds Guy
Join Date: Jul 2008
Location: Edmonton, AB. And "I am Can 'eh' jun - eh"
Posts: 24,525
What Dan said ^^^. Just make sure that if you originally had dash trim on your dash pad that you DON'T use the same holes the old fasteners came out of. Once the little plastic barbs pierce the indent in the recess, they act much like a barbed fishing hook to keep the trim from coming loose. There is a good picture layout of the installation in the Assembly Manual.

July 12th, 2013, 09:40 PM
#5
Registered User

Join Date: May 2008
Location: Austin, Texas
Posts: 3,128
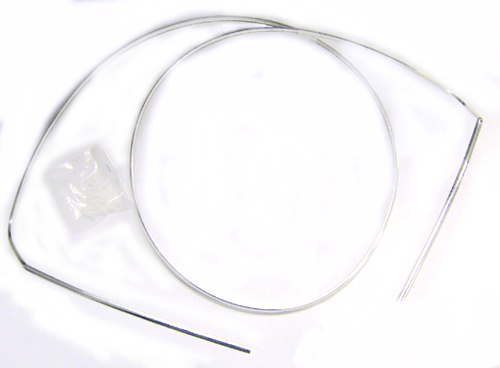
Pre-fit it first...the repro dash trim beads are typically made with some extra length on each "down leg". You will likely have to cut some off of each side.
I'd mark the middle of the trim piece and the dash and work outwards.
I'd mark the middle of the trim piece and the dash and work outwards.
 July 13th, 2013, 11:53 AM
#7
Just an Olds Guy
Join Date: Jul 2008
Location: Edmonton, AB. And "I am Can 'eh' jun - eh"
Posts: 24,525
Ted, the molding is reproduced (obviously) and is readily available from vendors like Parts Place, Fusicks, Year One, OPGI etc. I bought it from Parts Place if memory serves. The package comes with all the small T fasteners you will need.
Patton brings up a good point too! I might have been just lucky because the side trim on my moldings is just the right length. I will say that I was just a little apprehensive when I pushed those fasteners into my unmolested dash pad though.
On the dry fit? Use tape to hold the molding in the channel and also put tape strips where the fasteners will provide the best purchase (visual reference). All those fasteners have to be inserted from one end or the other and then slid down the channel to their final position. Only reason I mention this is someone somewhere is going to wonder how to do that. What's obvious to one person isn't always to the next?
Use this reference when searching for the part - Dash Bead Molding
From Parts Place:
(1970 - 1972 Cutlass/442) DASH BEAD MOLDING WITH CLIPS - MOLDED JUST LIKE FACTORY WITH CHROME PLATING $39.00
Same price at Fusicks, Year One is 'on sale now' for 51.00, OPGI 'on sale now' for 53.00 You're a smart shopper so you do the math and pick the best shipper. IIRC all these moldings are made by the same supplier?

Thread
Thread Starter
Forum
Replies
Last Post
oldspackrat
Parts For Sale
28
January 1st, 2015 02:39 AM
DJMatthews
Interior/Upholstery
9
December 12th, 2006 06:36 AM


