When you click on links to various merchants on this site and make a purchase, this can result in this site earning a commission. Affiliate programs and affiliations include, but are not limited to, the eBay Partner Network.
I had the same issue when I received the bottom rad hose for my 71 442 without air. Dave Jackson at Fusick tried to help me out by sending another that was trimmed down, but it still didn't fit properly over the inlet/outlets. I ended up reusing my old one as it didn't appear to be too bad once I cleaned it up.
This is one of those examples where I just don't get it. How basic is a rad hose, and why wouldn't a vendor who has been dealing exclusively in Olds reproduction parts sell a part that isn't correct after this length of time? The aftermarket made them correctly for at least twenty plus years, so how could this be possible?
Overall, Fusicks are great to deal with and with few exceptions I have been very pleased with their products.
Decided to replace the window cranks on my 72 cutlass. Looked around and saw Summit has Dorman window cranks for like 6 bucks apiece. Cool, since they are just down the road from me I bought 4 of them. Besides how complicated could they be?
Wrong, they didn't make the spline deep enough and they sit a good half an inch from the door panel. Looks like I am going to try other options.
Thanks oldcutlass, I did just that. If anyone else has this problem buy the hose # on the band in the pic. It is still too long but much shorter than the Fusick hose. Then take 3/4" off each end. Radiator hoses are hard to cut nice and square. It helps a lot to insert a socket into the hose while cutting, and use an Exacto knife as it is very thin. In the pic you can see I cut 3/4" from the top and 1/2" from the bottom but if I did it again I'd take 3/4" from both ends.
Ordered new one with Yukon part-number since i had to use my new as setup-nut, but received somehow Dorman Help!-product.
Some might have just used the "new" one with liberate amount of red loctite and call it a day, but i didnt want to.
The whole adventure with one single pinion-nut, after buying that crap Dorman, and sourcing out and ordering GM-original, ended up costing me 56$... Must be made of gold. Not sure do i want to laugh or cry?
Having american cars as hobby up there is already ridiculous expensive, but thats a joke! Btw, the OEM nut was cheaper up there than the Dorman..
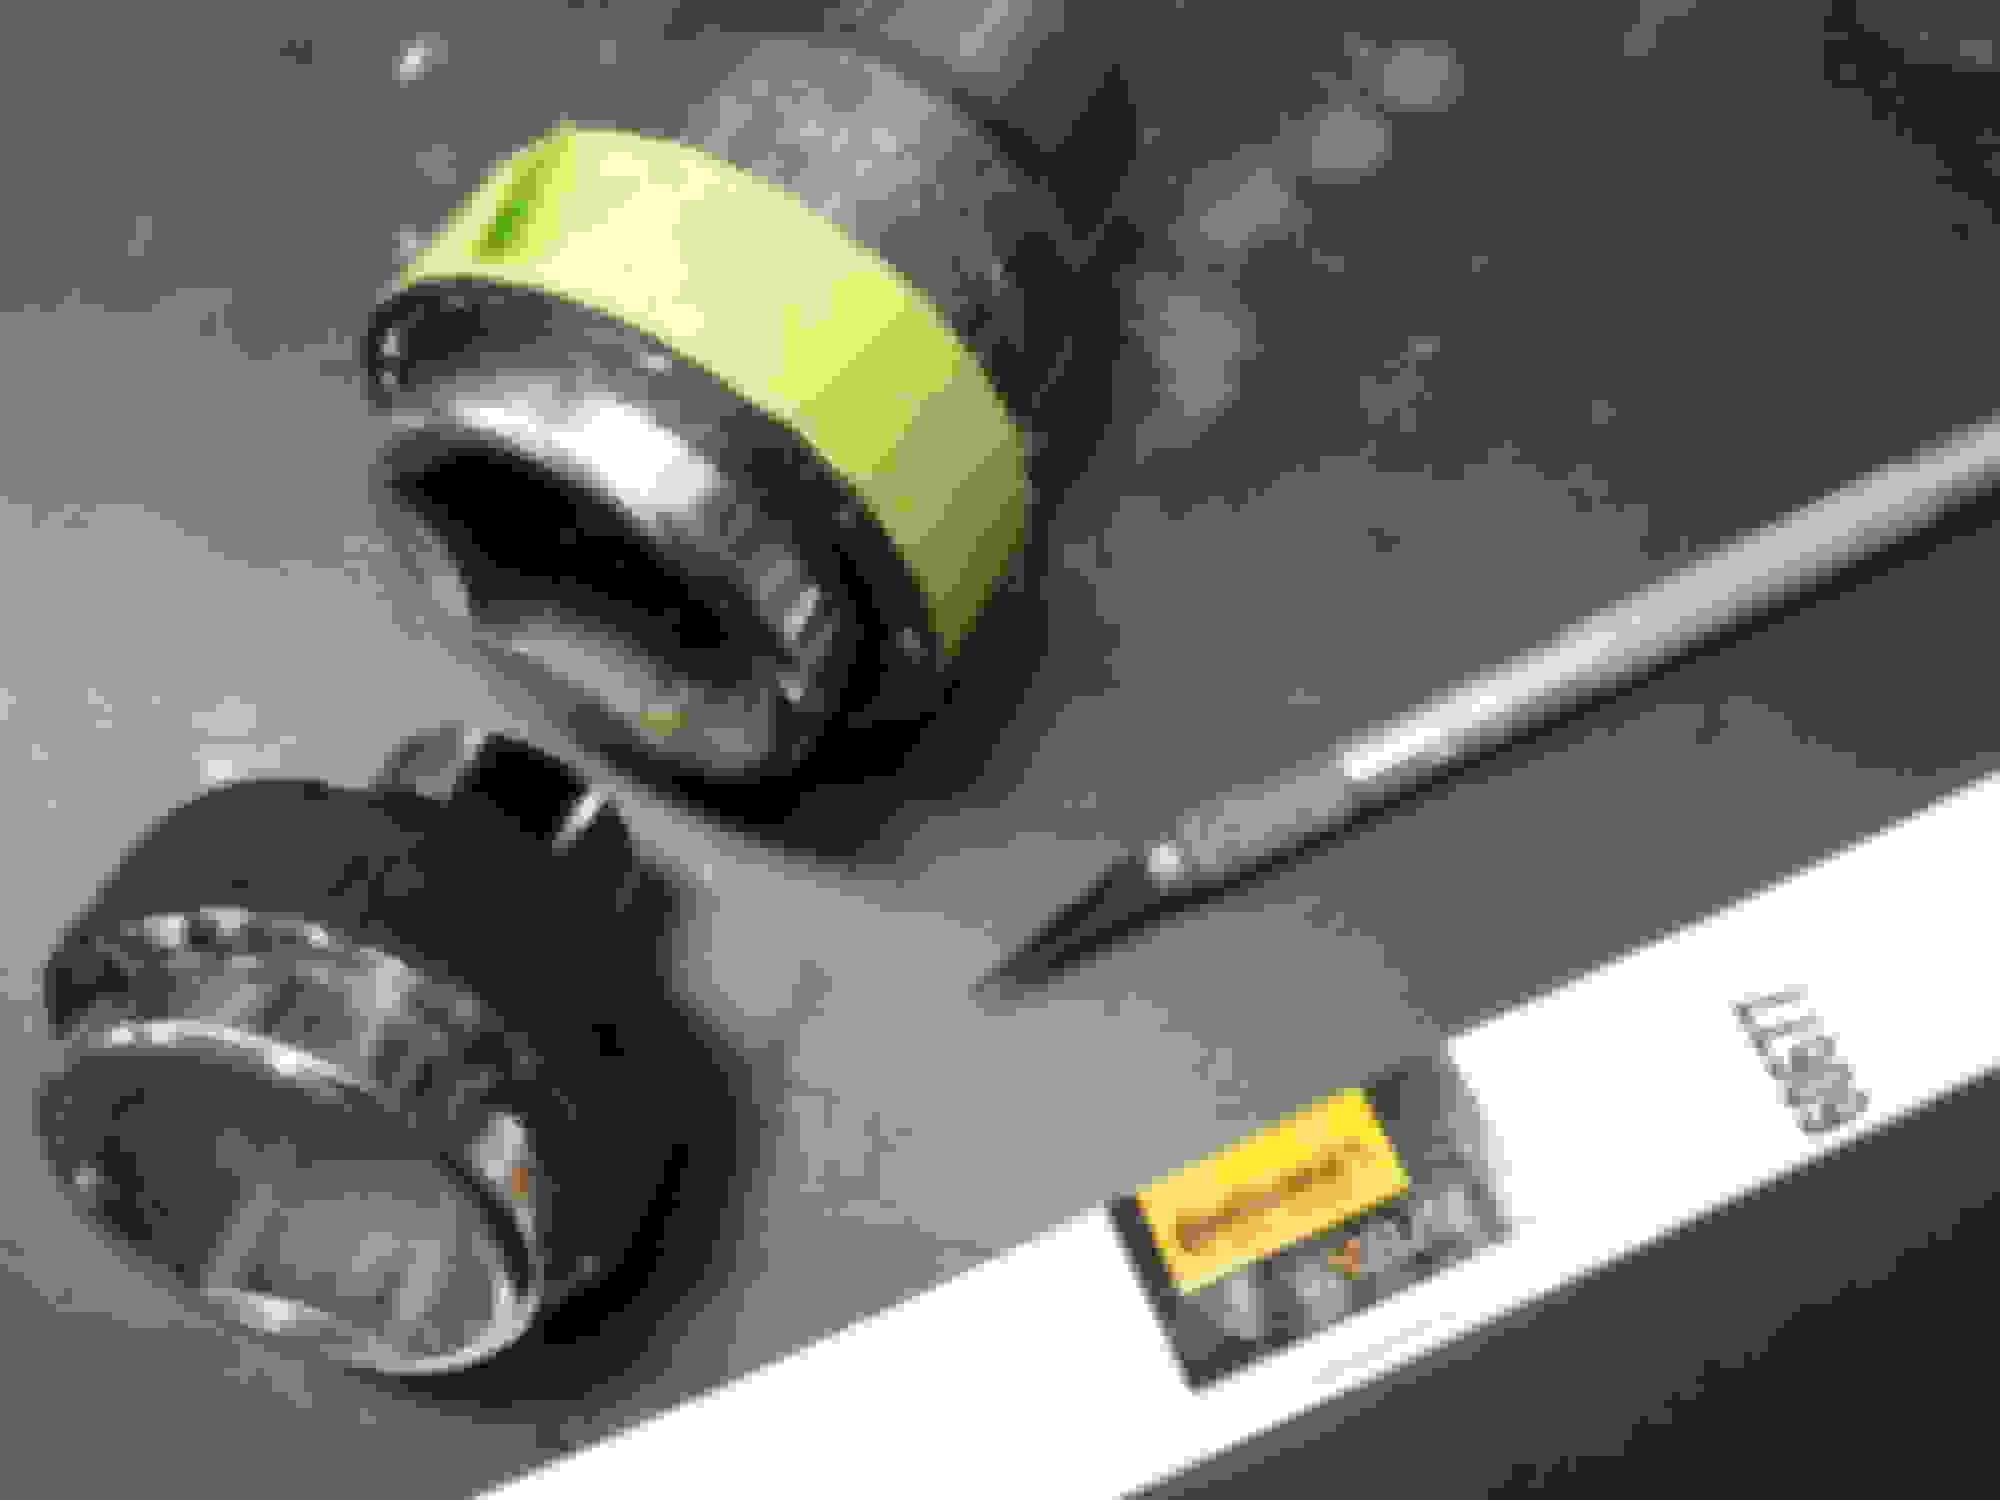
Well, just By the look i ditched the Dorman and dug out current OEM-part number and ordered it. Current OEM part-number is 88891763.
Dorman is 81053.
Pics:
Left is Dorman. Note the shape of the nut-end. It should be collapsible nut. Like the OEM.. Theres just two tiny marks of press on Dorman's nut end. Inside shape of Dorman is pretty much just round.
And notice thickness = amount of threads.
Gm is really really close, as close you can say its as thick as the radius of bolt, unlike the Dorman. Which should be the minimum if i remember correct from school, that nuts threaded thickness should be atleast the radius of bolt.
Also difference at socket size, OEM is 32mm, but Dorman is some weird size, 32.5mm??
I admit that i might be overthinking this, but i have really close to 2000$ at my rear now, i dont want to risk all of it just because of some stupid nut, especially when you can tell the difference between OEM and Dorman by blind eye.
Last edited by Inline; December 20th, 2016 at 03:42 AM.
Glove box liners, 70-72. I ordered a whole bunch of stuff from Year One at least 4 years ago when I had some spare cash. Just now got to where I could install some of the trim parts.
It simply doesn't work. Wrong shape. Some holes have retainers that should just be holes, some are just holes that should have retainers.
Year One's is made by "Repops" (there was a smaller brand printed on it).
As usual, Fusick's fit perfectly. They use REM.
Ordered this a while ago. Just got the motor in about 6 weeks ago and put about 900 miles on it. The original was a little pitted so I decided to try a new one. It's leaking from the tube pressed into the housing. It's not leaking a lot but experience has taught me small leaks leaks turn into big leaks later on. Dug out my original, blasted it & started painting it. With any luck I'll swap it out later today. I'm trying to take this car on a trip to VT and strangely, don't want to break down. Ran to RI about 2 weeks ago and ran perfect. Plan on doing a lot of long distance cruising this month. First summer vacation in years. Just goes to show you don't fix what ain't broke.
Thanks oldcutlass, I did just that. If anyone else has this problem buy the hose # on the band in the pic. It is still too long but much shorter than the Fusick hose. Then take 3/4" off each end. Radiator hoses are hard to cut nice and square. It helps a lot to insert a socket into the hose while cutting, and use an Exacto knife as it is very thin. In the pic you can see I cut 3/4" from the top and 1/2" from the bottom but if I did it again I'd take 3/4" from both ends.
Great tip for cutting hoses Rocket guy! Let me add a couple to the list of parts not right. Door lock **** ferrules from Fuicks aren�t even close to correct for 66�s. If you get ones for a �64 Impala it is exactly correct. The last one is drip rail moldings from Fusick�s for �66. They were made by a company called CHL and no matter how hard I tried, they were 1/4� short of fitting. Fusicks returned them. I later got some from Dynacorn for Chevelle and they fit very well.
67 fan shroud from OPGI, what a cheap piece of crap. Paper thin fiberglass, too small to even be effective, no way to attach it. not to mention $200.00. I would not recommend it, I returned mine.
Putting the hose clamp on the hose and using it as a cutting template/guide works well too if you don't have a large socket. Then use a die grinder with a sandpaper disc to dress the cut end.
I will look over my Gates hoses, hopefully they are close. My beef is electric fan controllers. The thermal switches and relays fail often. I think I have been overloading the relays. I bought a Hayden fan controller with push in probe. I thought the probe was bad, jumpered to bypass the probe, the relay just clicked, brand new! Either way, I will not run electric fans without a drect wired toggle switch with an in line 30 amp fuse to bypass the controller completely.
PVC cutters like this should work well for cutting the radiator hose. I use them to cut various tubing at work and it leaves a nice straight even cut. Available at Ace hardware and Graingers.
Motorcity SuperCars Olds 350/455 COLOR vacuum hose set https://www.ebay.com/itm/1970-Olds-O...53.m2749.l2649 comes with ALL WHITE striped hoses, and they apparently used spray paint to make the lines, as they are brittle and will crack and flake dried paint all over your engine when actually used. No comparison to the original hoses at all. Very disappointed....
I have found that most repop engine compartment decals are crap, they won't stick and they fad the first time you wash anything, I've gotten them from several places and all seem to be the same poor quality, Fusicks 65 tail lenses fit quite poorly for $200, Legendary's carpet samples doen't match there carpet and don't get anything from NAPA it's all Chinese junk that is inferior or just plan old doesn't fit, had a bad water pump, bad blower motor, water neck that wouldn't fit, starter that flat out exploded, twilight sockets that won't fit, guess I'm an idiot for going back time after time.
There are many more but can't remember them all.
I'm not sure how to respond to the NAPA comment. "Back in the day" I would have agreed with you 100%. But now, compared to O'Reilly, Autozone and the like, NAPA is considered good. The bar has sunk to unbelievably low levels!
Listed as "1970 Oldsmobile W-27 Alum Axle Rear End Cover Bolts 12pc OEM NOS" the bolts are a full 1/4" too long and will bottom out in your differential housing far before they snug your W-27 cover up to the gasket surface. I couldn't find a supplier that had a similar bolt on short notice, so I ended up grinding the ends of each bolt off to match the length needed (3/4") and hand filing to make them work. I sent them a note via eBay to let them know, but who knows if they will change anything in their inventory. I've let them know about previous parts, and they just replied with a "not our problem" email....
BSeig: those bolts are not only too long but they have serrated heads which I don’t think are correct. The serrated heads will dig in to the aluminum cover too much. Also the head markings are wrong. They are just hardware store bolts. You can buy the correct bolts from AMK or Heartbeat City, they will be for a 12 bolt Chevy, but they will be the correct bolt with the correct head marking. Then you will have to have them zinc plated. A lot of work but if you want the right bolts it’s what you need to do
Last edited by Fpcopo; July 18th, 2018 at 09:55 AM.
BSeig: those bolts are not only too long but they have serrated heads which I don�t think are correct. The serrated heads will dig in to the aluminum cover too much. Also the head markings are wrong. They are just hardware store bolts. You can buy the correct bolts from AMK or Heartbeat City, they will be for a 12 bolt Chevy, but they will be the correct bolt with the correct head marking. Then you will have to have them zinc plated. A lot of work but if you want the right bolts it�s what you need to do
GREAT info, thanks. I found serrated head bolts when I removed the stock steel cover, so I didn't think anything of it, but I'm guessing you're right about that. The head markings are just standard Grade 5 markings. How they sell these as "NOS" is beyond me. I appreciate the lead on getting the right bolts - I don't have an original cover, but one of the early repros. I just like things to be as "right" as I can make them. Why not?
not a fan of any of those stores. The lack of knowledge behind the counter can be frustrating for a guy like me that needs some questions answered sometimes. Now I use sites like theses and I get what I can from rock auto. I like their site and their prices.
So I see Rocket guy had the same issue I did. While playing with the front end I noticed the lower hose was taking a beating from the Idler arm. Mostly because I never trimmed it. I ordered a new hose from Rock Auto and that was way off from the one I put on last. I trimmed about 3/4'' off the water pump side and about 1-3/4" off the radiator side.
I've given up on molded lower hoses. Seems all the suppliers changed the molding some time in the past 10 years and none of the current ones fit well at all. I use the generic-fit 16" flex host (gates 26502) BUT I also have a Be-cool radiator with a 1.75" outlet.
The lone exception being the L shaped full-length T-Stat bypass hose. It's too thin. it fits but you cant use factory double wire style clamps as they bottom out before fully compressing the hose. I have yet to find smaller clamps or thicker hoses. I was forced to use an old but pliable take off bypass hose that's gotta be 35-40 years old. The thinner hose expands and contracts when at temp with RPMs like its breathing. The old skool hose doesn't move.
All upper and lower hoses old or new required some trimming to get that show car look. Especially for clearance on the idler.
Cant comment on OEM or NOS fit.
As far back as the late 70s, I've had to trim molded hoses on various applications to get a "craft fit" Better long vs short .
The repro 8 track tape player housing leaves a lot to be desired. Made by The Parts Place I believe.
The biggest issue is that the player can't slide far enough into the housing so that the button and tape door opening protrude through the wood grain plate as far as they should. The result is that the raised lip around the tape door opening winds up recessed in the opening of the wood grain plate(or silver on 68s) instead of protruding slightly.
On the one I've seen, I believe the issue is with the bosses for the **** shafts. The plastic is too thick at the **** shaft holes. The fix for that would be to sand down the back side of those bosses so the player can slide in further. However, if you sand enough off to put the player where it should be, the remaining plastic at the holes would be very thin. So you would then need to make two plastic washers or fillers to install on the front side (inside the **** shaft recesses). The only other thing you'd need to do then is sand down the screw boss on top pass side of the plastic housing, again, so the housing can slide further forward. The following doesn't affect function but I found it incredible that they spent thousands of dollars to have the injection mold made and the brackets reproduced but then just used common pop rivets to install the brackets instead of sourcing the correct painted head semi-tubular rivets. If i found a source, there's absolutely no reason why they couldn't. Another thing, though I don't think most people even realize this, is that the grain or texture on the 68, and I think 69, plastic 8 track housing is different than the grain/texture on the 70-72 housings. As far as I know, the reproduction housing is ONLY made with the 70-72 grain/texture. The contour of the upper sides of the housings are different 68/69 compared to 70-72 as well. So I guess I'll be repairing broken original 8 track housings for people a little longer.....
Last edited by W70442; April 30th, 2019 at 02:54 AM.
Someone on this site re-manufactures them. I can't remember his handle but his title was "Get your Gauge..." sorry can't remember the rest.
That would be me. That's why, in the last line of my post, I said "So I guess I'll be repairing broken original 8 track housings for people a little longer....."
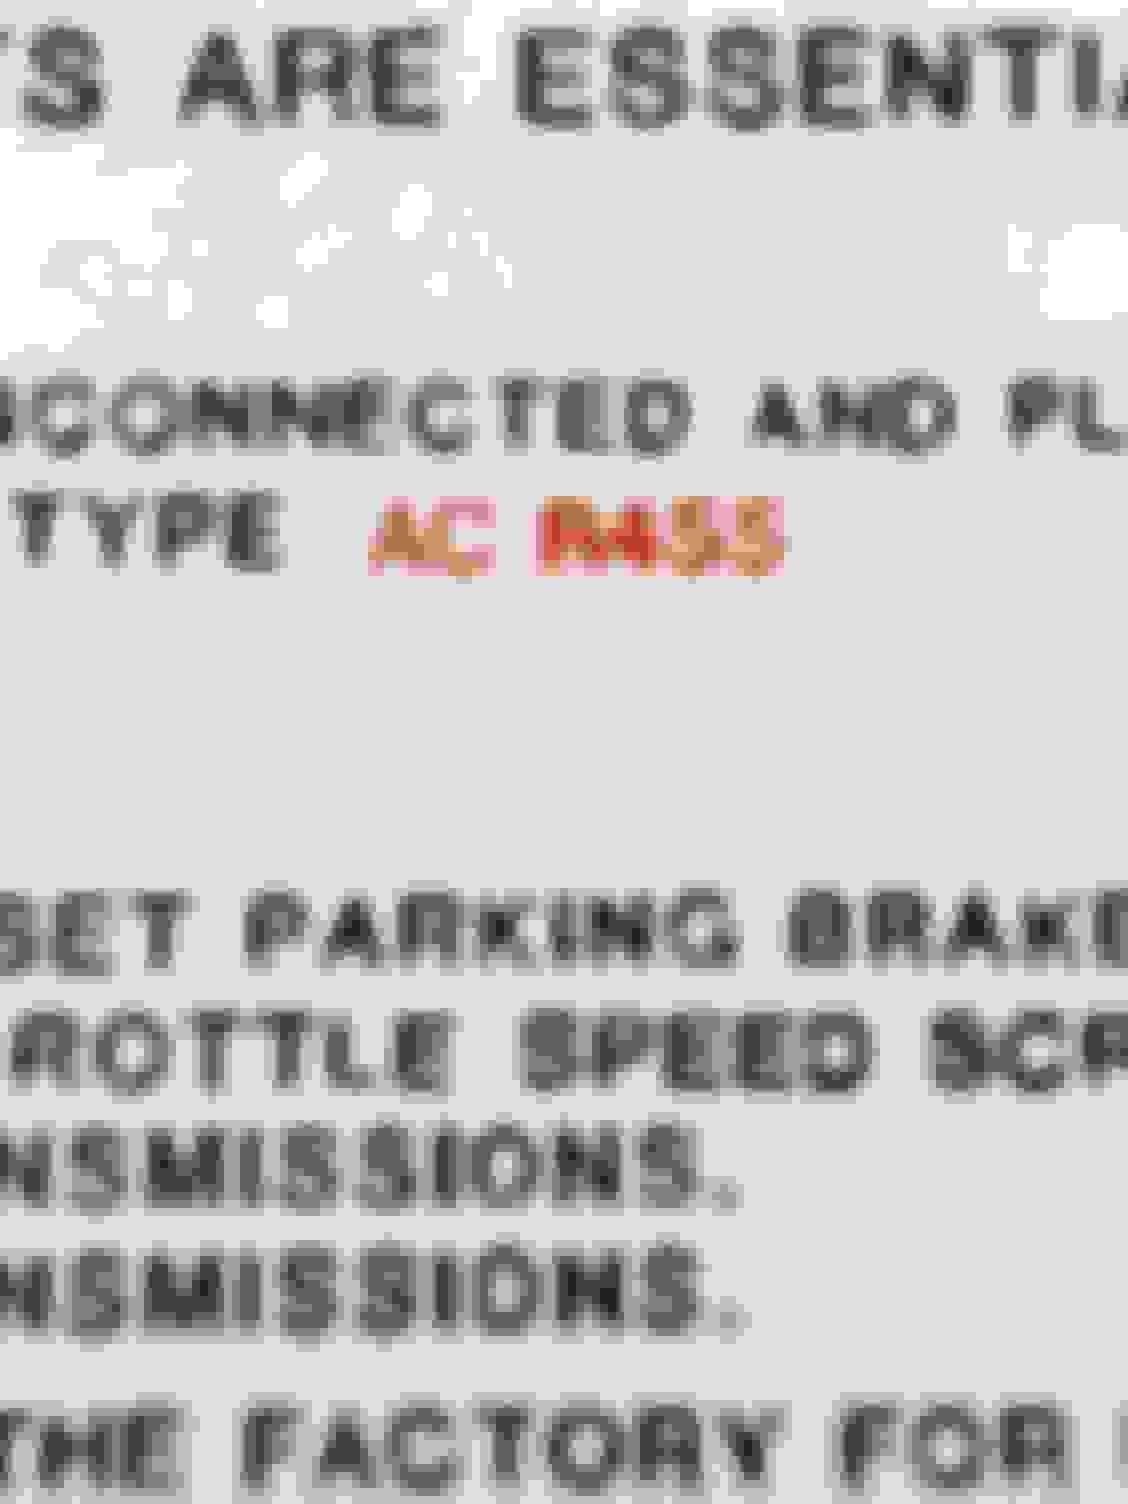
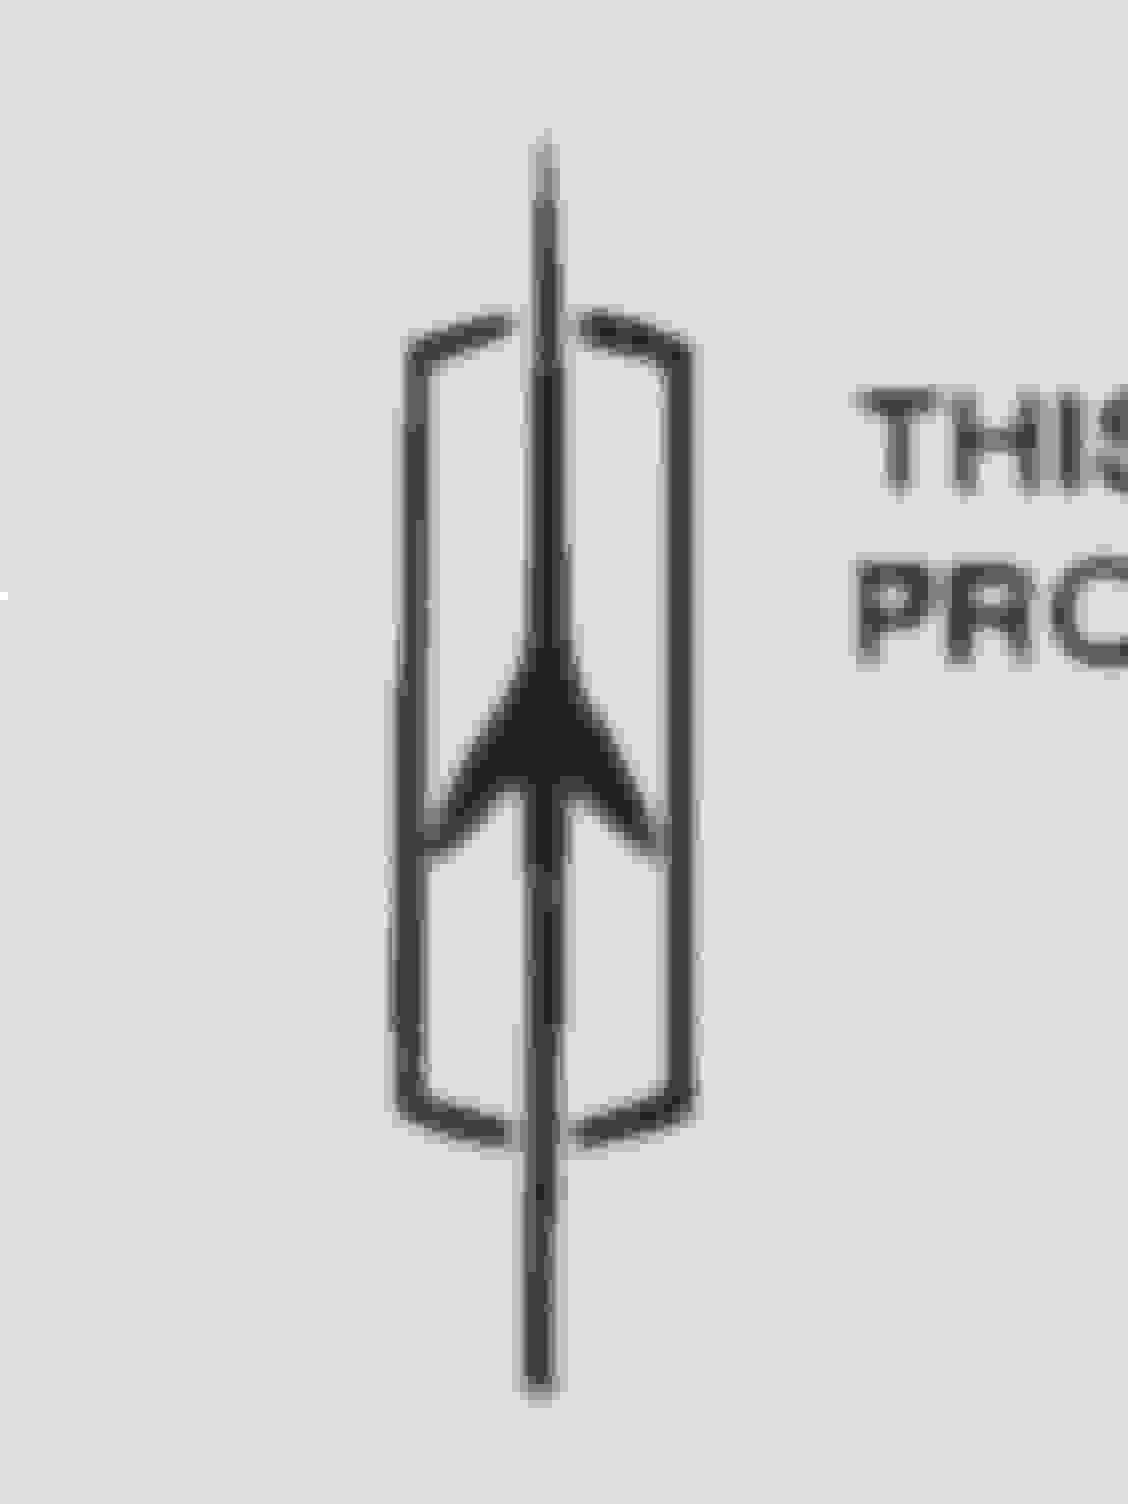
So I just got a new tune up decal from Fusick that was supposed to be for my �70 Rallye 350. As I understand it, the plug recommendation for my car with the OAI is an R43S, so I�m expecting the proper plug to be printed onto the sticker they sell, since they advertise it specifically for my car. Not only does it not show �R43S�, it actually has printed �R455� - oh, boy. As a secondary issue, it looks like the printer went into 480i mode when it started printing these, as the clarity and preciseness you would expect is FAR from acceptable.
Fusick did refund my money promptly, but the hope is that they make corrections to this decal.
Last edited by BSiegPaint; May 10th, 2019 at 08:11 AM.
Funny I was just talking to my buddy over the weekend and we were discussing the difference between my 69 Chevelle and my Cutlass. He was under impression that it was the same car. WRONG very different. When restoring Chevelle everything usually fits right out of the box not the case with the Cutlass
Nothing fits right on the Cutlass and everything needs some modification, while sometime those challenges are fun most of the times they are annoying and time consuming.
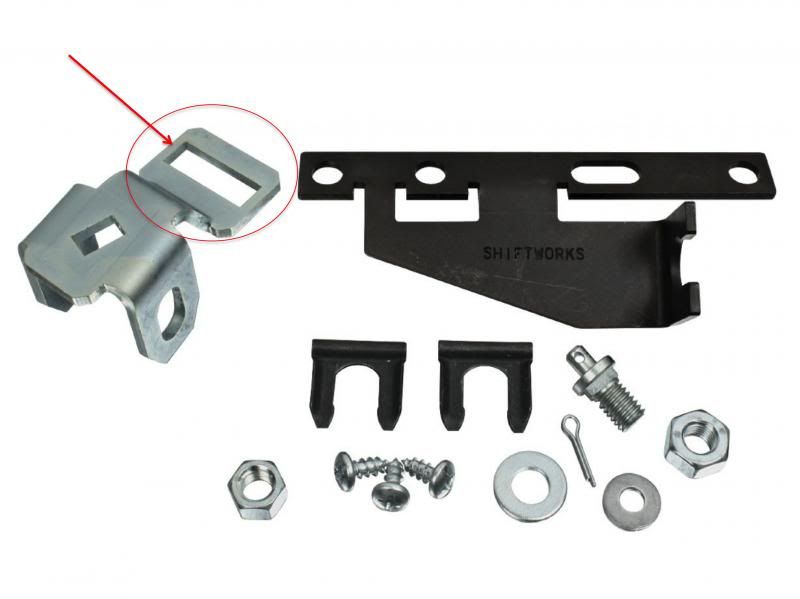
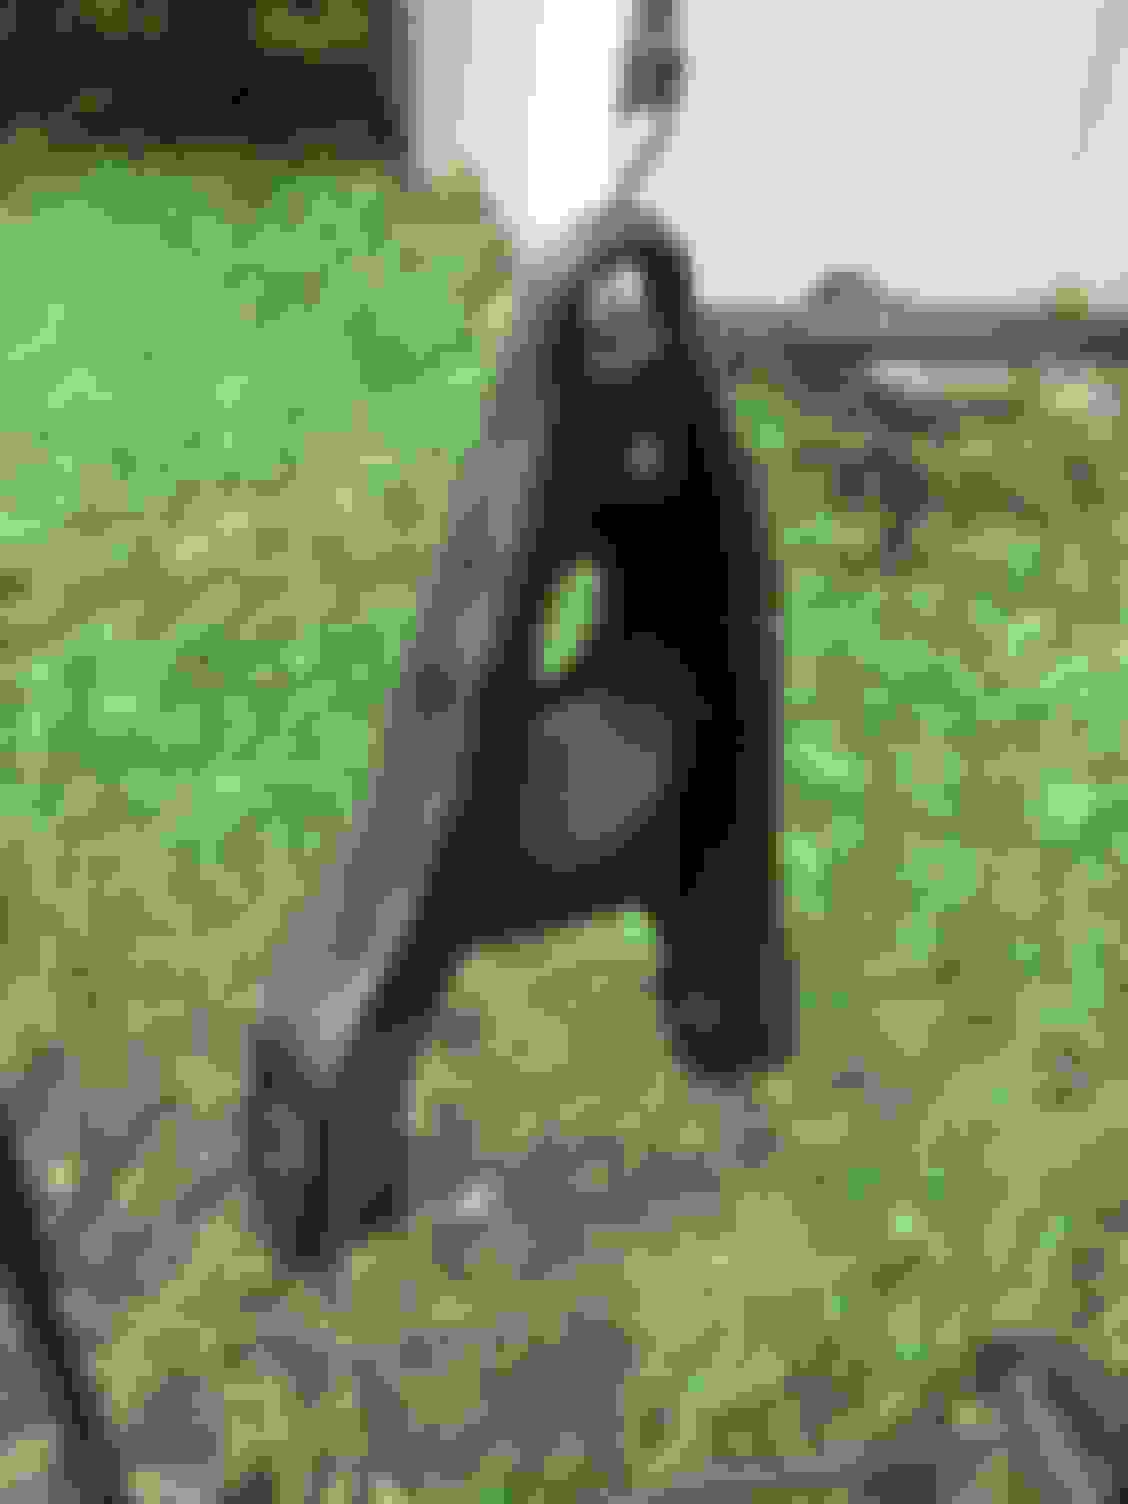
The latest is a Cable Shift Conversion Brackets for Floor or Dual Gate shifter conversion from OPGI. Part #C351. First of all these brackets are not for Olds but for Chevy so In picture below I circled the part that needed modification. When installed as is it will not shift into Park or 1st gear. I had to cut and weld a piece that extended the slot about 3/8" so it can be adjusted to shift through all the gears.
[IMG]
When you modified the link, did you add the 3/8" to either end or in the middle of the slot?
Bought a replacement left side LCA from southwest speed out of fort smith Arkansas - i pushed in the bushings and the coating instantly cracked and peeled - I ground it down and painted it myself - then I pushed in the ball joint and couldn�t get the grease boot to seat. - then I compared it to he oem right and the original oem left and turns out the �cup� the ball joint presses in was cast too shallow compared to the oem - spoke with southwest speed and got the �circle talk� for 38 minutes - they get to keep my $ and I get to scrap their junk control arm - I�d avoid doing business with them and at the very least avoid this part Southwest speed representative commented that the bushings need to be pressed in gently - I thought I did a pretty good job - coating still flaked Removed crappy coating Repainted Boot wouldn�t sit flush with CA Oem ball joint seated - notice depth of cup Southwest speed repo - notice shallow cup - ball joint presses to far through for boot to sit properly - southwest rep claimed it was made by Dana Southwest speed repo on left - oem on right - notice front facing (most noticeable) part of CA�s profile is different - oem has a quick drop down on front edge - repo is straight
Need upper and lower control arm kit for 1971 Cutlass Supreme convertible
Wondering if anyone has experience with a vendor who offers control arm kits or all the parts needed to replace both the upper and lower front control arms.
I found a kit on parts geek but when my mechanic went to install it it turned out the lower control arms were too short. They were awesome and allowed a free return with no issues.
This might be stating the obvious, but most of those hose fitment issues spring from the aftermarket manufacturers of replacement hoses (Gates, Dayco, Goodyear) discontinuing the original design hose, and "consolidating" the application with another part number that still has some significant demand. I' m pretty sure the Olds specialty houses then buy them in bulk and have the OE style part numbers and markings painted on them.
Wow - the power seat brackets sold by OPGI, Parts Place and whomever else are total junk. They in no way approximate the correct fitment to the floorboards, and significant modification is needed along with some good welding skills. GET THE FACTORY BRACKETS for your power seat swap - there is no substitute for the right parts.
Factory left side driver's seat bracket:
OPGI brackets:
It's best to reuse the right side or simply weld a bolt where the forward rear hole is.
The left side must be bent many different ways, and the rear legs absolutely have to be broken off and new pieces welded in their place for the bracket to fit - you can see I reinstalled the right side factory bracket after moving the stud forward. The replacement part wasn't used at all.
Bottom line: Do NOT waste your money on these brackets unless you have the time and skills to fabricate a new bracket out of what you've just been sold. Do what you can to find an original part.
Wondering if anyone has experience with a vendor who offers control arm kits or all the parts needed to replace both the upper and lower front control arms.
I found a kit on parts geek but when my mechanic went to install it it turned out the lower control arms were too short. They were awesome and allowed a free return with no issues.
 November 19th, 2016, 04:15 AM


 .
.

")