1955 Olds rust repair job.
 December 14th, 2015, 02:27 PM
#1
Registered User
Thread Starter

Join Date: Jan 2008
Location: Melbourne Australia
Posts: 206
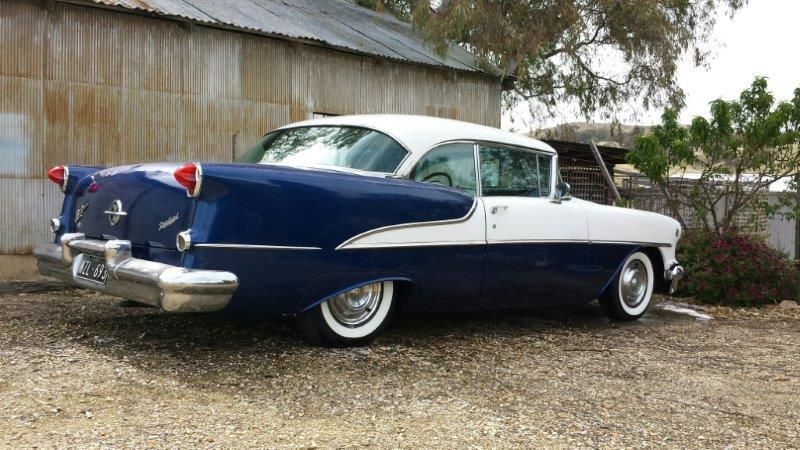
1955 Olds rust repair job.
My olds was showing signs of rust coming out under the paint. the rear quarters behind the door were not looking good and then a bubble started to come through on the door. I nursed the thing along for another year or two and decided to take some time off in November to try and sort it out.
Problem I have with this car is it is my every day driver. So anything I do that takes more than 2 days must be well planned and have contingencies for stuff ups or unforeseen issues.
I got the paint colour matched prior to pulling it down and also made a template of the body curve to get some steel rolled as a patch panel. Body work is my least desirable car related job. I can do it, but I know I'm not that good at it. Anyway. to get it done in the 10 days I had and to a level I was happy with I knew I'd have to tackle it myself.
Anyway I live in Melbourne on a standard house block and while thats all good and I have shed space, I decided to do this up the farm where space wasn't an issue nor was making noise to 1-2 am. which we did for about 10 days straight. we worked from about 7-8 through to after midnight all nights. but it was worth it in the end.
anyway. photos. everyone loves photos...
Before.
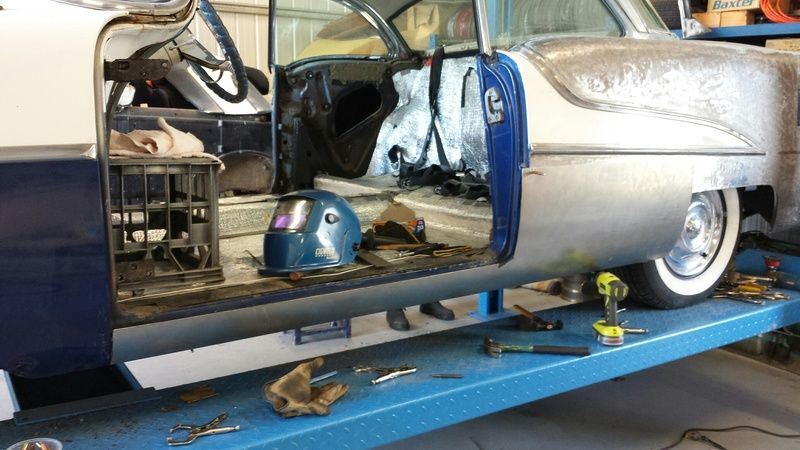
Pull the interior out and start stripping
My father was helping me and we started out with paint stripper. this was abandoned as a joke after it took all morning to get to this stage on a door alone.
stripping%20door_zps8j5jynhp.jpg
So we went for stripper discs on a grinder to start , the body had many layers and it was hard going.
stripping_zpsaenhp1we.jpg
it seems there were some less than desirable fixes on the car, as you expect, however while I knew there was some bad stuff there I found some that was worse than I thought and some that wasn't as bad as I expected.
2_zpskrxo5mjr.jpg
1_zpsojusxr9z.jpg
the pass side was really full of bog and the dog leg nearly non existent. this worried me.
bog_zpsuxtsji0m.jpg
stripping%20car_zpsh7pbyrts.jpg
drives side
stripping%20car%20ds_zpsy4nlzioi.jpg
pass%20f_zpstz4dmitj.jpg
pass%20front%20fender%20_zpsu0yukgqy.jpg
Problem I have with this car is it is my every day driver. So anything I do that takes more than 2 days must be well planned and have contingencies for stuff ups or unforeseen issues.
I got the paint colour matched prior to pulling it down and also made a template of the body curve to get some steel rolled as a patch panel. Body work is my least desirable car related job. I can do it, but I know I'm not that good at it. Anyway. to get it done in the 10 days I had and to a level I was happy with I knew I'd have to tackle it myself.
Anyway I live in Melbourne on a standard house block and while thats all good and I have shed space, I decided to do this up the farm where space wasn't an issue nor was making noise to 1-2 am. which we did for about 10 days straight. we worked from about 7-8 through to after midnight all nights. but it was worth it in the end.
anyway. photos. everyone loves photos...
Before.
Pull the interior out and start stripping
My father was helping me and we started out with paint stripper. this was abandoned as a joke after it took all morning to get to this stage on a door alone.
stripping%20door_zps8j5jynhp.jpg
So we went for stripper discs on a grinder to start , the body had many layers and it was hard going.
stripping_zpsaenhp1we.jpg
it seems there were some less than desirable fixes on the car, as you expect, however while I knew there was some bad stuff there I found some that was worse than I thought and some that wasn't as bad as I expected.
2_zpskrxo5mjr.jpg
1_zpsojusxr9z.jpg
the pass side was really full of bog and the dog leg nearly non existent. this worried me.
bog_zpsuxtsji0m.jpg
stripping%20car_zpsh7pbyrts.jpg
drives side
stripping%20car%20ds_zpsy4nlzioi.jpg
pass%20f_zpstz4dmitj.jpg
pass%20front%20fender%20_zpsu0yukgqy.jpg
 December 14th, 2015, 02:27 PM
#2
Registered User
Thread Starter
Join Date: Jan 2008
Location: Melbourne Australia
Posts: 206
First cut has to start somewhere...
so may as well make it a big one.
first%20cut_zpsmvdkhyt7.jpg
inner sill repair
inner%20sill%20repair_zpsifpmn8s2.jpg
20151116_184729_resized_zps2jivptzv.jpg
I didn't take as many photos of the process on the pass side more on the drivers side.
marking out where I was going to cut to.
ds%20r_zpshltvh3l0.jpg
ds%20inner%20and%20outer_zpsicpdqeyl.jpg
ds%20innersill_zpsrhkhenb7.jpg
inner%20sill%20repair%20ds_zpsmunlc67c.jpg
ds%20inner%20repair_zpshmouehyp.jpg
previous quality repair
quality%20work_zpsykc0idbo.jpg
December 14th, 2015, 02:28 PM
#3
Registered User
Thread Starter
Join Date: Jan 2008
Location: Melbourne Australia
Posts: 206
Right about now I was lucky that a mate turned up to have a look, he knew I was going to be up and about doing this and he’s a qualified welder, I was lucky enough that over the next few days he was in and out and helped. He also welded in the patches as he’s much better than I am at this stuff. I was planning on doing it, but was more than happy to leave it to him. He has nearly completed a massive project of rust repair on a ’55 buick so he was more than familiar with this stuff. He kept saying how good mine was, while I kept looking at it thinking I had bitten off more than I can chew.
As we were working together on the pass. Side I didn’t take too many photos of that side. He left late and the next day I started on my own on the drivers side so I took more photos of that.
Roughed in on the pass side. These patch panels went on and off to may times to count.
20151116_232942_resized_zpsqqgxm6us.jpg
Starting mocking up on the pass side
ds%20rolled%20panel_zpskbvvxz1g.jpg
20151117_172223_resized_zpsqwxkqwtd.jpg
The hoist is a huge help with this work. Getting the car to a height that’s easy to work on.
Time to trim the patch panel. I got the sheety place to make a 8x4 patch. I stuffed up on the first one and then redid a template, they put a crease in that one so it had to be redone again. This of course ate into my time as they are a good half an hour away, so backwards and forwards to Bendigo usually meant the morning lost in getting supplies.
rolled%20repair%20panel_zpsbhmkroke.jpg
template%20for%20repair%20panel_zpshrgjf4ic.jpg
Cleco’s were used to hold things in place, they made it easier and also made sure that the panel went back in the same spot everytime.
Neil doing some final welding on the inner repairs.
20151118_170237_resized_zpswuapbh5f.jpg
welding_zpsk8kquyqg.jpg
The drivers side patch tacked in.
ds%20tacked%20in_zpsrbyikesd.jpg
ds%20final%20weld%202_zpsfojhvrus.jpg
ds%20welded_zpspvrjffhu.jpg
December 14th, 2015, 02:29 PM
#4
Registered User
Thread Starter
Join Date: Jan 2008
Location: Melbourne Australia
Posts: 206
Prep for paint, using a stripper disc on a buff.
prep%20for%20paint_zpsd2t62lio.jpg
prep%20for%20paint%202_zpsvzumvhkt.jpg
Masked and ready.

masked%202_zpsurbqg8qm.jpg
Sealer on.
sealer%20on%202_zps9rscuman.jpg
Back together and on the road.
olds%20finished_zpsoo6p5bag.jpg
finished%202_zpsmetm5vpb.jpg
So really to anyone looking at the car would think it looks like a pile of crap with dents and rust repairs showing. However I’m happy as what I see I know is good. Previously I was nervous as to what was under the paint. Now I know it’s all good as such. So next phase will be get the dents beat out and then ready for paint. Being a daily driver this might not happen for a while.
I didn’t take photos of it, but Swifty has a body guy come once a week to work on his coupe and he helped out one night and that dog leg on the pass side, he hand made out of the patch I had got rolled. I didn’t even know he had done it but man was it a relief as I wasn’t sure what was going to happen there and it scared me some. But in the end, I met my deadline and got the car back on the road for family service and now I can just work on the small things as I go along and know that the major rust repair is done and now it’s one dent at a time until it’s ready for paint.
prep%20for%20paint_zpsd2t62lio.jpg
prep%20for%20paint%202_zpsvzumvhkt.jpg
Masked and ready.
masked%202_zpsurbqg8qm.jpg
Sealer on.
sealer%20on%202_zps9rscuman.jpg
Back together and on the road.
olds%20finished_zpsoo6p5bag.jpg
finished%202_zpsmetm5vpb.jpg
So really to anyone looking at the car would think it looks like a pile of crap with dents and rust repairs showing. However I’m happy as what I see I know is good. Previously I was nervous as to what was under the paint. Now I know it’s all good as such. So next phase will be get the dents beat out and then ready for paint. Being a daily driver this might not happen for a while.
I didn’t take photos of it, but Swifty has a body guy come once a week to work on his coupe and he helped out one night and that dog leg on the pass side, he hand made out of the patch I had got rolled. I didn’t even know he had done it but man was it a relief as I wasn’t sure what was going to happen there and it scared me some. But in the end, I met my deadline and got the car back on the road for family service and now I can just work on the small things as I go along and know that the major rust repair is done and now it’s one dent at a time until it’s ready for paint.
December 14th, 2015, 05:11 PM
#6
Registered User
Join Date: Feb 2013
Location: Tennessee
Posts: 1,393
Great job,you should be done with the rust problems,and it will free up a little time for the dents. You saved it from quickly deteriating . The dent will not get any worse like the rust problems would have. I had a coral and white Super 88 2 dr. Holiday back in 1961. Best of luck, Larry
Last edited by Rocketowner; December 14th, 2015 at 05:37 PM.
January 20th, 2017, 06:03 AM
#9
Registered User
Join Date: Feb 2013
Location: Tennessee
Posts: 1,393
I know it was a big job but at least it won't come back.Congratulations,you will be very proud when someone ask who you hired to do the metal work and you can point to yourself.
I know ,I installed the Aftermarket Air conditioner myself and had to fabricate the brackets,and it makes you proud when someone ask, who installed your AC ,and you can say, I did. Great job, Larry
I know ,I installed the Aftermarket Air conditioner myself and had to fabricate the brackets,and it makes you proud when someone ask, who installed your AC ,and you can say, I did. Great job, Larry
January 20th, 2017, 08:20 AM
#10
Registered User
Join Date: Mar 2012
Location: Sistersville, WV
Posts: 2,163
I think you and your friends did a wonderful job. A fifties for daily driving is very cool. Drive it with pride. Anybody can hire out the work if they have cash, but to be able to say I did it raises the bar.

Thread
Thread Starter
Forum
Replies
Last Post
Switch Blade Betties
General Discussion
1
November 8th, 2013 04:29 PM


