70 Cutlass Water Pump issue?
 August 7th, 2010, 03:20 PM
#1
Runner
Thread Starter
Join Date: Jun 2010
Location: Ballwin, MO
Posts: 1,714
70 Cutlass Water Pump issue?
I was driving my 70 SX around and all of a sudden it sounded like tar was bubbling underneath the hood. I pulled over and popped the hood and didn't see anything leaking anywhere. It didn't seem like anything was overflowing on the radiator. My gauges don't work on a side note.
Is there just a possible issue with my water pumped acting up? If so, what should I check up on first. I let the car sit for a day and started it back up to see if it still made the noise after cooling down, and it does. Any Help?
Thanks
Is there just a possible issue with my water pumped acting up? If so, what should I check up on first. I let the car sit for a day and started it back up to see if it still made the noise after cooling down, and it does. Any Help?
Thanks
 August 7th, 2010, 06:11 PM
#2
Registered User
Join Date: Feb 2008
Location: Plano, TX
Posts: 11,798
Could be coolant boiling in the radiator, or air bubbles being blown into the overflow tank if equipped.
Get an infared thermometer and take the engines temp.
Also make sure you are running a 50-50 mix of coolant and water.
Get an infared thermometer and take the engines temp.
Also make sure you are running a 50-50 mix of coolant and water.
August 8th, 2010, 07:50 AM
#4
Registered User

Join Date: Jun 2010
Location: Lebanon, Ohio
Posts: 226
If it makes the noise when the engine is cool, it's possibly a bearing. Alternator and water pump are the main suspects.
I second the addition of a temp gauge, but you said "My gaugeS don't work..." which sounds like all of them. I suggest you get at least a coolant temp and oil pressure gauge, and throw in a voltmeter for good measure. They can be bought inexpensively as a set and look pretty cool besides.
Good Luck!
Last edited by 69 Ragtop; August 9th, 2010 at 05:21 PM.
August 9th, 2010, 11:00 AM
#5
Runner
Thread Starter
Join Date: Jun 2010
Location: Ballwin, MO
Posts: 1,714
If it makes the noise when the engine is cool, it's possibly a bearing. Alternator and water pump are the main suspects.
I second the addition of a temp gauge, but you said "My gaugeS don't work..." which soulds like all of them. I suggest you get at least a coolant temp and oil pressure gauge, and throw in a voltmeter for good measure. They can be bought inexpensively as a set and look pretty cool besides.
Good Luck!
http://www.youtube.com/watch?v=d5Mc5TC3Kng.
Again, this was after not touching the car for a day and immediately after turning it on.
August 9th, 2010, 05:18 PM
#6
Registered User
Join Date: Jun 2010
Location: Lebanon, Ohio
Posts: 226
Wow. It sounds like compressed air-fuel mixture is being pumped into your cooling system? Can't say I've ever heard an engine sound like that. With the engine cold, take the radiator cap off, fill the radiator to about an inch from the top, then start the engine and run it for 2 minutes or less. Tell us if there are bubbles in the coolant, and how violent they are. Could be a head gasket or (heaven forbid) a casting failure in the head or block.
August 10th, 2010, 11:30 AM
#7
Runner
Thread Starter
Join Date: Jun 2010
Location: Ballwin, MO
Posts: 1,714
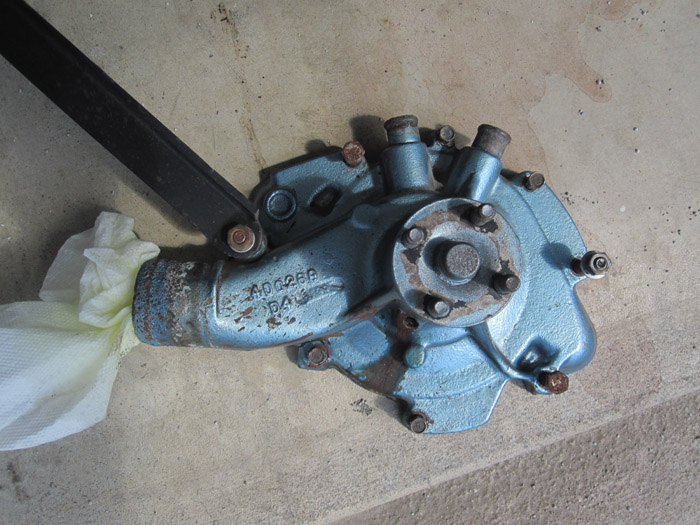
Well, after further review, it looks like it is the water pump. I watched it and it definitely shifts when turned on and the noise happens when in sync with the rotation and tilt of it (tough to describe) so it looks like the barrings are shot.
So that is going to be a 100 piece, and will need to get paint to get it to match. Is it a tough piece to replace myself or should I take it to a garage?
My mechanic skills on a scale from one to 10.. .probably a strong 3 haha. I am good and following instruction.
So that is going to be a 100 piece, and will need to get paint to get it to match. Is it a tough piece to replace myself or should I take it to a garage?
My mechanic skills on a scale from one to 10.. .probably a strong 3 haha. I am good and following instruction.
August 10th, 2010, 03:29 PM
#8
Registered User
Join Date: Dec 2009
Location: highland, michigan
Posts: 111
It is preety easy as long as you dont strip out any of the treads/holes on the timing chain cover. take your time and label where bolts came from, also buy a chilton manual for your car they are helpful. also, from real life lessons, make sure you get the right pump. There are two different lenght snouts/shaft lenghts.
August 11th, 2010, 11:12 AM
#10
Runner
Thread Starter
Join Date: Jun 2010
Location: Ballwin, MO
Posts: 1,714
Just to make sure, I took better footage that shows the water pump kind of tilting which I believe is the issue. Can we say that replacing that will fix it 100%?
Here is the video: http://www.youtube.com/watch?v=ayvTIxBEoPg
Thanks for all the help
@highlander, thanks for the heads up.
Here is the video: http://www.youtube.com/watch?v=ayvTIxBEoPg
Thanks for all the help
@highlander, thanks for the heads up.
August 11th, 2010, 04:44 PM
#12
Registered User
Join Date: Jun 2010
Location: Lebanon, Ohio
Posts: 226
...and I'd suggest that don't start the engine again until you do, or you may be replacing a radiator as well. When pumps get that bad they have a habit of spitting the fan into the fan shroud!
August 20th, 2010, 01:12 PM
#13
Runner
Thread Starter
Join Date: Jun 2010
Location: Ballwin, MO
Posts: 1,714
So I started to try to take things apart and I got a little stuck when I reached the portion of the fan. I took off the top guard, but then really didn't know what step I should take next. Since I'm not that mechanically inclined, I didn't want to just start taking off hoses and such and then being left with a car that won't run. Does anyway have semi easy steps I should follow? Do I need to just start taking off hoses and everything I can to pull out the water pump?
August 20th, 2010, 01:32 PM
#14
Old(s) Fart
Join Date: Mar 2007
Location: Northern VA
Posts: 47,259
1. Drain radiator
2. remove fan shroud
3. Unbolt fan
4. Remove all fan belts
5. Remove all accessory brackets that bolt to water pump (PS pump and A/C at a minimum)
WARNING: Note carefully where the two spacers go between the PS pump bracket and the engine!
6. Remove radiator hose, heater hose, and bypass hose.
7. Remove water pump.
8. Clean up gasket surfaces and inspect front cover for heavy pitting
9. Reverse to reassemble.
WARNING: Do NOT overtorque the small 1/4-20 bolts on the water pump. These only thread into the sheet metal front cover.
August 21st, 2010, 07:43 AM
#15
Registered User
Join Date: Feb 2008
Location: Plano, TX
Posts: 11,798
Here is a little bit of instructions that I made up a few years ago when i resored my cooling system. Read through and familiarize yourself withthe process.
http://www.flickr.com/photos/robsalb...7602930020786/
Here is the manual's instructions, including critical TORQUE SPECS...

Take your time and take pictures as you go if you can. Allocate a whole day if it is your first pump job. Lots of disassy and reassy...
http://www.flickr.com/photos/robsalb...7602930020786/
Here is the manual's instructions, including critical TORQUE SPECS...
Take your time and take pictures as you go if you can. Allocate a whole day if it is your first pump job. Lots of disassy and reassy...
August 26th, 2010, 12:57 PM
#16
Runner
Thread Starter
Join Date: Jun 2010
Location: Ballwin, MO
Posts: 1,714
So my first attempt didn't get that far. How do you take off the fan and fan shroud. I unbolted the shroud, but can't take it out because the fan is in the way (along with the radiator). After I unbolted parts of the fan, I tried moving it and it wouldn't budge. Am I on the right track?

August 26th, 2010, 01:34 PM
#17
Registered User
Join Date: Jun 2010
Location: Lebanon, Ohio
Posts: 226
Good Luck,
Last edited by 69 Ragtop; August 26th, 2010 at 01:39 PM.
August 26th, 2010, 02:59 PM
#18
Registered User

Join Date: Aug 2009
Location: Long Beach, CA
Posts: 81
The only thing I can think of being a problem is putting the power steering belt back in.. Does anyone know an easy way of adjusting the power steering belt? I couldnt figure it out when I had my car all torn apart. I actually had to take my car to the mechanic after putting everything back together all because I couldn't get this belt on.. 71 cutlass
August 28th, 2010, 09:24 AM
#20
Runner
Thread Starter
Join Date: Jun 2010
Location: Ballwin, MO
Posts: 1,714
I see some of the questions I am going to ask have been answer (above) but I just want to double confirm my next steps on this. My wife and I were finally able to get off the fan so now I just want to double check on some of the next steps.
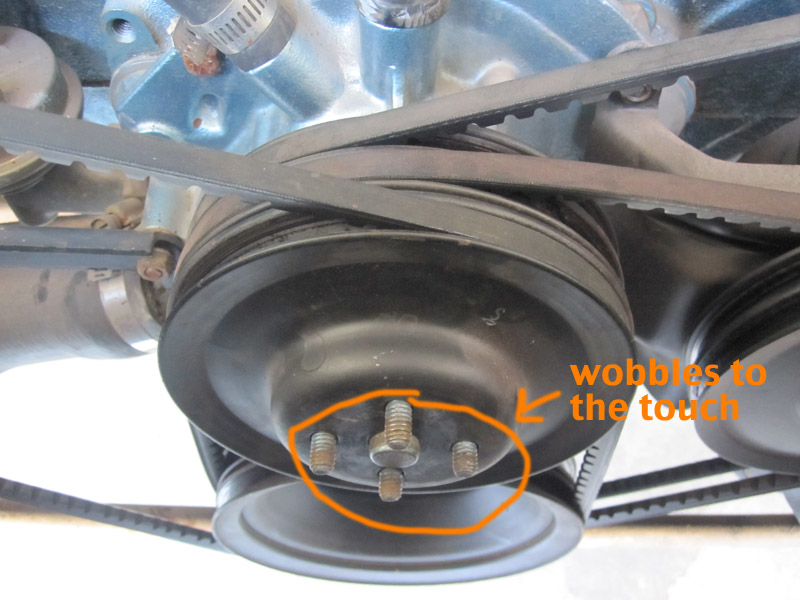
Just to confirm, because the water pump shaft seems to wobble, this is probably because the internal bearings are shot?
Taking off the alternator's belt seems easy, just unbolt the adjustment to let it slide inward.

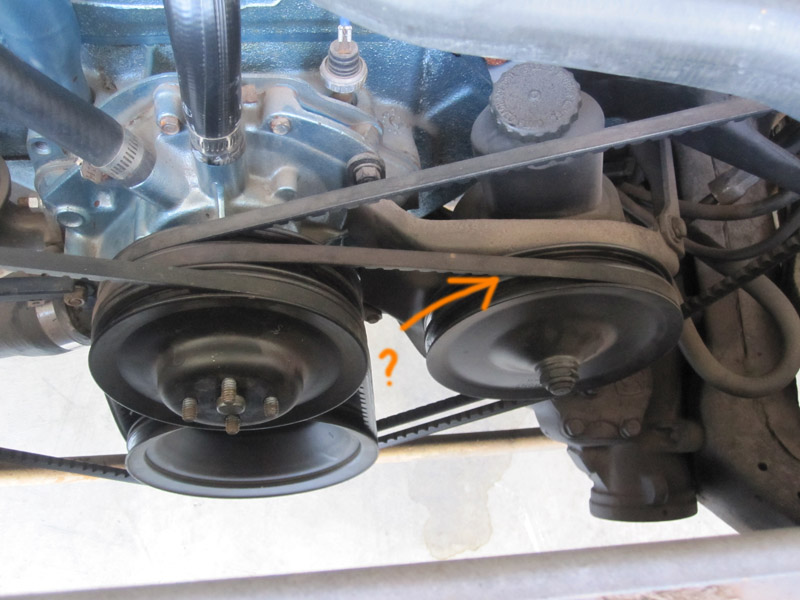
Where do I go to loosen the A/C belt?
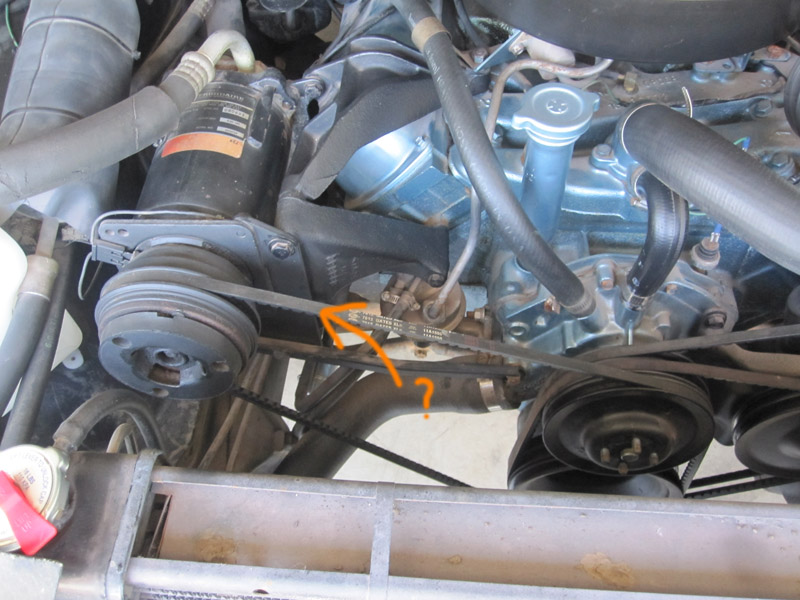
Also, where do I go to loosen the power steering belt?
After those are off, I need to drain the radiator fluid (or before taking off the belts?) I assume I should just do this at the lowest point possible?
And after that, its pretty much taking off all the other tubes and such connect to the water pump then cleaning it as mentioned above.... then all that in reverse.
Thanks for the help in advance. I wish I new more about this haha.
Just to confirm, because the water pump shaft seems to wobble, this is probably because the internal bearings are shot?
Taking off the alternator's belt seems easy, just unbolt the adjustment to let it slide inward.
Where do I go to loosen the A/C belt?
Also, where do I go to loosen the power steering belt?
After those are off, I need to drain the radiator fluid (or before taking off the belts?) I assume I should just do this at the lowest point possible?
And after that, its pretty much taking off all the other tubes and such connect to the water pump then cleaning it as mentioned above.... then all that in reverse.
Thanks for the help in advance. I wish I new more about this haha.
August 28th, 2010, 10:17 AM
#21
Registered User

Join Date: Jun 2009
Location: Palm Bay, FL
Posts: 4,249
You need to put at least two of the nuts back on the pump and reconfirm that it's loose. The pulley will wobble like that as it is loose.
You need to loosen both the lower bolt and the pivot bolt for the alt to move freely. And forget to disconnect the negative battery cable first.
The adjustment point for the A/C compressor is almost straight down from the top bolt on the bracket. You can see it in the picture. Loosen both bolts and the compressor should move. It's been a while since I've seen one in person so there may be a brace on the back as well that would need to be loosened.
The P/S adjustment bolt is located behind the pulley. You'll need a 9/16" open end wrench to get at it.
The pet-**** is on the drivers side (I think) and that is where you drain the radiator if you need to.
August 28th, 2010, 10:59 AM
#22

Do you have the fan clutch? Make sure that wasn't what was wobbling,though it sound like it was the pump itself. Yes,if the pump wobbles,it is the inner bearings.Sometimes you get a warning with a small leak from the hole in the underside of the pump. If I get this far into taking it apart,I usually replace the thermostat and gasket,just in case.What do any others think of this,good idea? ---bil
August 28th, 2010, 02:07 PM
#23
Registered User
Join Date: Jun 2010
Location: Lebanon, Ohio
Posts: 226
Also, I don't think gasket sealer has been mentioned. Buy some silicone "Form-A-Gasket" (also sometimes called "blue goop"), available at your local parts store. Ten years ago you would find just the blue stuff, and maybe black. The marketing folks have been hard at work, so these days there will be an assortment of colors and applications. Pick one suitable for the water pump. I use a SKIM COAT on both sides of the water pump gasket and thermostat gasket. (Exception: if the thermostat gasket has adhesive on one side, don't use Form-A-Gasket on that side.)
Clean the block surface and new pump surface with lacquer thinner or some other residue-free solvent (NOT gasoline). Then see how LITTLE Form-A-Gasket you can use on the gasket. I lay the gasket on a piece of newspaper and smear the sealer on with my finger, then turn it over and do the second side. Then I stick the gasket on the block and bolt the pump in place.
For hoses, inspect them first. If they appear hard and brittle, replace them. If they're still fairly new, I scrape the inside end out if there are rust particles embedded in it, then smear a little wheel bearing grease inside the end so it slides back on easily. This also helps the hose re-seat and seal.
Last edited by 69 Ragtop; August 28th, 2010 at 02:13 PM.
August 28th, 2010, 03:08 PM
#24
Runner
Thread Starter
Join Date: Jun 2010
Location: Ballwin, MO
Posts: 1,714
Do you have the fan clutch? Make sure that wasn't what was wobbling,though it sound like it was the pump itself. Yes,if the pump wobbles,it is the inner bearings.Sometimes you get a warning with a small leak from the hole in the underside of the pump. If I get this far into taking it apart,I usually replace the thermostat and gasket,just in case.What do any others think of this,good idea? ---bil
http://www.youtube.com/watch?v=ayvTIxBEoPg (from above)
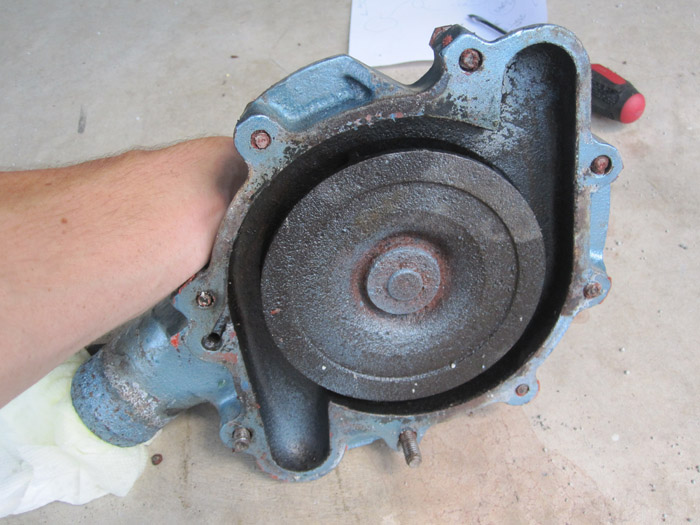
Since I've never seen the inside of a water pump, is the entire thing going to need to be replaced or just a section?
August 29th, 2010, 07:08 AM
#26
The water pump is replaced as a unit.( I remember when you could rebuild them!) There is only the housing,impeller,shaft and bearing-fairly simple.And as avove,check the plate behind the pimp to make sure ot isn't scored. On lubing the hoses,use the grease,don't use any oil.I have see quicky mechanics just stick a finger in motor oil and swipe it around inside the hoses to get them to slide on easier.That is the beginning of the end for the hose,they don't mix. The small bypass hose can be hard to get on,take your time and make sure it it seated all the way on. If the hoses need replacing,do it now,be carefull if you replace the heater hoses.Do NOT just take the clamp off and twist-you may end up with the neck of the core also.Personally,I like to cut them off about an inch past the end of the inlet/outlet,and carefully slice the hose to remove.It doesn't take much to cause a leak there. ---bil
August 29th, 2010, 12:56 PM
#28
Runner
Thread Starter
Join Date: Jun 2010
Location: Ballwin, MO
Posts: 1,714
I was able to successfully take off the water pump with your help. In the meantime, I went ahead covered the holes to prevent possible rust since I don't think I can make it to autozone to get parts today. So which grease should I get for putting the tubes back on? All but the radiator tube was fairly simple to get off. This may also sound dumb, where exactly are the gasket and thermostat?
So just to make sure, my next steps are:
1)Buying pump, paint so pump can match, grease and sealant (blue goop) . (right? what type of grease and sealant)
2) Paint pump then clean both ends,
3) Apply sealant
4) Bolt new pump
5) Grease tubes and put back
6) Put back belts
7)Put back fans, fan guard, and other
8) Put in radiator fluid
9) Drive happily
Am I missing anything and is there any else that might cause problems?
Again, thanks for all the help. After this I plan I posting "instructions for dummies" to maybe help the next new cutlass / mechanic to try this out.
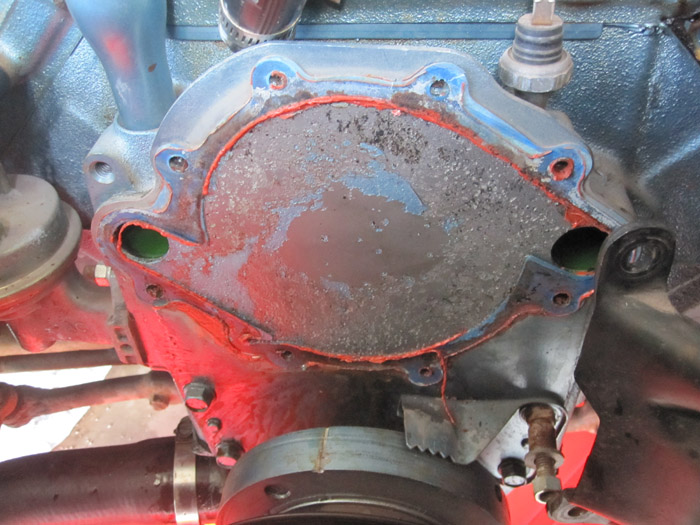
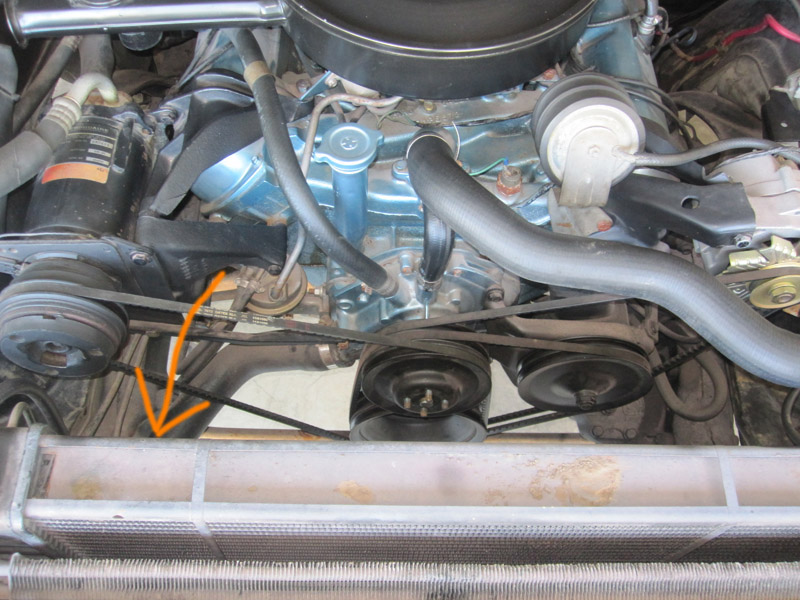
(Orange glow is from a sled I used to catch the radiator fluid.
So just to make sure, my next steps are:
1)Buying pump, paint so pump can match, grease and sealant (blue goop) . (right? what type of grease and sealant)
2) Paint pump then clean both ends,
3) Apply sealant
4) Bolt new pump
5) Grease tubes and put back
6) Put back belts
7)Put back fans, fan guard, and other
8) Put in radiator fluid
9) Drive happily
Am I missing anything and is there any else that might cause problems?
Again, thanks for all the help. After this I plan I posting "instructions for dummies" to maybe help the next new cutlass / mechanic to try this out.
(Orange glow is from a sled I used to catch the radiator fluid.
August 29th, 2010, 01:45 PM
#29
Runner
Thread Starter
Join Date: Jun 2010
Location: Ballwin, MO
Posts: 1,714
wow, so there are a lot of different water pumps. Are they really all different? Is there anything wrong with this one, the price seems pretty cheap?
http://www.oreillyauto.com/site/c/de...Stores=true#at
Cardone - Water Pump
http://www.oreillyauto.com/site/c/de...Stores=true#at
Cardone - Water Pump
August 29th, 2010, 02:20 PM
#30
Thermostat-look to top of the page-your picture#3.The top hose from the radiator goes from the radiator to the thermostat housing.It also has a small hose that goes to the water pump.Bypass hose,lets stuff circulate until thermostat opens.2 bolts to remove,sometimes to sticks,if so,a SLIGHT tap with a mallet -not a hammer-should loosen it.Dont break it.Thermostat is inside.Usually they have a gasket with them,but check,not all do.Scrape all of the old gasket off both surfaces.Also scrape that old goo from the old water pump. Don't buy a cheap chinese remanufactured water pump,unless this is fun for you.They do not last! I am not familiar with the brand in the link. ---bil
August 29th, 2010, 10:19 PM
#33
Registered User
Join Date: Jun 2009
Location: Palm Bay, FL
Posts: 4,249
wow, so there are a lot of different water pumps. Are they really all different? Is there anything wrong with this one, the price seems pretty cheap?
http://www.oreillyauto.com/site/c/de...Stores=true#at
Cardone - Water Pump
http://www.oreillyauto.com/site/c/de...Stores=true#at
Cardone - Water Pump
It is a brand new pump and comes with a lifetime warranty. I have had bad luck with re-mans haveing smaller impellers and the Master Pro pump has a nice impeller on it. It is the one I have on my car currently.
August 30th, 2010, 02:14 AM
#34
Olds Fanatic
Join Date: Apr 2009
Location: Antioch,Ca
Posts: 36
Buy this pump http://www.summitracing.com/parts/TFF-1444NB/ its correct for your year with a/c. Its the one I ended up buying after 2 Cardones leaked through the weep holes.
August 31st, 2010, 07:36 PM
#35
Runner
Thread Starter
Join Date: Jun 2010
Location: Ballwin, MO
Posts: 1,714
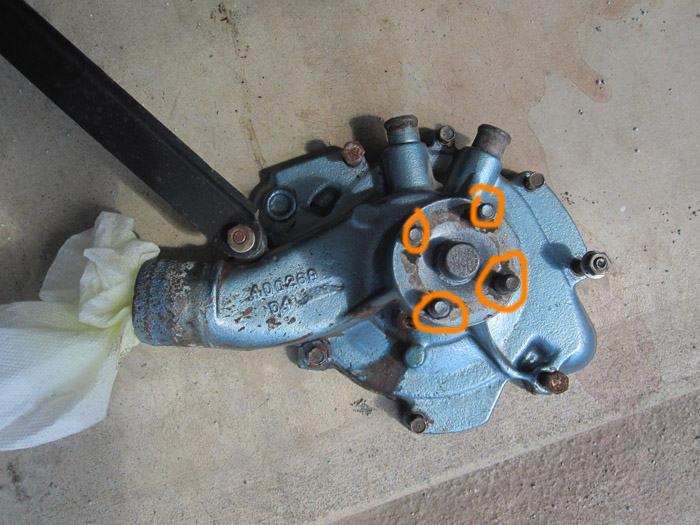
Got a new pump, and bought the correct paint for my engine color. I unfortunately found out that my engine was actually painted the incorrect blue when it was rebuilt, but own well. My question before I start having to put this on... is how to I get these bolt / screws off the front of my old one on too my new pump without stripping the screws (was able to get two off, but the other two are stuck in the old pump pretty well)
(old pump)
(old pump)
August 31st, 2010, 08:22 PM
#36
Spray some Breakaway or similar product,let soak.Tap around the studs lightly-not the studs themselves.You want to kind of shake things up and let the penetrant work.Take two nuts that are the right thread,put one on,them thread the other down to it.Start to turn the BOTTOM nut off.This is called double nutting,it can also work to lock a nut in place,The pressure of one against the other keeps it from turning.Make sure you arent twisting the stud off. Now that you know how to do that,you may want to take the easy way,take one of the studs you removed,and get two more at a hardware store.No cheap Chinese junk,and the same length.Remember that they are spinning and the wrong size can cause balance problems. ---bil
September 2nd, 2010, 07:29 PM
#37
Runner
Thread Starter
Join Date: Jun 2010
Location: Ballwin, MO
Posts: 1,714
Great new guys! Buddy of mine and I have successfully changed the water pump!!! (I think)
Now the slightly bad news...
1) didn't have the alternator belt on tight enough, it jump off and I pretty much have to replace it.
2) Probably need a little more radiator fluid
3) Accidentally left my glove box open and the little light killed my battery.
But after charging and testing I tried for the first time to start the car.
A little smoke came out and it didn't sound so great.
10 minutes later, smaller amount of smoke, still died.
10 minutes later again, started up great! Sounded 100x better then before, almost like a new car!
I hope I did everything right. Thanks for all the help guys! I'll try to post picture of the entire process for the next guy that needs a water pump replaced.


Thread
Thread Starter
Forum
Replies
Last Post
Dead Reckon
Small Blocks
18
July 14th, 2014 02:35 PM
Nor Cal Andy
Parts For Sale
0
March 29th, 2012 07:27 PM


