Rear Drum Brake Tutorial
 July 31st, 2012, 02:30 AM
#1
Kickin' It Oldschool
Thread Starter
Join Date: Jul 2012
Location: Champaign-Urbana, Illinois
Posts: 422

 How to change Rear Shoes.


")
Last edited by bdub217; July 31st, 2012 at 02:52 AM.
 July 31st, 2012, 02:48 AM
#2
Kickin' It Oldschool
Thread Starter
Join Date: Jul 2012
Location: Champaign-Urbana, Illinois
Posts: 422

Notice the front shoe has a shorter pad area than the rear.
__________________________________________________ _______________________________________
You will notice the springs are different colors, i had two packages that someone had opened and mixed into one bin already for some reason and the sizes werent all that different until i tried fitting them, the final picture end product is shown with all the correct hardware. i was pressed for time and couldnt take more pics to show the correct hardware, i feel it doesnt affect the idea or get in the way of the learning process. feel free to pm me with questions, or post here of course.
Last edited by bdub217; July 31st, 2012 at 08:50 PM. Reason: ALL THE PICTURES WERE TAKEN WITH MY PHONE =P
 .
July 31st, 2012, 11:15 AM
.
July 31st, 2012, 11:15 AM
#6
Kickin' It Oldschool
Thread Starter
Join Date: Jul 2012
Location: Champaign-Urbana, Illinois
Posts: 422
I am sure that when you re-installed the drum, you made sure that they were adjusted to the point of a light drag on the drum!
Pat
Pat
Thank you everyone, you are very welcome! I'll try to do a few more tutorials on some other simple projects to help you guys save some money.
Last edited by bdub217; July 31st, 2012 at 11:19 AM.
September 17th, 2012, 09:17 PM
#7
Registered User

Join Date: Aug 2012
Posts: 36
Good job but incorrect
Good job! But slightly incorrect. The star adjuster only works when the brakes are applied in reverse.
When finishing the brake job; hand adjust the star adjuster just so that the drum clears the installed shoes. Bleed the system starting from the brake cylinder (or caliper) that is on the opposite side of the master cylinder and is at the farthest point from the master cylinder, and then work forward. When done correctly, the last wheel bled will be the wheel on the same side of the master cylinder, and the nearest to the master cylinder.
Use an empty parking lot for the following: With the wheels on the car, drive the car in reverse at about 1100 - 1500 rpm and stab the brakes 4 - 5 times. The rear end should firmly squat, but not violently. Obviously you don’t want to hurt the vehicle or risk a ticket. Both sides will be correctly adjusted assuming that the star wheels are working properly. From then on the brakes will adjust themselves as you stated.
Also you should wire brush the threads on the adjuster and use some grease. I always used light application of 500*F wheel bearing grease on the threads and in the cap. The grease will collect dust over time, yes, but; it will keep it from scaling rust and making removal at a later date difficult.
By the way you are the only person I have seen in 30 plus years that held the shoes correctly. Fingers only on the edges, never, never on the braking surface. Holds true for caliper pads as well.
Last edited by 78Delta; May 1st, 2013 at 07:57 PM. Reason: previous post was too ambiguous
 April 28th, 2013, 07:19 AM
#14
Registered User

Join Date: Dec 2011
Posts: 7,286
Did you mention anywhere whether the longer shoe goes on the front or the rear?
Also, there are more contact points such as the anchor pin at the top, where the braking force gets transferred to the axle, and the adjuster link at the bottom where it transfers force from one shoe to the other. I like to use white brake grease and the "acid brush" [teensy brush] to coat these surfaces.
Leaky wheel cyl. inspection should be shown.
This is one of those jobs where you really should get the 2-3 tools that will greatly expedite the process... the retainer 1/4 turn tool, the funny looking pliers that make the springs remove and install a breeze...
April 28th, 2013, 08:41 AM
#15
70 Cutlass SX
Join Date: Apr 2011
Location: Bermuda
Posts: 1,041
Great primer on brake shoe replacement! Thanks.
If I could suggest a comment on:
- removal of rusted on drum. I use a propane torch.
- care in handling of cylinder. I always seemed to do something to the cylinders that made them leak from the boots afterwards, and so ended up replacing them as well.
Octania - what are the pliers you are referring to - I use a screwdriver.
April 28th, 2013, 04:59 PM
#16
Registered User
Join Date: Dec 2011
Posts: 7,286
Amazon.com
"brake pliers"
http://www.amazon.com/s/ref=nb_sb_no...brake%20pliers
Snap-on via epay:
http://www.ebay.com/itm/SNAP-ON-TOOL...3c9885&vxp=mtr
The round end makes removal of the two top anchor springs a BREEZE. Other leg puts 'em on fast and easy. Not real sure what they were thinking with the pinchy end, maybe a Chevy thing. If you just need to do these tasks, then this is a good choice:
http://www.ebay.com/itm/Snap-on-Bend...191a48&vxp=mtr
this puts the 1/4 turn shoe retainer springs on/off easy:
http://www.ebay.com/itm/Snap-On-B135...fded0c&vxp=mtr
For adjusting the star wheel, lesser brands will suffice, but here's a real nice one for cheap:
http://www.ebay.com/itm/Snap-On-Tool...435456&vxp=mtr
April 29th, 2013, 11:11 AM
#18
@MDchanic & oldscutlass The previous weekend I replaced my front pads and just wanted to complete the rears at the same time, I know they didn't really need it but I have OCD lol and now wont have to mess with the front or rear brakes for awhile.
July 12th, 2013, 01:42 PM
#20
2 '66 98's

Join Date: Aug 2008
Location: central New Jersey
Posts: 489
Here are two pictures of the completed assembly on the right rear of my '66 98. Those are the correct colors for the springs. There are some slight differences from the original subject project.
July 12th, 2013, 04:41 PM
#21
Registered User

Join Date: Jun 2008
Location: Near Muskegon Michigan
Posts: 1,015
Great timing for a refresher for me! I'm putting new drums and shoes on mine tomorrow morning! I re used the originals 4 years ago as they looked fine. Lately they have been making noise and sqweaking at a stop. Hate that. Upon inspection, mainly they were a little dirty and the shoes and drums looked smooth although the drums are a little different from each other. Anyways, the MAW's said while I have them apart, why not just go with new. Thanks for the pic's.
 August 6th, 2014, 05:34 AM
#23
Parking Brake?
This is great info.
I'm redoing mine as the wheel cylinder had a blow out and I think they just keep adding brake fluid and driving it. I've never seen such a greasy, messy drum brake.
I'm really struggling with the parking brake part of this though. When I have it in place where I think it goes (the manual is worthless for this part), that horizontal bar doesn't seem to line up quite right between the shoes without contacting the parking brake assembly in a funny manner.
Also, my spring on that horizontal bar has a little pig tail on it, and you can put that spring on a total of four different ways. Any idea which way that pig tail goes?
Any pics or diagrams would be greatly appreciated.
August 6th, 2014, 07:49 AM
#24
Registered User
Join Date: Aug 2013
Location: Central Illinois
Posts: 3,900
Maybe post a pic of the parking brake / strut interface? That strut needs to go on with a certain orientation. But I'm not sure what you mean by pigtail. My springs didn't have any obvious protrusions. Once it's all together, make sure that you can turn the adjuster star wheel in one direction only. You should here/feel the adjuster lever arm clicking between the teeth. To turn the wheel back, simply pull out on the lever a little and turn the wheel. Maybe these diagrams will help.
[IMG]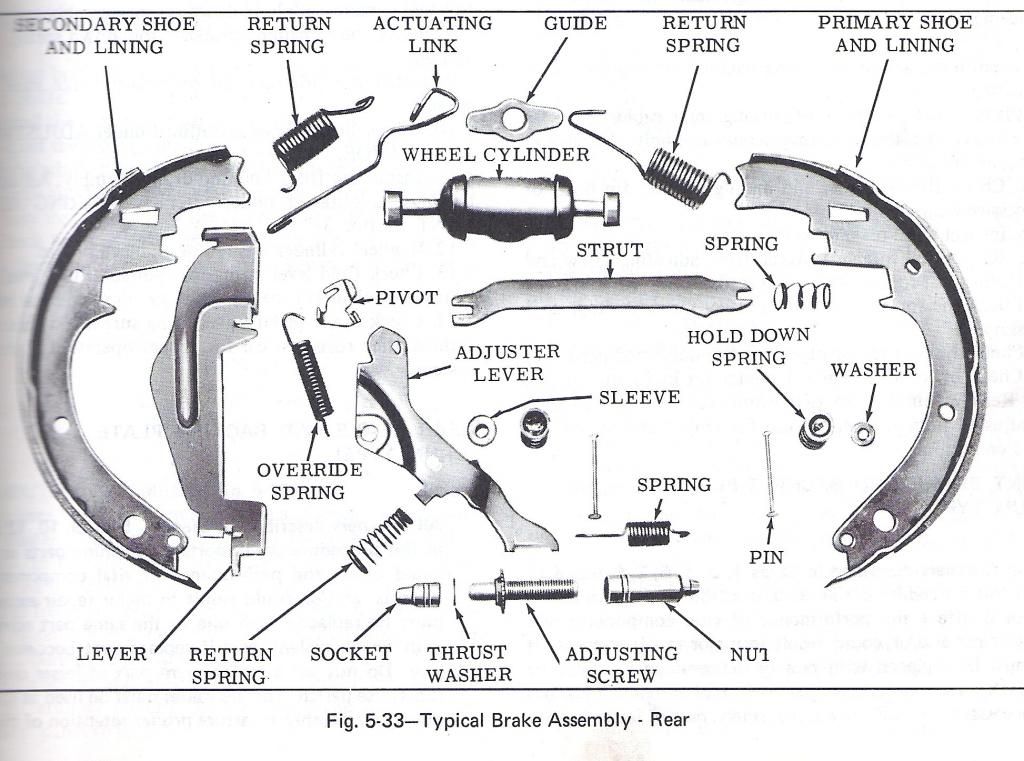 [/IMG]
[IMG]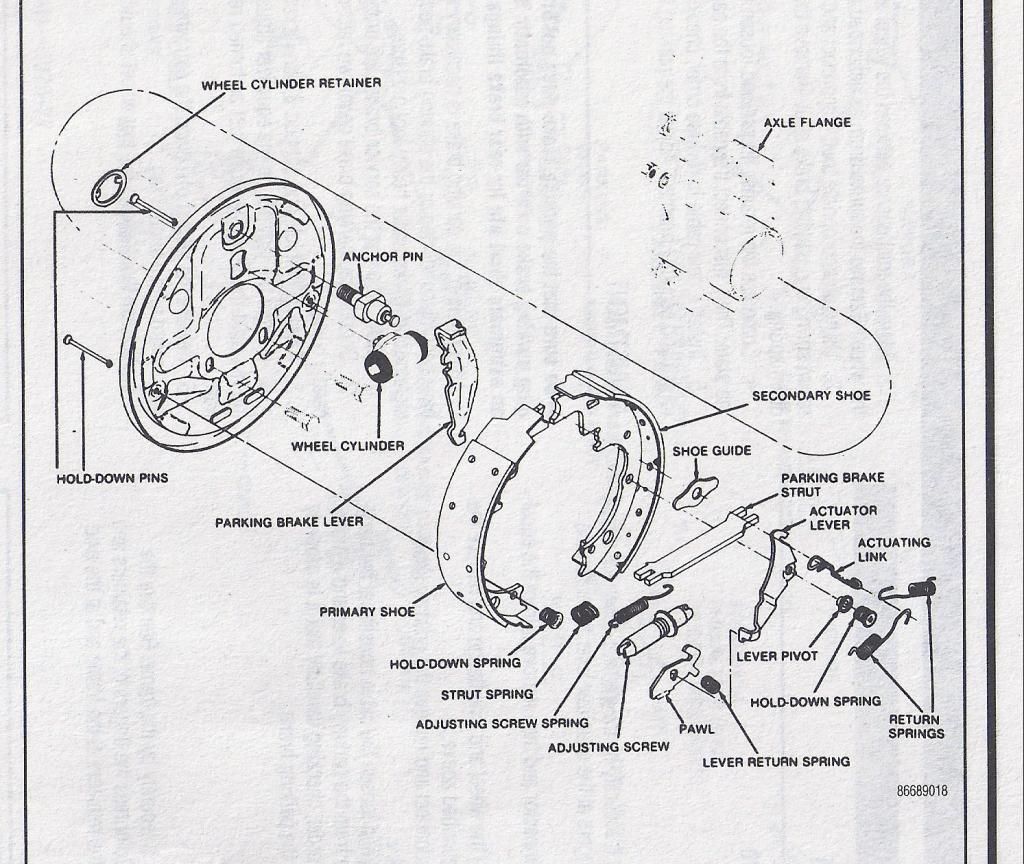 [/IMG]
[IMG]
 [/IMG]
[IMG]
 [/IMG]
August 13th, 2014, 10:10 AM
[/IMG]
August 13th, 2014, 10:10 AM
#25
Registered User
Join Date: Feb 2010
Location: Vancouver Island, Canada
Posts: 1,473
I just finished the rear brakes on my '71 Cutlass S and thought I'd throw out these observations:
- The spring positions in the early pictures are incorrect. There are only two yellow hold down springs in each kit, one per wheel. They hold down the rear shoe with the parking brake lever.
- The green spring is the hold down spring for the leading shoe - it is not the parking brake lever return spring as shown here. The tapered end of the green spring goes against the shoe.
(Discovered this after starting on the second wheel, cursing the missing springs and taking a good look around...then having to redo the first wheel correctly!)
- The spring kit does not include the tapered parking brake lever return spring, you'll need to re-use the existing spring.
I found a great tutorial showing the brakes on a '96 Yukon/Tahoe which will be helpful too. It's amazing how similar the brakes are 25 years later - identical except the '96 uses an e-clip to hold the brake lever to the shoe and my '71 doesn't.
This page also gives some hints on using the brake tools (ie pliers) mentioned earlier in this thread. Really wish I'd found that information a couple days ago.
http://www.handymanlyness.com/archiv..._96_Yukon.html
Of course I didn't find this until after I finished the brakes, and find there are a couple items I need to go back and check now. At least the car's still on axle stands and hasn't moved yet!
Last edited by VI Cutty; August 13th, 2014 at 10:12 AM.
August 13th, 2014, 10:50 AM
#27
Old(s) Fart
Join Date: Mar 2007
Location: Northern VA
Posts: 47,259
I just finished the rear brakes on my '71 Cutlass S and thought I'd throw out these observations:
- The spring positions in the early pictures are incorrect. There are only two yellow hold down springs in each kit, one per wheel. They hold down the rear shoe with the parking brake lever.
- The green spring is the hold down spring for the leading shoe - it is not the parking brake lever return spring as shown here. The tapered end of the green spring goes against the shoe.
(Discovered this after starting on the second wheel, cursing the missing springs and taking a good look around...then having to redo the first wheel correctly!)
- The spring kit does not include the tapered parking brake lever return spring, you'll need to re-use the existing spring.
August 13th, 2014, 11:06 AM
#28
Registered User
Join Date: Feb 2010
Location: Vancouver Island, Canada
Posts: 1,473
The main way I clued in was noticing that the old hold down springs weren't a matched pair, but by that time it was too late to see which spring went on which shoe, and how it was oriented.
Another point is the importance of matching the new springs to the old. There are one or two springs in the kits which are side specific. Using the wrong spring will lead to further frustration!
August 13th, 2014, 11:26 AM
#29
Old(s) Fart
Join Date: Mar 2007
Location: Northern VA
Posts: 47,259
The main way I clued in was noticing that the old hold down springs weren't a matched pair, but by that time it was too late to see which spring went on which shoe, and how it was oriented.
Another point is the importance of matching the new springs to the old. There are one or two springs in the kits which are side specific. Using the wrong spring will lead to further frustration!
Another point is the importance of matching the new springs to the old. There are one or two springs in the kits which are side specific. Using the wrong spring will lead to further frustration!
The retractor springs are the same way - one long and one short. The short one is designed to hook onto the self adjuster actuating rod and won't reach if you try to use it on the front shoe. The self adjuster only goes one way - with the star wheel to the rear so it engages the self adjuster lever - and thus the spring only fits one way to clear the star wheel. The strut has one wide slot and one narrow slot, so it also only fits one way (wide slot over the double thickness of the rear brake shoe and e-brake actuating lever).
September 29th, 2015, 09:52 AM
#30
Registered User

Join Date: Apr 2012
Posts: 65
Rear Brakes 71 Cutlass
The longer shoe goes on the rear normally. The one question I have is the brake kit I bought had two different length Hold Down Pins. One had a number 2 on it and the other the number 4, which was longer. Does anyone know which one goes on the primary or secondary shoe? I have a 71 Cutlass S and replaced the wheel cylinders. Also I noticed that the hand brake lever does not have the part that goes through the shoe and is held in place with the circlip. Thank you.
September 29th, 2015, 01:30 PM
#31
Registered User
Join Date: Feb 2010
Location: Vancouver Island, Canada
Posts: 1,473
The longer shoe goes on the rear normally. The one question I have is the brake kit I bought had two different length Hold Down Pins. One had a number 2 on it and the other the number 4, which was longer. Does anyone know which one goes on the primary or secondary shoe? I have a 71 Cutlass S and replaced the wheel cylinders. Also I noticed that the hand brake lever does not have the part that goes through the shoe and is held in place with the circlip. Thank you.
You may also need to reuse the brake lever pivot - I think only the circlip for it is in the hardware kit.
September 29th, 2015, 01:34 PM
#32
Old(s) Fart
Join Date: Mar 2007
Location: Northern VA
Posts: 47,259
How many of each pin was provided? I seem to recall the kit I had included a couple different lengths which weren't actually needed. Hopefully you have your old parts so you can compare.
You may also need to reuse the brake lever pivot - I think only the circlip for it is in the hardware kit.
You may also need to reuse the brake lever pivot - I think only the circlip for it is in the hardware kit.
September 30th, 2015, 06:42 PM
#36
Old(s) Fart
Join Date: Mar 2007
Location: Northern VA
Posts: 47,259
October 1st, 2015, 10:50 AM
#38
Registered User
Join Date: Apr 2012
Posts: 65
Rear Brakes 71 Cutlass
Unfortunately the car has sat for over 10 years and there is a lot of rust. The pins are about to break in two. I just got done replacing the fuel tank because it has tiny holes in it. RA is sending another kit though.
October 2nd, 2015, 05:39 PM
#39
Registered User
Join Date: Aug 2013
Location: Central Illinois
Posts: 3,900


