My '62 Dynamic 88 (I thought it just needed paint)'62 Dynamic 88 (I thought it just n
 December 18th, 2011, 08:21 PM
#1
Registered User
Thread Starter
Join Date: Dec 2011
Location: Utah County
Posts: 80
My '62 Dynamic 88 (I thought it just needed paint)
Here is my '62 that I am trying to hone my skills on. Body work is by far the hardest for me... It takes FOREVER! I do like welding and fabrication, but stripping paint and straightening panels takes time, patience and practice. Whew! I hope to have paint on this car this winter or early spring. This is just copied from my cheesy blog:
More Progress 2.0
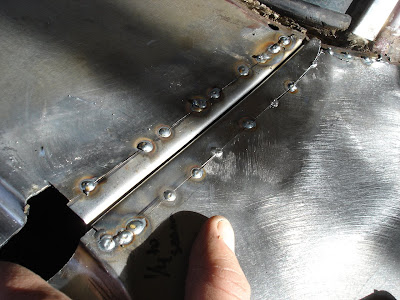
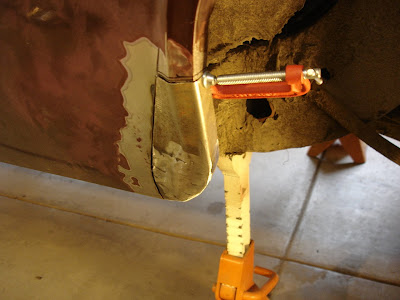
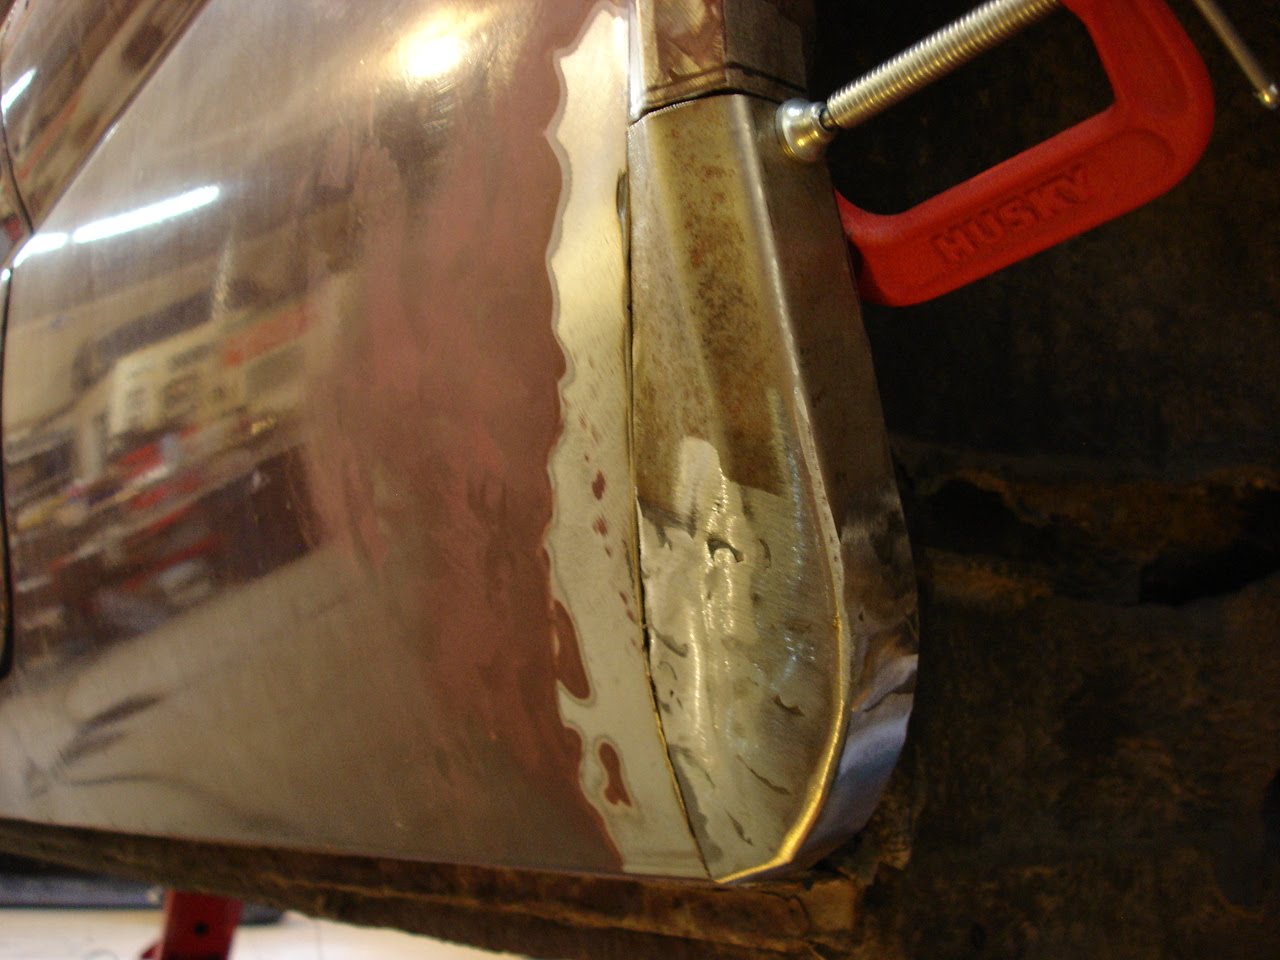
I thought welding was over! This seam where the 1/4 passenger 1/4 panel meets the body just behind the rear window has just been replaced. The above picture show the replacement pieces tacked in place, which below I'll show the process of making and fitting them.
The reason I replaced this area is because the passenger 1/4 panel was replaced in the '60s, and anywhere lead was reapplied (joint seams) I have stripped, since most of the leaded areas showed bulges starting to appear. When the lead was removed here, I found rust creeping into the joint. I also discovered that the seam had been aligned poorly, with the new 1/4 being mounted higher than the package tray area it meets to, and then banged at the edges down in an attempt to level things up. There was also a lot of lead, and it wasn't just for the seam.
The factory joint was an area where two 90 degree angles meet, giving two flanges that meet underneath to be spot welded together. Then lead was applied to cover the seam, but still scored with a small groove that shows in the finished paint job, giving a neat appearing seam line. I would imagine that the seam line is scored into the lead at this place to channel flexing and shifting in the body from opening the heavy trunk. Kind of like seams in concrete that prevent cracks forming and allow expansion.

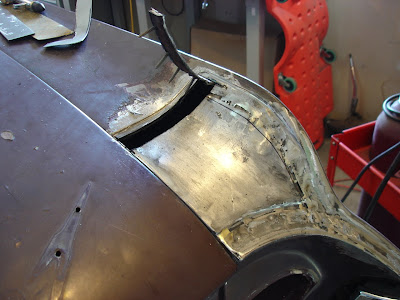
Not only was the flat area of the seam needing help, but the part that angles down into the trunk channel was hammered rough, brazed, and gobbed with lead. It was crusty and rust prone, as well as holding the misaligned 1/4 seam from lining up smooth. So I cut the area out, and will have to make patches for it.

This picture shows how out of alignment the top edges were, requiring the newedge to be banged down and lead slathered all over.

Here in the above picture you can see the huge gap that was brazed and leaded. This gap size scared me; It appeared that it would be more prone to stress cracks and I didn't want to dump tons of lead back into it. Also, it was pitted with rust which I did not want to clean out.

Here is one of the flange areas cut out. This one was the package tray side, showing where an original spot weld had been drilled out when they removed the original 1/4 panel.
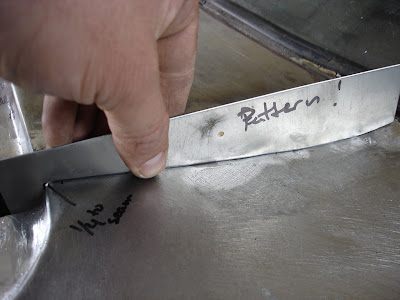
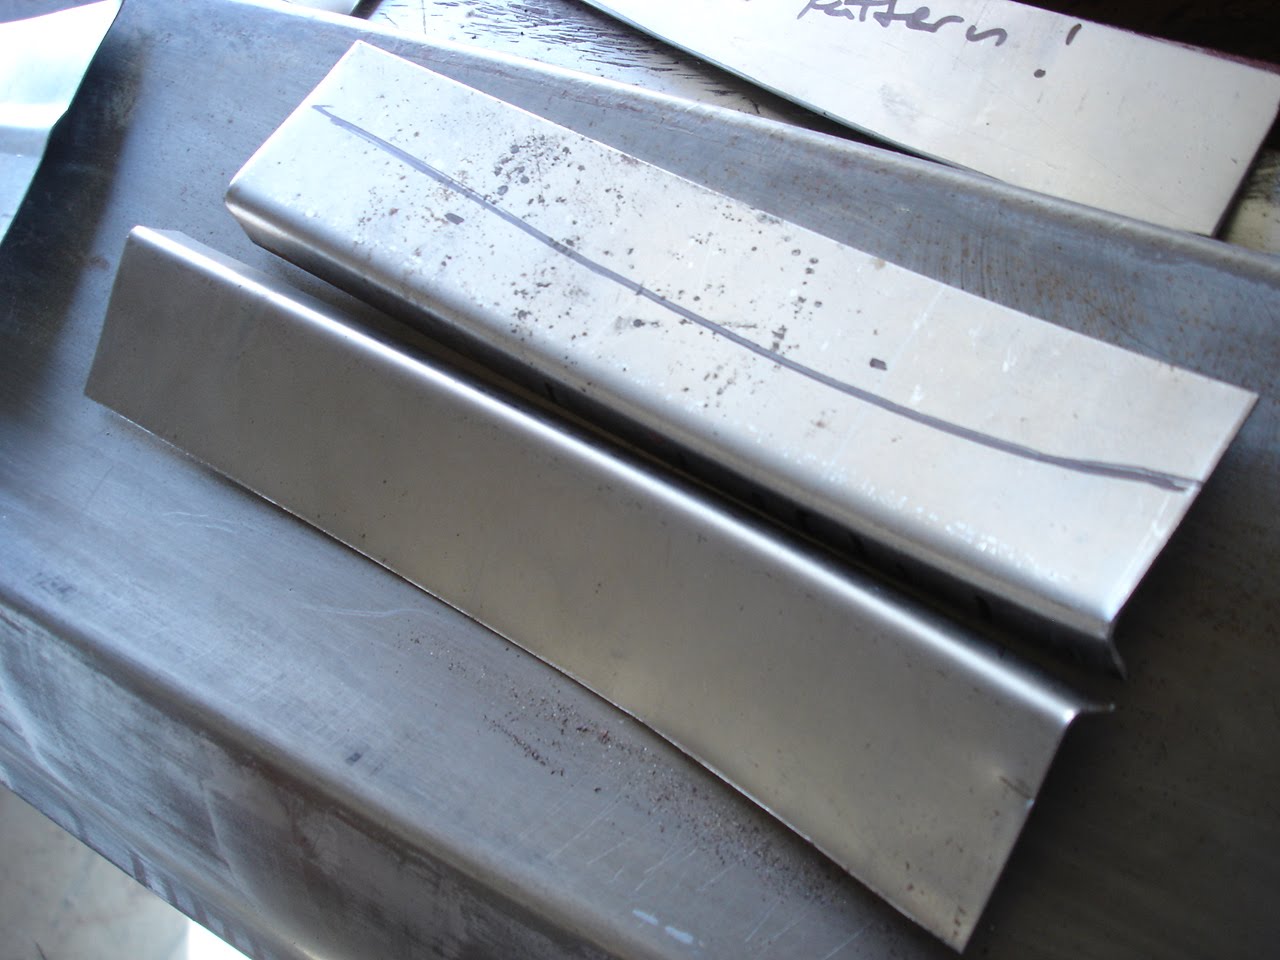
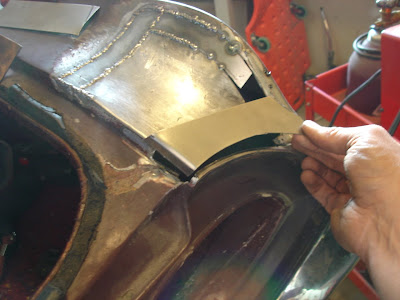
After cutting the flanges out, I made this little pattern to compare the new pieces to as I made them. This way I wouldn't have to run back and forth between the shrinker-stretcher and the car, checking for fit.

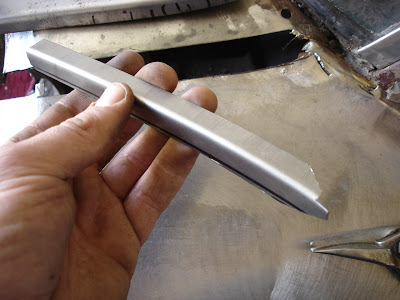
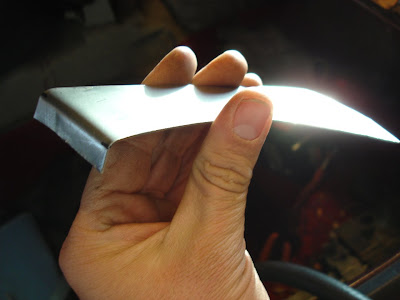
To make the repair pieces I just used a brake to bend the angle, and just a tiny bit of stretching on the downward flanges.

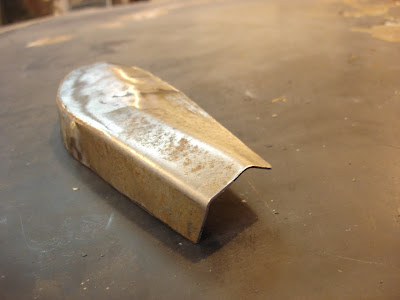
Both pieces are formed and stretched to proper contours, ready for trimming to fit.
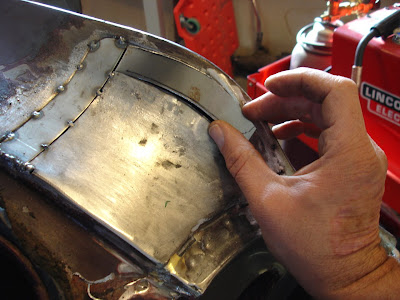
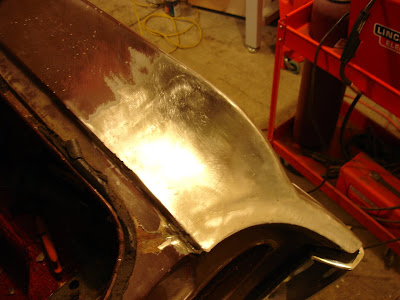
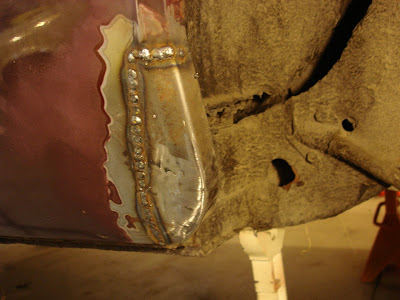
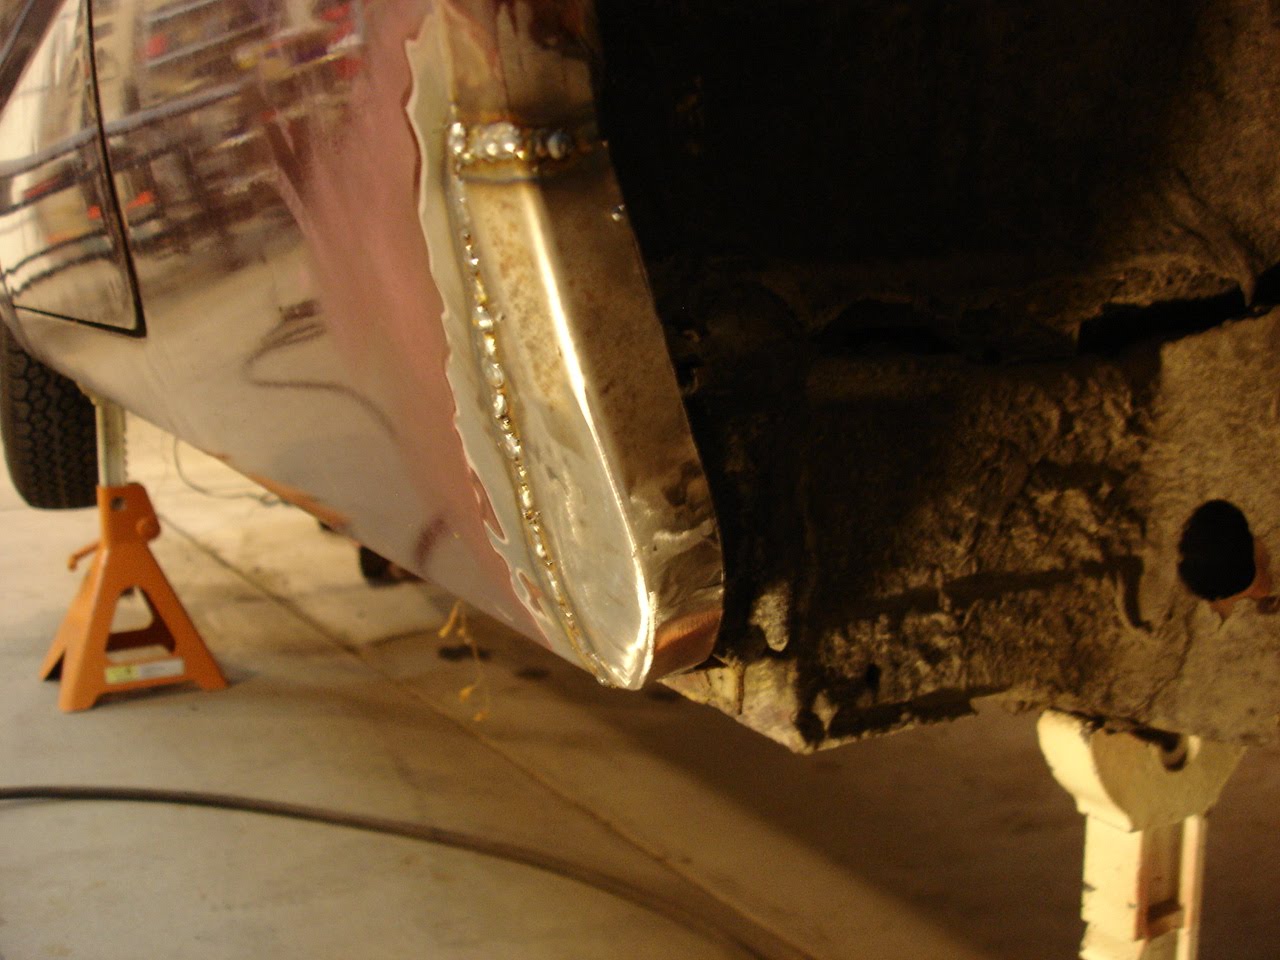
Here shows the 1/4 panel piece is trimmed down and ready to place.
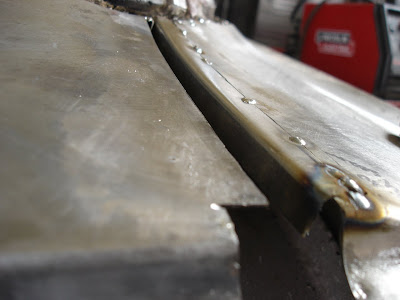
Above shows the piece tacked to the 1/4, fitting nicely.

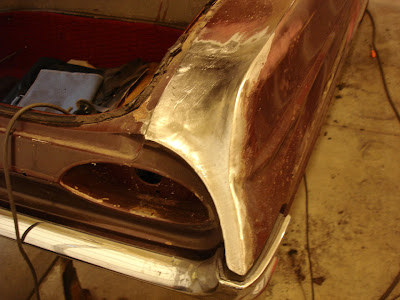
And here is the other piece trimmed and fitted, ready for tacking on. I went on to tack weld it on, and as the first picture of this post shows, I was able to gently position the 1/4 panel edge down to perfect alignment with the package tray area, with the seam meeting just as the factory one did. Now I can move down to the trunk channel area and start making pieces to fit.
One thing I forgot to do is punch holes in the inside flange. Now it will be a chore figuring out how to plug weld the flanges underneath together. Oops! Other than that, the repair is working nicely. I just need to make sure I weld the flanges together before I start making the pieces that extend into the trunk lip. Now I think a small spot welder might come in handy...
More Progress 2.0

I thought welding was over! This seam where the 1/4 passenger 1/4 panel meets the body just behind the rear window has just been replaced. The above picture show the replacement pieces tacked in place, which below I'll show the process of making and fitting them.
The reason I replaced this area is because the passenger 1/4 panel was replaced in the '60s, and anywhere lead was reapplied (joint seams) I have stripped, since most of the leaded areas showed bulges starting to appear. When the lead was removed here, I found rust creeping into the joint. I also discovered that the seam had been aligned poorly, with the new 1/4 being mounted higher than the package tray area it meets to, and then banged at the edges down in an attempt to level things up. There was also a lot of lead, and it wasn't just for the seam.
The factory joint was an area where two 90 degree angles meet, giving two flanges that meet underneath to be spot welded together. Then lead was applied to cover the seam, but still scored with a small groove that shows in the finished paint job, giving a neat appearing seam line. I would imagine that the seam line is scored into the lead at this place to channel flexing and shifting in the body from opening the heavy trunk. Kind of like seams in concrete that prevent cracks forming and allow expansion.

Not only was the flat area of the seam needing help, but the part that angles down into the trunk channel was hammered rough, brazed, and gobbed with lead. It was crusty and rust prone, as well as holding the misaligned 1/4 seam from lining up smooth. So I cut the area out, and will have to make patches for it.

This picture shows how out of alignment the top edges were, requiring the newedge to be banged down and lead slathered all over.

Here in the above picture you can see the huge gap that was brazed and leaded. This gap size scared me; It appeared that it would be more prone to stress cracks and I didn't want to dump tons of lead back into it. Also, it was pitted with rust which I did not want to clean out.

Here is one of the flange areas cut out. This one was the package tray side, showing where an original spot weld had been drilled out when they removed the original 1/4 panel.

After cutting the flanges out, I made this little pattern to compare the new pieces to as I made them. This way I wouldn't have to run back and forth between the shrinker-stretcher and the car, checking for fit.

To make the repair pieces I just used a brake to bend the angle, and just a tiny bit of stretching on the downward flanges.
Both pieces are formed and stretched to proper contours, ready for trimming to fit.

Here shows the 1/4 panel piece is trimmed down and ready to place.

Above shows the piece tacked to the 1/4, fitting nicely.

And here is the other piece trimmed and fitted, ready for tacking on. I went on to tack weld it on, and as the first picture of this post shows, I was able to gently position the 1/4 panel edge down to perfect alignment with the package tray area, with the seam meeting just as the factory one did. Now I can move down to the trunk channel area and start making pieces to fit.
One thing I forgot to do is punch holes in the inside flange. Now it will be a chore figuring out how to plug weld the flanges underneath together. Oops! Other than that, the repair is working nicely. I just need to make sure I weld the flanges together before I start making the pieces that extend into the trunk lip. Now I think a small spot welder might come in handy...
Last edited by CRH; December 19th, 2011 at 05:52 AM.
 December 18th, 2011, 08:22 PM
#2
Registered User
Thread Starter
Join Date: Dec 2011
Location: Utah County
Posts: 80
More Olds!
I am back at the '62 Oldsmobile, this time finishing the last rust areas and a leaded area that started bubbling. The passenger rear corner had bulges in the lead applied to cover the overlap seams where the rear corner piece meets the 1/4 panel. The factory did this the same way after spot welding the panels together. This particular area was redone when a new entire 1/4 panel was attached sometime early in the car's life. The liberal use of lead indicates this to me.
The body man attached this area of panels with brazing and sheet metal screws, with welding elsewhere. Then the seams were covered with lots of lead. I would never have messed with this area, but here is where the lead was bubbling. After removing lead from the seams I found pockets where something didn't get along with the lead and steel living together. I wonder if it was a sort of oxidation, impurities in the lead, or the steel base not being totally prepared.
 So I began to remove all of the lead with careful heating, pushing soft blobs away and wiping the wet lead with a rag. The lead used seemed extensive; I also didn't want to put lead back onto a not-so-perfect seam full of crevices and overlap, being afraid that no matter how clean I get it, there would likely be remaining impurity issues. I didn't want the bulges to reappear after I finish this car. So I decided to remove the overlap areas entirely, and weld new sheet metal patches level with the outer area.
 Forming little pieces was not difficult, as I had a nice pattern to follow. The curves were very easy since the patches were so small, only requiring using my hand and pliers to shape them. The main reason I made one small patch (and attached it) at a time was to keep the overall shape of this panel in line. This helped me avoid moving the middle panel out of alignment with the shape it needed to follow.
 This is the only time I needed any other tool than my hand held pliers. I just needed a little bend on the brake.
 Second to last piece being fitted for trimming.
 Careful grinding, filing and a little picking with the body hammer left the pieces pretty smooth. Now I can use a little bit of filler and the area can be fully cleaned/scuffed for adhesion. No lead needed, either.
 Not too bad!
 Here's an area under the pass. door where I needed to make a new patch. The brake, stretcher and hammer-on-anvil were used for this little patch. Welds still look nasty, just waiting to be carefully ground smooth.
December 18th, 2011, 08:26 PM
Here's an area under the pass. door where I needed to make a new patch. The brake, stretcher and hammer-on-anvil were used for this little patch. Welds still look nasty, just waiting to be carefully ground smooth.
December 18th, 2011, 08:26 PM
#3
Registered User
Thread Starter
Join Date: Dec 2011
Location: Utah County
Posts: 80
This was the first repair piece for the '62 Olds. This one worked better than expected, especially with the crease that fades away to flat. Test fits required multiple trimming, twisting, hammering and shrinking. And it finally reached this stage! The pictures below show the final shape, fit and attaching of the piece.
The last picture shows where welds were ground. I am frustrated with the weld area sucking in so much... I am thinking I didn't give consistent cool down times in between welds. Other than that, it is now part of the car and fitting good.

 __________________

The last picture shows where welds were ground. I am frustrated with the weld area sucking in so much... I am thinking I didn't give consistent cool down times in between welds. Other than that, it is now part of the car and fitting good.

 __________________
Last edited by CRH; December 18th, 2011 at 08:51 PM.
December 18th, 2011, 10:07 PM
#4
Registered User

Join Date: Sep 2010
Location: Shorewood, Il.
Posts: 3,057
Since I noticed some surface rust on your new panels, and this product was introduced after your 'lead work' - see if you can get some 'metal prep' from you body shop supply store.
I was introduced to this about 40 years ago, and have never had rust come back after using this product!
We used to 'grind and fill' those rust spots that appeared in the middle of panels in the '80's - grind it out, use metal prep, and fill with thick fiberglass gel - never had a comeback!
Very good job, too!!
Last edited by Rickman48; December 18th, 2011 at 10:09 PM.
December 18th, 2011, 10:52 PM
#5
This was the first repair piece for the '62 Olds. This one worked better than expected, especially with the crease that fades away to flat. Test fits required multiple trimming, twisting, hammering and shrinking. And it finally reached this stage! The pictures below show the final shape, fit and attaching of the piece.
The last picture shows where welds were ground. I am frustrated with the weld area sucking in so much... I am thinking I didn't give consistent cool down times in between welds. Other than that, it is now part of the car and fitting good.
__________________
The last picture shows where welds were ground. I am frustrated with the weld area sucking in so much... I am thinking I didn't give consistent cool down times in between welds. Other than that, it is now part of the car and fitting good.
__________________ December 19th, 2011, 05:48 AM
#7
Registered User
Thread Starter
Join Date: Dec 2011
Location: Utah County
Posts: 80
The reinforcing bracket looks rusted but it is mostly blobs of old tar (everywhere under this car). But either way, I am learning you are exactly right. There is always "more to do!"
December 19th, 2011, 04:31 PM
#9
Registered User
Thread Starter
Join Date: Dec 2011
Location: Utah County
Posts: 80
Since I noticed some surface rust on your new panels, and this product was introduced after your 'lead work' - see if you can get some 'metal prep' from you body shop supply store.
I was introduced to this about 40 years ago, and have never had rust come back after using this product!
We used to 'grind and fill' those rust spots that appeared in the middle of panels in the '80's - grind it out, use metal prep, and fill with thick fiberglass gel - never had a comeback!
Very good job, too!!
I was introduced to this about 40 years ago, and have never had rust come back after using this product!
We used to 'grind and fill' those rust spots that appeared in the middle of panels in the '80's - grind it out, use metal prep, and fill with thick fiberglass gel - never had a comeback!
Very good job, too!!
And thanks for the kind words from you guys!
Last edited by CRH; December 19th, 2011 at 04:34 PM.
December 20th, 2011, 02:20 AM
#10
[QUOTE=CRH;351189]Good idea! Will metal prep help me get rid of tiny spots of surface rust on the existing car panels? I am going nuts finding TINY spots where rust specks started under the original paint as I strip the car. I hate trying to sandblast or grind these little spots... Can the metal prep fix this?
I've used metal prep many times for the exact same problem you are experiencing and I dipped fine steel wool in the metal prep and scrub out the surface rust areas and then quickly afterwards you can wipe it all down with a old clean cloth soaked with water and that will leave surface that won't surface rust again so you can prepare the rest of your sheet metal for fillers and primer surfacers.
I've used metal prep many times for the exact same problem you are experiencing and I dipped fine steel wool in the metal prep and scrub out the surface rust areas and then quickly afterwards you can wipe it all down with a old clean cloth soaked with water and that will leave surface that won't surface rust again so you can prepare the rest of your sheet metal for fillers and primer surfacers.
March 4th, 2012, 07:56 PM
#11
Registered User
Thread Starter
Join Date: Dec 2011
Location: Utah County
Posts: 80
Awesome. I'll get some.
I am finally getting close to primer stage! I plan on a coat of epoxy first, then dumping urethane sanding primer over that within the curing window. Then I get to sand, sand, sand, sand,....
I am finally getting close to primer stage! I plan on a coat of epoxy first, then dumping urethane sanding primer over that within the curing window. Then I get to sand, sand, sand, sand,....

Thread
Thread Starter
Forum
Replies
Last Post
CRH
Major Builds & Projects
0
December 13th, 2011 02:57 PM
lshlsh2
General Discussion
13
September 8th, 2010 10:17 AM


