OLDSmobility '67 442 (clone) buildup...
 April 6th, 2011, 06:42 PM
#41
Registered User
Thread Starter
Join Date: Jul 2008
Location: West Point, NE
Posts: 163

 April 7th, 2011, 08:05 AM
#43
Registered User
Thread Starter
Join Date: Jul 2008
Location: West Point, NE
Posts: 163
May 1st, 2011, 07:15 PM
#44
Registered User
Thread Starter
Join Date: Jul 2008
Location: West Point, NE
Posts: 163
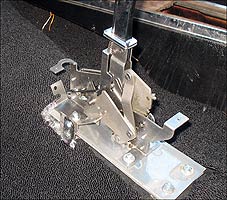
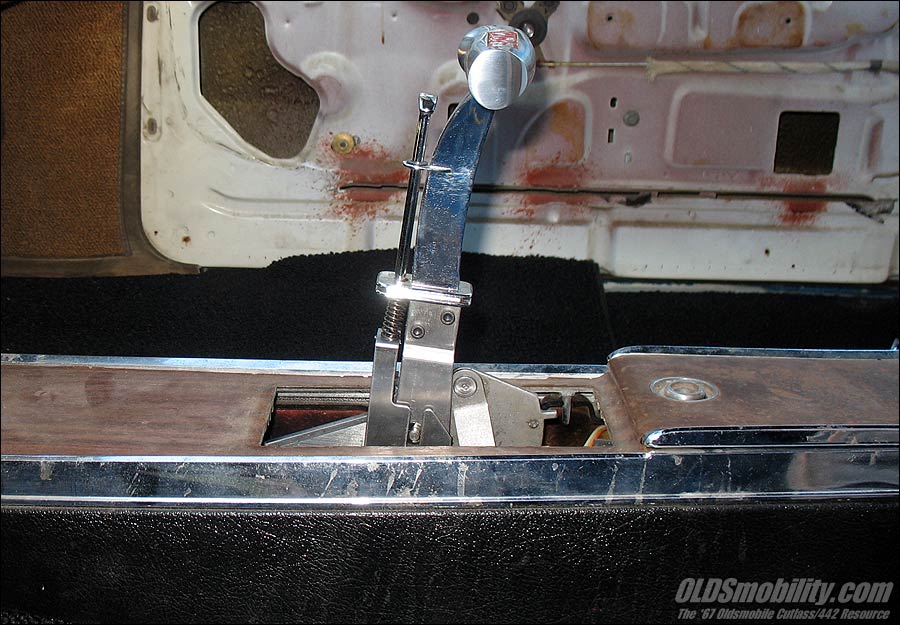
Finally had some time this afternoon to get back to work. On today's agenda was getting the new B&M Megashifter installed. For my project, I'm using a Hurst Dual-Gate (his/hers) console from a '67 GTO, since I preferred it's long and low look over the stock Olds console, but it also allows me to integrate the B&M shifter. Plus the console's flat top will allow me to add some additional goodies later on, maybe some surface-mount gauges.
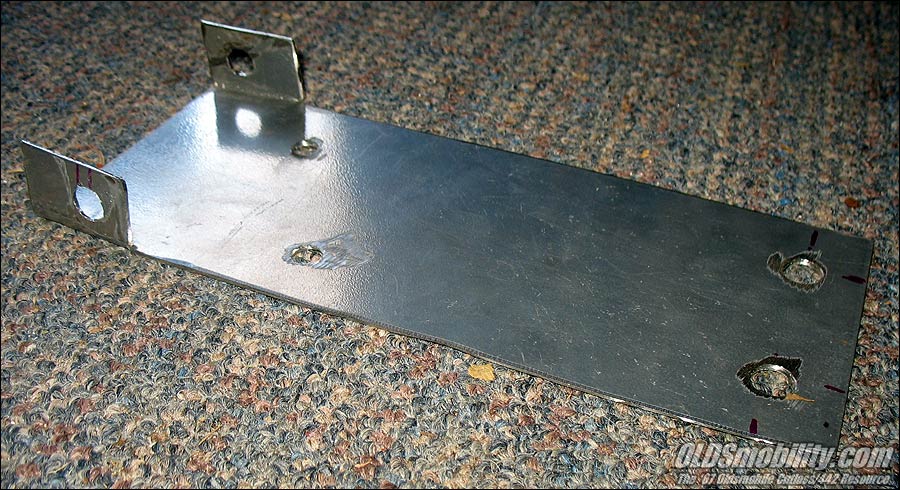
The Megashifter base is set up for a flat surface. However, since the tunnel where it needs to be mounted obviously isn't flat, I had to fabricate some sort of flat mounting bracket for it. Back when this car was running (20+ years ago), I had the DualGate shifter installed, which utilized two L-shaped mounting brackets in front. I decided to fabricate a mounting plate that would use these mounting brackets and the existing two rear mounting holes in the floorpan. I whipped up a mounting plate, drilled the holes to mount the shifter to it and then attached the shifter to it. When I installed the assembly in the car, I discovered I should have measured first instead of eyeballing it, since it turned out the shifter was back too far...it wasn't centered in the console opening and wouldn't allow the console to be mounted far enough forward. No problem...I removed the shifter from the mounting plate, drilled four new mounting holes as far forward as I could and then remocked everything up. Unfortunately, the shifter was still too far back.
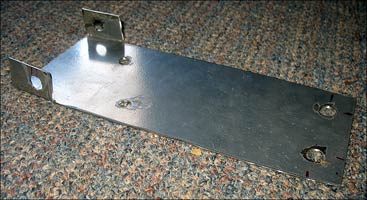
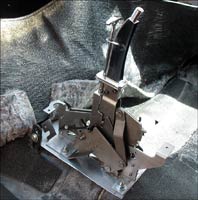
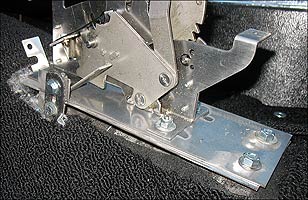
Upon measuring, I decided I needed to go an additional 1-1/2" forward to center it in the console opening. However, my existing mounting plate wasn't long enough to allow this, so I had to start over, creating a duplicate mounting plate that was 1-1/2" longer (towards the front). As I was getting ready to mock things up again, I decided to actually use both plates, one on top of the other, for added rigidity. I flipped the first (shorter) one upside down and and attached it to the bottom of the second (longer) one, and then mocked it up again...and everything's looking pretty good and is rock-solid.
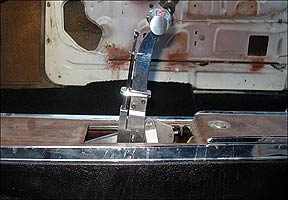
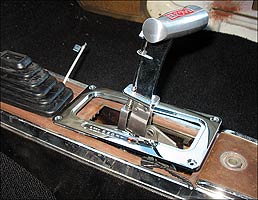
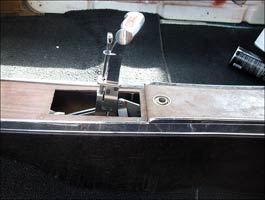
You probably noticed that the console needs to be cleaned up and detailed. I decided to hold off on that until the shifter got mounted, since I figured there might be some minor mods required to mate the shifter to it...and there is. The shifter hole is long enough, but just a hair too narrow to accommodate the top bezel, so that will need to be widened. Hopefully by next weekend I'll have the console cleaned up, new woodgrain appliques attached and new latch mechanism installed, and the console installed. I'm also going to have to do a little bit of minor sanding on the plastic top bezel's edges to allow it to sit down flat between the console's top chrome trim.
The Megashifter base is set up for a flat surface. However, since the tunnel where it needs to be mounted obviously isn't flat, I had to fabricate some sort of flat mounting bracket for it. Back when this car was running (20+ years ago), I had the DualGate shifter installed, which utilized two L-shaped mounting brackets in front. I decided to fabricate a mounting plate that would use these mounting brackets and the existing two rear mounting holes in the floorpan. I whipped up a mounting plate, drilled the holes to mount the shifter to it and then attached the shifter to it. When I installed the assembly in the car, I discovered I should have measured first instead of eyeballing it, since it turned out the shifter was back too far...it wasn't centered in the console opening and wouldn't allow the console to be mounted far enough forward. No problem...I removed the shifter from the mounting plate, drilled four new mounting holes as far forward as I could and then remocked everything up. Unfortunately, the shifter was still too far back.


Upon measuring, I decided I needed to go an additional 1-1/2" forward to center it in the console opening. However, my existing mounting plate wasn't long enough to allow this, so I had to start over, creating a duplicate mounting plate that was 1-1/2" longer (towards the front). As I was getting ready to mock things up again, I decided to actually use both plates, one on top of the other, for added rigidity. I flipped the first (shorter) one upside down and and attached it to the bottom of the second (longer) one, and then mocked it up again...and everything's looking pretty good and is rock-solid.


You probably noticed that the console needs to be cleaned up and detailed. I decided to hold off on that until the shifter got mounted, since I figured there might be some minor mods required to mate the shifter to it...and there is. The shifter hole is long enough, but just a hair too narrow to accommodate the top bezel, so that will need to be widened. Hopefully by next weekend I'll have the console cleaned up, new woodgrain appliques attached and new latch mechanism installed, and the console installed. I'm also going to have to do a little bit of minor sanding on the plastic top bezel's edges to allow it to sit down flat between the console's top chrome trim.
May 2nd, 2011, 06:25 PM
#47
Registered User
Thread Starter
Join Date: Jul 2008
Location: West Point, NE
Posts: 163
Warmer weather's coming, so I'll be picking up the pace quite a bit. I believe I now have all the parts to get my engine completely assembled, minus the pushrods ('cause I'll probably need custom pieces).
May 8th, 2011, 06:51 PM
#48
Registered User
Thread Starter
Join Date: Jul 2008
Location: West Point, NE
Posts: 163
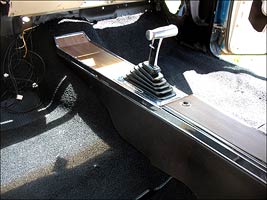
Got the Megashifter installation finished up this afternoon, aside from actually screwing down the console (didn't have the correct-length screws).
The console was torn down, cleaned up and repainted, then reassembled, new woodgrain appliques installed and then I enlarged the hole for the shifter. Ran wires up under the carpet for the neutral safety switch, back-up lights, shift indicator light and the console's rear domelight. I still need to screw the console down and install the latch mechanism (hasn't arrived yet).
After I post this, I'll be doing the finally reassembly of the dash assembly. Then towards the end of the week I'll be getting started on the firewall cover/pad. If you remember back a few posts, I discovered that the pad I got from OPGI last fall was too narrow side-to-side, and I was contemplating making my own. I've decided what to do in that area...I think you'll get a kick out of how it turns out.
The console was torn down, cleaned up and repainted, then reassembled, new woodgrain appliques installed and then I enlarged the hole for the shifter. Ran wires up under the carpet for the neutral safety switch, back-up lights, shift indicator light and the console's rear domelight. I still need to screw the console down and install the latch mechanism (hasn't arrived yet).

After I post this, I'll be doing the finally reassembly of the dash assembly. Then towards the end of the week I'll be getting started on the firewall cover/pad. If you remember back a few posts, I discovered that the pad I got from OPGI last fall was too narrow side-to-side, and I was contemplating making my own. I've decided what to do in that area...I think you'll get a kick out of how it turns out.
May 8th, 2011, 09:52 PM
#49
Registered User
Thread Starter
Join Date: Jul 2008
Location: West Point, NE
Posts: 163
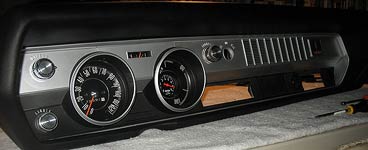
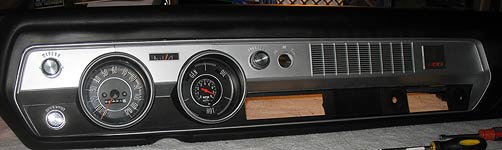
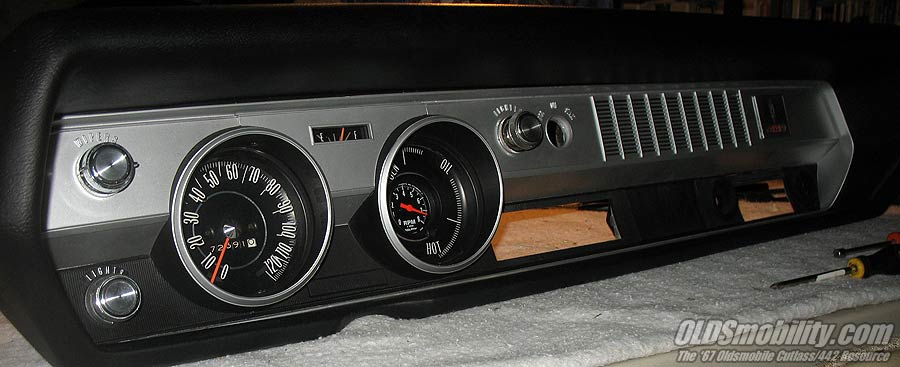
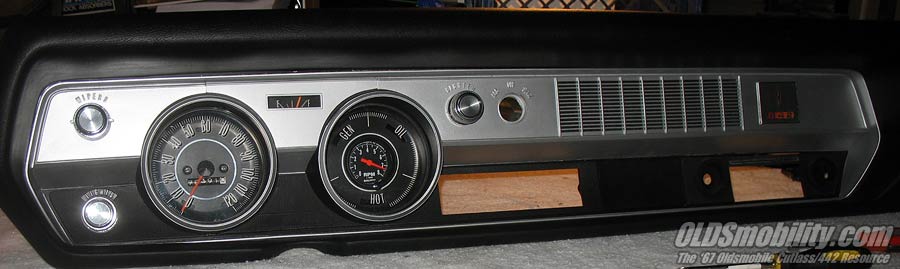
Just thought I'd post these two pics. Got the dash assembled, it's now ready to install. I'm pretty pleased with how it turned out overall. It's not a concours-quality job, but it IS very nice, and a huge improvement over what I had originally...I'll probably do a few more minor touch-ups in a couple places.
Last edited by OLDSmobility; May 8th, 2011 at 09:54 PM.
May 21st, 2011, 01:50 PM
#51
Registered User
Thread Starter
Join Date: Jul 2008
Location: West Point, NE
Posts: 163
I had a couple hours this morning to work in the garage, so I decided to finish up transforming the passenger-side kick panel area from an AC-type to a non-AC (manual vent) style.
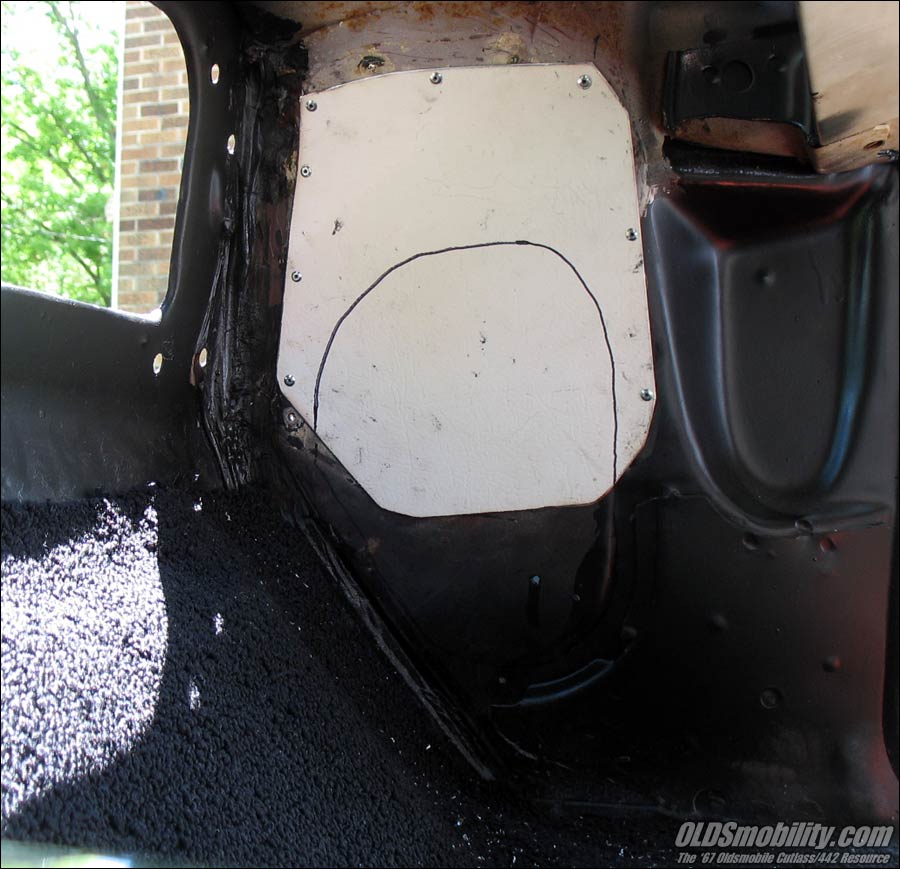
First I had to fabricate a sheetmetal plate to cover the hole in the kickpanel area. I riveted it over the hole and then marked out where I needed to cut to allow the vent-style kick panel to protrude through. I used an angle grinder and cut-off wheel to rough in the hole, and then cleaned it up with a die-grinder. Unfortunately, I ended up roughing the hole in a bit too large, and by the time I got it cleaned up, the hole was a little too tall. It would have worked OK and been completely invisible, but it still bugged me, so I ended up drilling out the rivets to remove the cover and fabricating a new one with a slightly smaller hole, which will allow the kickpanel to mate up better for better sealing. In the end it actually turned out pretty well.
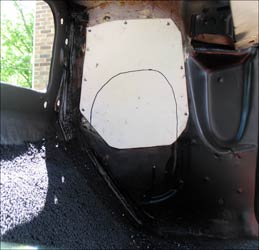


The second picture shows the first attempt at cutting the hole, and you can see how the top of the hole is a bit out of shape. I didn't take pics of the re-do, but it's essentially the same, only a bit smaller. Now I just need to paint my handiwork to make it disappear, seal the kickpanel cover to the body with some 3M rope caulk, and then I can get started on the firewall cover...but due to a busy weekend with my daughter's two dance recitals, that'll have to wait until next weekend.
First I had to fabricate a sheetmetal plate to cover the hole in the kickpanel area. I riveted it over the hole and then marked out where I needed to cut to allow the vent-style kick panel to protrude through. I used an angle grinder and cut-off wheel to rough in the hole, and then cleaned it up with a die-grinder. Unfortunately, I ended up roughing the hole in a bit too large, and by the time I got it cleaned up, the hole was a little too tall. It would have worked OK and been completely invisible, but it still bugged me, so I ended up drilling out the rivets to remove the cover and fabricating a new one with a slightly smaller hole, which will allow the kickpanel to mate up better for better sealing. In the end it actually turned out pretty well.

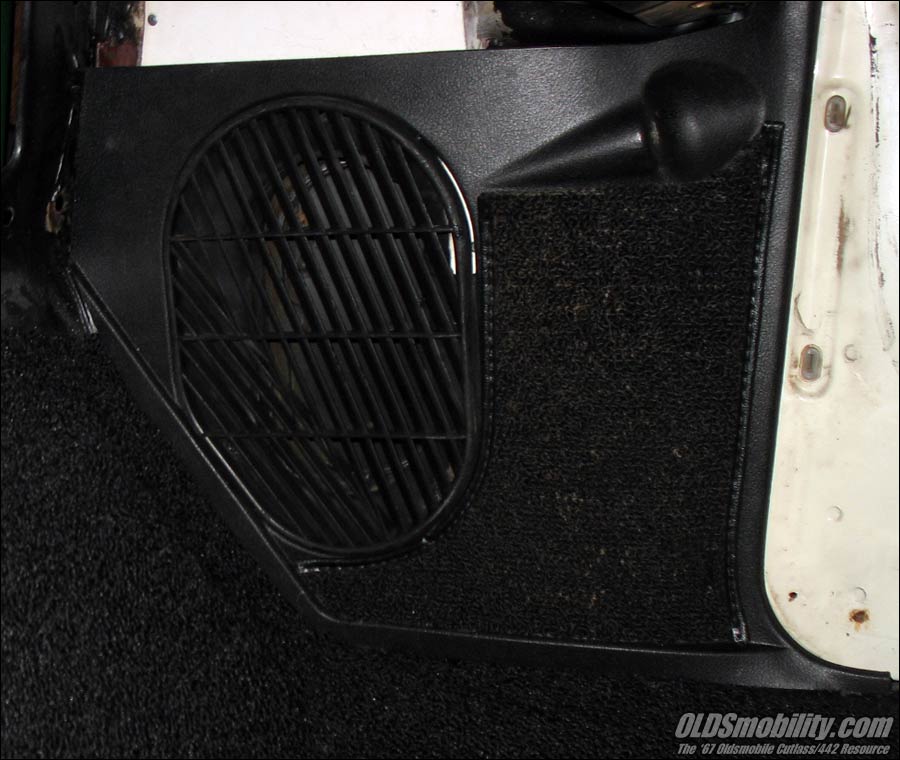
The second picture shows the first attempt at cutting the hole, and you can see how the top of the hole is a bit out of shape. I didn't take pics of the re-do, but it's essentially the same, only a bit smaller. Now I just need to paint my handiwork to make it disappear, seal the kickpanel cover to the body with some 3M rope caulk, and then I can get started on the firewall cover...but due to a busy weekend with my daughter's two dance recitals, that'll have to wait until next weekend.
May 22nd, 2011, 07:06 AM
#52
NOVICE car nut
Join Date: Nov 2010
Location: Milwaukee Wisconsin
Posts: 3,123
I figured I should start my own build-up thread, since I'm probably going to be hanging out here quite a bit in the future. (I've got a similar thread on another Olds forum, but it was suggested I add my build-up here as well, since many folks can't get registered at the other site.)
This first post will just be a quick flashback, relating how I got involved with my Olds.
Back in the late '80s I had a friend who wanted to find an old musclecar to restore. I did some looking around and found a '67 Cutlass post in a repo lot which had been abandoned years earlier with a blown-up engine. He bought it for $150, and then after deciding it would be too much work for him, he sold it to me. I dropped a 455 from a '73 wagon into it and drove it around for a couple years.
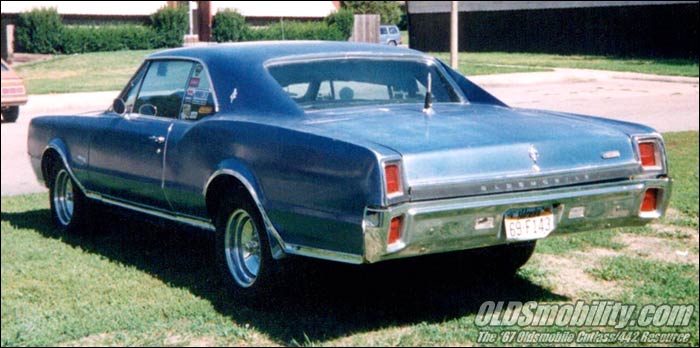
One day while on a roadtrip I drove by a field that had two '67s (a Cutlass and a 442) and a '66 442 shell parked out in it. I tracked down the owner and purchased all three for $1250, figuring to just part them out. Upon getting them home however, I found that the Cutlass body was in much better shape then the one I was driving, so the decision was made to part out my driver instead. The 442 had been rear-ended and needed bodywork that was beyond my capabilities, but donated all the cool parts. Here's a (crappy) shot of the three cars together at one time:

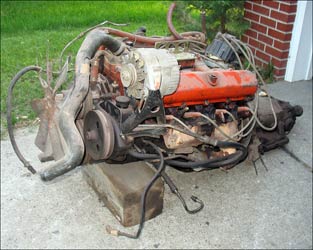
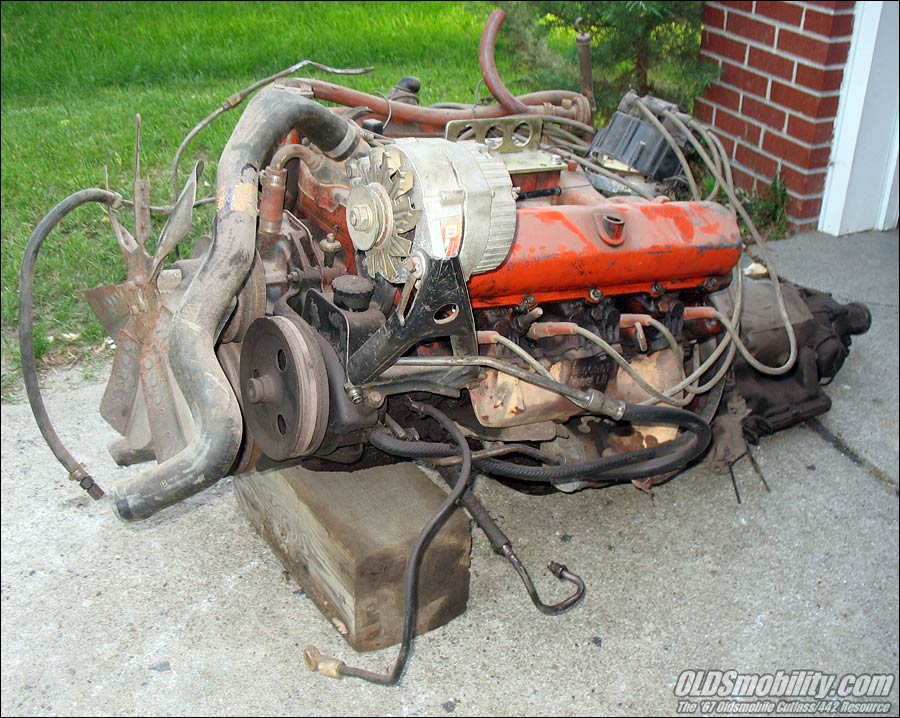
My other driver was a '68 Toronado, and I ended up pulling that 455 to build up for my 442 clone project.

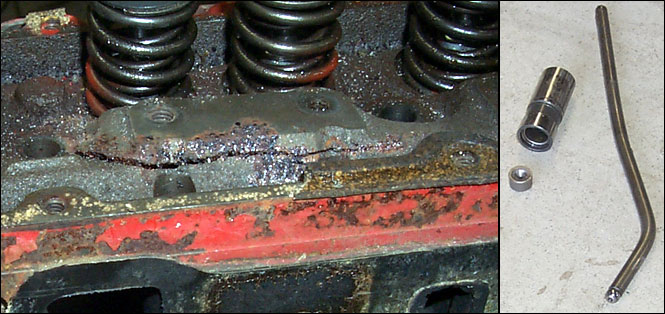
I dropped it in, replaced most of the interior and then got ready to drive this around for a while...but before the motor even got broke in, there was an 'incident' which allowed contact between a piston and a valve, which exploded the lifter, bent a pushrod, and actually ripped the rocker arm pedestal away from the head!
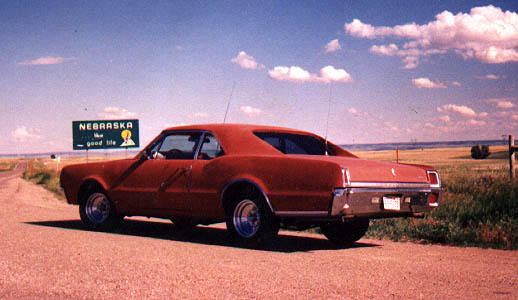
Here's the last time it was roadworthy, back in 1995:
Due to circumstances in my life, I had to put the Olds into storage for a few years. When I got it back out, I decided to redo my amateur resto-mod with a complete body-off. I pulled the body off, scrounged up a '72 Pontiac LeMans chassis to set the body on in the meantime, which allowed me to move it around as needed, and sandblasted and painted the frame (with Dupont single-stage urethane) and got the suspension pieces powdercoated. But then life REALLY got busy...and again it got pushed off to the side, while I got married, had four kids, blah blah....for the next 12 years.
Until June 17, 2010 (my birthday)....
This first post will just be a quick flashback, relating how I got involved with my Olds.
Back in the late '80s I had a friend who wanted to find an old musclecar to restore. I did some looking around and found a '67 Cutlass post in a repo lot which had been abandoned years earlier with a blown-up engine. He bought it for $150, and then after deciding it would be too much work for him, he sold it to me. I dropped a 455 from a '73 wagon into it and drove it around for a couple years.
One day while on a roadtrip I drove by a field that had two '67s (a Cutlass and a 442) and a '66 442 shell parked out in it. I tracked down the owner and purchased all three for $1250, figuring to just part them out. Upon getting them home however, I found that the Cutlass body was in much better shape then the one I was driving, so the decision was made to part out my driver instead. The 442 had been rear-ended and needed bodywork that was beyond my capabilities, but donated all the cool parts. Here's a (crappy) shot of the three cars together at one time:
My other driver was a '68 Toronado, and I ended up pulling that 455 to build up for my 442 clone project.
I dropped it in, replaced most of the interior and then got ready to drive this around for a while...but before the motor even got broke in, there was an 'incident' which allowed contact between a piston and a valve, which exploded the lifter, bent a pushrod, and actually ripped the rocker arm pedestal away from the head!
Here's the last time it was roadworthy, back in 1995:
Due to circumstances in my life, I had to put the Olds into storage for a few years. When I got it back out, I decided to redo my amateur resto-mod with a complete body-off. I pulled the body off, scrounged up a '72 Pontiac LeMans chassis to set the body on in the meantime, which allowed me to move it around as needed, and sandblasted and painted the frame (with Dupont single-stage urethane) and got the suspension pieces powdercoated. But then life REALLY got busy...and again it got pushed off to the side, while I got married, had four kids, blah blah....for the next 12 years.
Until June 17, 2010 (my birthday)....
June 4th, 2011, 09:27 PM
#53
Registered User
Thread Starter
Join Date: Jul 2008
Location: West Point, NE
Posts: 163
Just a quick update to show you the progress over the past few days...
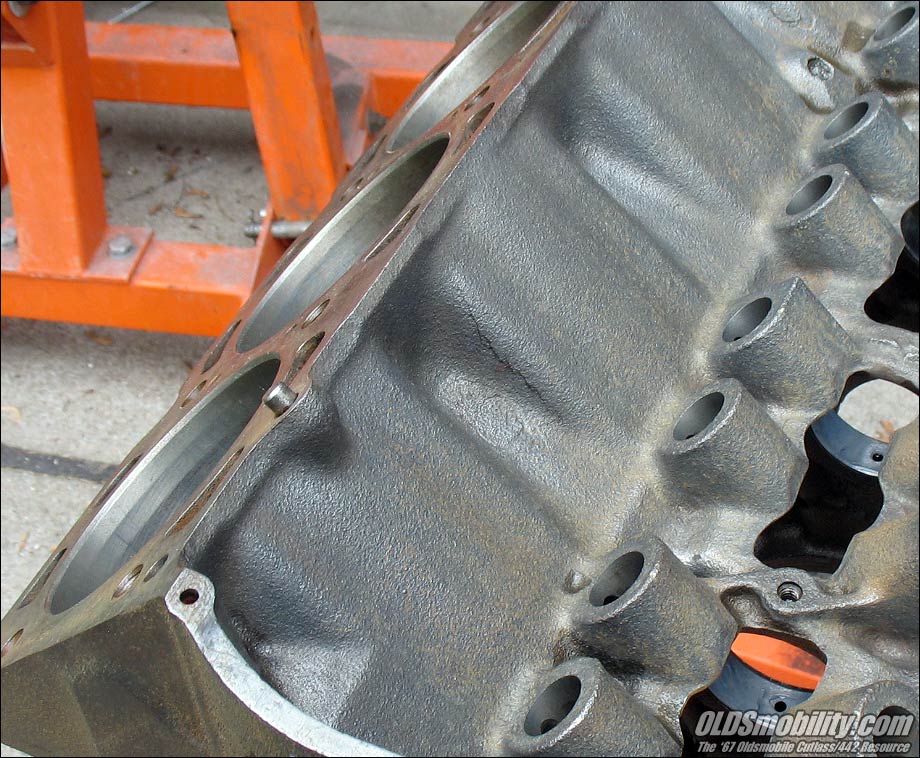
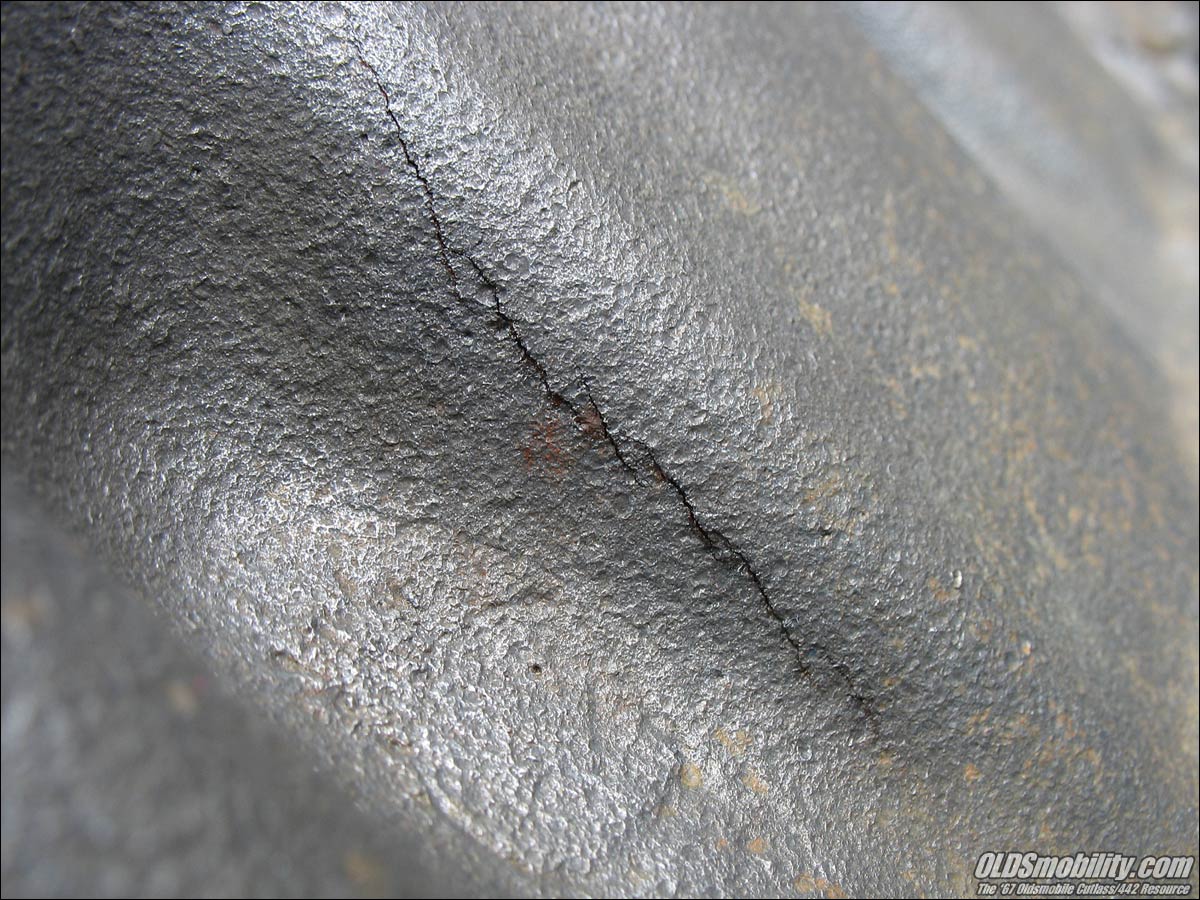
I took Thursday and Friday off work in order to get started assembling the 455, but during the final block scrubbing I noticed a crack in the lifter valley area...which pretty much renders this block useless.
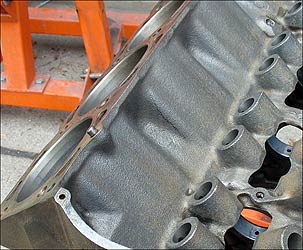

I'm not sure how the hell I missed this one, but it's all over but the cryin'. So...I get to start over on the engine. I have another complete '71 455 in storage that will supply the block, I'll just have to get it bored .030 to mate up with the forged aluminum pistons I've already got. However, I won't be able to retrieve it to start the teardown for another week or so, so I decided to have a couple-day marathon session with the interior.
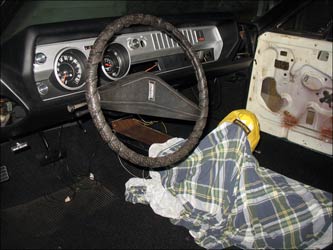
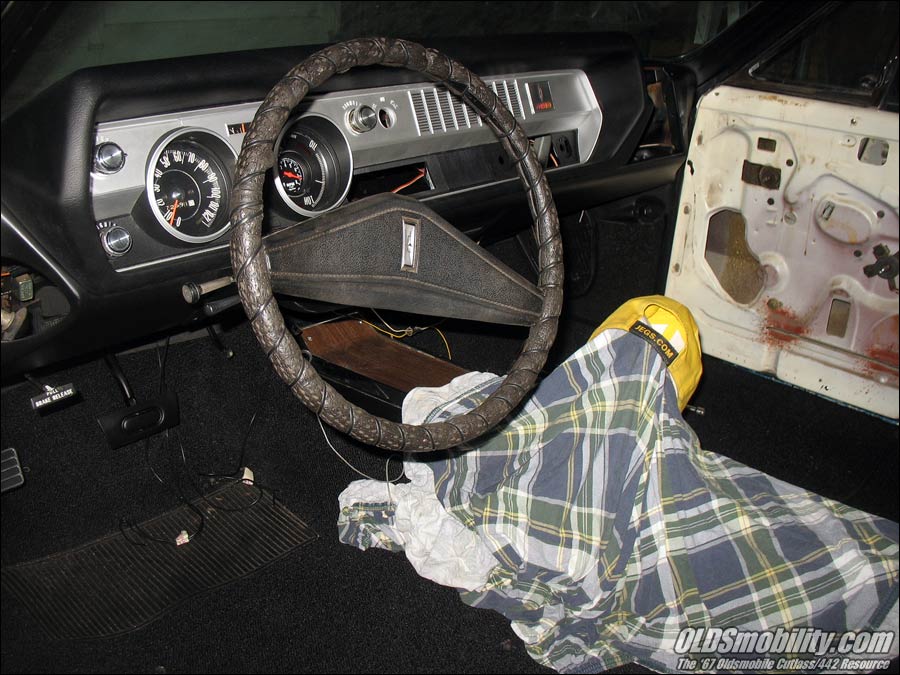
I got the kickpanels cleaned up and installed, the dash painted (white to black), finished installing the firewall cover and then got the heater box and outer AC-delete cover installed. Then I got started on the steering column. Got my hands on a nice tilt column which was the wrong color and needed a new turn signal switch, so that kept me busy for a few hours. After it was installed, it was time for the new instrument panel assembly. It's in and about 90% hooked up. At the moment I'm working on taking the guts from a heater-only dash control setup getting it to fit inside an AC/heater control, because the chrome face of the heater-only controls was very pitted, whereas the AC/heater face is pretty nice. (In other words, when it's finally installed, it's gonna look pretty, but it'll be kinda confusing to everyone else, since the AC slider will now be activating the defrost duct, and the switch itself will be marked backwards. Oh well...it's just another part I'll have to keep my eyes open for, but it'll work in the meantime.) So anyway, here's a quick shot of the interior as it sits now. Ignore the crappy steering wheel...I've got a nice aftermarket wheel that'll get installed after the rest of the interior is finished. (I slapped this one on just to appease my 4-year old son, who has the need to remind me several times a day that I need to put in a steering wheel.)
Now he's 'reminding' me that I need to put in some seats.") I was actually going to get started installing the new Legendary seat covers today until it dawned on me I forgot to order the hog rings and pliers, so that detail will be taken care of this evening, so I should be ready to start on the covers by next weekend.
I was actually going to get started installing the new Legendary seat covers today until it dawned on me I forgot to order the hog rings and pliers, so that detail will be taken care of this evening, so I should be ready to start on the covers by next weekend.
I took Thursday and Friday off work in order to get started assembling the 455, but during the final block scrubbing I noticed a crack in the lifter valley area...which pretty much renders this block useless.
I'm not sure how the hell I missed this one, but it's all over but the cryin'. So...I get to start over on the engine. I have another complete '71 455 in storage that will supply the block, I'll just have to get it bored .030 to mate up with the forged aluminum pistons I've already got. However, I won't be able to retrieve it to start the teardown for another week or so, so I decided to have a couple-day marathon session with the interior.
I got the kickpanels cleaned up and installed, the dash painted (white to black), finished installing the firewall cover and then got the heater box and outer AC-delete cover installed. Then I got started on the steering column. Got my hands on a nice tilt column which was the wrong color and needed a new turn signal switch, so that kept me busy for a few hours. After it was installed, it was time for the new instrument panel assembly. It's in and about 90% hooked up. At the moment I'm working on taking the guts from a heater-only dash control setup getting it to fit inside an AC/heater control, because the chrome face of the heater-only controls was very pitted, whereas the AC/heater face is pretty nice. (In other words, when it's finally installed, it's gonna look pretty, but it'll be kinda confusing to everyone else, since the AC slider will now be activating the defrost duct, and the switch itself will be marked backwards. Oh well...it's just another part I'll have to keep my eyes open for, but it'll work in the meantime.) So anyway, here's a quick shot of the interior as it sits now. Ignore the crappy steering wheel...I've got a nice aftermarket wheel that'll get installed after the rest of the interior is finished. (I slapped this one on just to appease my 4-year old son, who has the need to remind me several times a day that I need to put in a steering wheel.)
Now he's 'reminding' me that I need to put in some seats.
I was actually going to get started installing the new Legendary seat covers today until it dawned on me I forgot to order the hog rings and pliers, so that detail will be taken care of this evening, so I should be ready to start on the covers by next weekend.
June 8th, 2011, 08:21 PM
#54
Registered User
Thread Starter
Join Date: Jul 2008
Location: West Point, NE
Posts: 163
Not much to report yet...but I did get the back-up 455 out of storage after work tonight and into the driveway, and got it about 1/3 disassembled. Should complete the teardown tomorrow evening.

 November 30th, 2011, 10:41 AM
#57
NOVICE car nut
Join Date: Nov 2010
Location: Milwaukee Wisconsin
Posts: 3,123
Just a quick update to show you the progress over the past few days...
I took Thursday and Friday off work in order to get started assembling the 455, but during the final block scrubbing I noticed a crack in the lifter valley area...which pretty much renders this block useless.
I'm not sure how the hell I missed this one, but it's all over but the cryin'. So...I get to start over on the engine. I have another complete '71 455 in storage that will supply the block, I'll just have to get it bored .030 to mate up with the forged aluminum pistons I've already got. However, I won't be able to retrieve it to start the teardown for another week or so, so I decided to have a couple-day marathon session with the interior.
I got the kickpanels cleaned up and installed, the dash painted (white to black), finished installing the firewall cover and then got the heater box and outer AC-delete cover installed. Then I got started on the steering column. Got my hands on a nice tilt column which was the wrong color and needed a new turn signal switch, so that kept me busy for a few hours. After it was installed, it was time for the new instrument panel assembly. It's in and about 90% hooked up. At the moment I'm working on taking the guts from a heater-only dash control setup getting it to fit inside an AC/heater control, because the chrome face of the heater-only controls was very pitted, whereas the AC/heater face is pretty nice. (In other words, when it's finally installed, it's gonna look pretty, but it'll be kinda confusing to everyone else, since the AC slider will now be activating the defrost duct, and the switch itself will be marked backwards. Oh well...it's just another part I'll have to keep my eyes open for, but it'll work in the meantime.) So anyway, here's a quick shot of the interior as it sits now. Ignore the crappy steering wheel...I've got a nice aftermarket wheel that'll get installed after the rest of the interior is finished. (I slapped this one on just to appease my 4-year old son, who has the need to remind me several times a day that I need to put in a steering wheel.)
Now he's 'reminding' me that I need to put in some seats. I was actually going to get started installing the new Legendary seat covers today until it dawned on me I forgot to order the hog rings and pliers, so that detail will be taken care of this evening, so I should be ready to start on the covers by next weekend.
I took Thursday and Friday off work in order to get started assembling the 455, but during the final block scrubbing I noticed a crack in the lifter valley area...which pretty much renders this block useless.
I'm not sure how the hell I missed this one, but it's all over but the cryin'. So...I get to start over on the engine. I have another complete '71 455 in storage that will supply the block, I'll just have to get it bored .030 to mate up with the forged aluminum pistons I've already got. However, I won't be able to retrieve it to start the teardown for another week or so, so I decided to have a couple-day marathon session with the interior.
I got the kickpanels cleaned up and installed, the dash painted (white to black), finished installing the firewall cover and then got the heater box and outer AC-delete cover installed. Then I got started on the steering column. Got my hands on a nice tilt column which was the wrong color and needed a new turn signal switch, so that kept me busy for a few hours. After it was installed, it was time for the new instrument panel assembly. It's in and about 90% hooked up. At the moment I'm working on taking the guts from a heater-only dash control setup getting it to fit inside an AC/heater control, because the chrome face of the heater-only controls was very pitted, whereas the AC/heater face is pretty nice. (In other words, when it's finally installed, it's gonna look pretty, but it'll be kinda confusing to everyone else, since the AC slider will now be activating the defrost duct, and the switch itself will be marked backwards. Oh well...it's just another part I'll have to keep my eyes open for, but it'll work in the meantime.) So anyway, here's a quick shot of the interior as it sits now. Ignore the crappy steering wheel...I've got a nice aftermarket wheel that'll get installed after the rest of the interior is finished. (I slapped this one on just to appease my 4-year old son, who has the need to remind me several times a day that I need to put in a steering wheel.)
Now he's 'reminding' me that I need to put in some seats.
I was actually going to get started installing the new Legendary seat covers today until it dawned on me I forgot to order the hog rings and pliers, so that detail will be taken care of this evening, so I should be ready to start on the covers by next weekend. jk actually that would be the same wheel I got on my 72 CS , and I agree I dont like it.... BTW excellent job you are doing , every new pic you post just wows me .... top notch work for sure .... had a question on the marine clean you used a while back .... I used it to clean some parts and noticed it left a slime coating on the metal when rinsed off .... perhaps I made the mixture to strong ? or could that be because I let the bottle of marine clean sit in my moms garage over winter ( not a heated garage ) could that have ruined the marine clean ? just wondering .
February 15th, 2012, 02:12 PM
#58
I have spent the last hour reading all of this thread and reviewing all of the pictures.
What a GREAT thing you have done here. I can not tell you how much I appreciate your time and effort in this. It is a really "get off your butt and do something" inspiration.
I noticed you have not updated this since June of last year. I hope all is well with you and yours and that you have just been to busy to update.
If you have any more info or pics to post I am sure I speak for many when I say we would love to read/see.
Best wishes.
Todd
June 30th, 2012, 07:29 PM
#59
Registered User
Thread Starter
Join Date: Jul 2008
Location: West Point, NE
Posts: 163
Well, FWIW....I'm back!
First of all, I have to apologize for not posting anything for the past year to let you all know I'm still kicking and that this project just got put on a temporary hold. I should have done so before now, I know. I'll definitely try to keep you all in the loop a little better from now on. Sorry! However, I do have some semi-valid excuses. Things around my household have been busy as hell, with two new additions to the family that have been keeping me pretty occupied.
My last post here was in June of last year. About three weeks later I finally found and purchased a truck that I've been actively searching for for several years. I'm really into '60s/'70s Ford pickups and have been keeping my eyes open for that one special truck that was in very good condition and was optioned like I'd have ordered it from the factory, and I finally found one on E-bay that fit all the criteria. The family and I drove from Nebraska to Wisconsin to pick it up over the July 4th weekend last year, and I've been working on it and driving the hell out of it ever since.
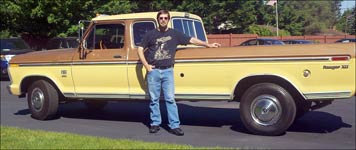
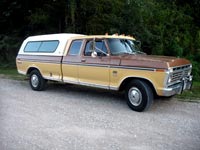
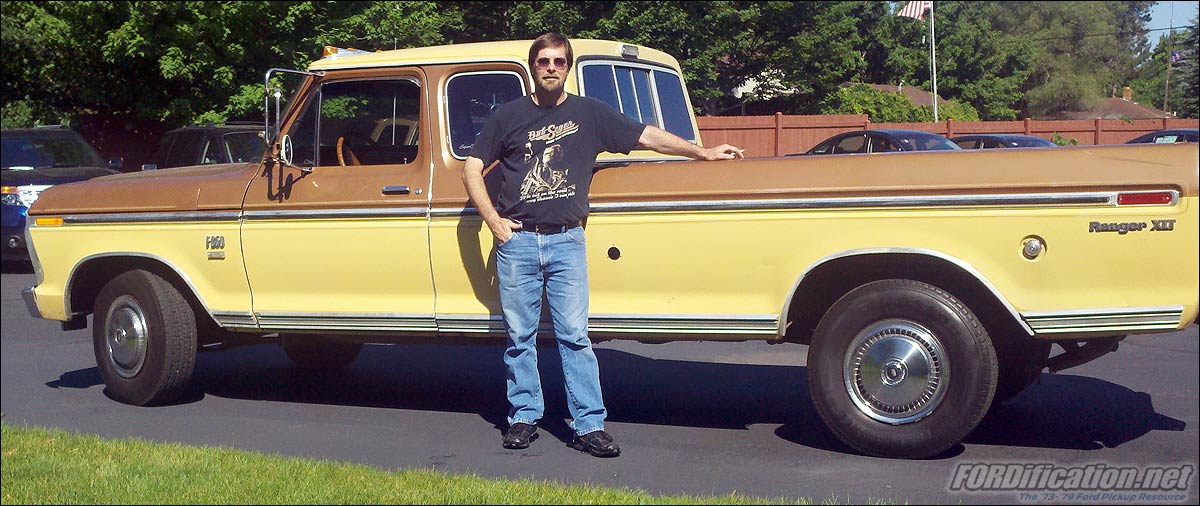
The first shot was taken with my cell phone as I was getting ready to hop in and drive home. The second shot was several months later, after I'd found an original Ford Four Seasons topper that was made specifically for this generation of truck and got it installed. (I've since replaced this Standard version with a Deluxe version, which has sliding side windows and screens and bright trim around the windows.)
Anyway, what you're looking at is a 1975 Ford F250 SuperCab Ranger XLT Camper Special. It's powered by a 460/C6/Dana 60 w/3.55 gears and is fully loaded with desireable options: power steering, power disc brakes, A/C, cruise control (this is the first year for cruise in a Ford truck), dual exhaust, dual fuel tanks, bedside toolbox, swing-out spare tire and factory air horns. When I picked it up there was only 81,000 original miles on this truck....and while there are a few dings here and there, there is no body rust whatsoever! While the truck is exactly what I'd been looking for, I did have some reservations about the colors, but they're now kinda starting to grow on me. I've since added a period-correct Ford AM/FM radio (hooked up to a vintage 7-band graphic equalizer and four speakers) and replaced a few pieces of dented trim. This truck is now my daily driver, and I've racked up almost 10,000 miles on it in the year since I bought it.
So...you remember I said there were TWO new additions? Well, a couple months after buying this truck, my wife informs me that our family was about to get a little larger! Since we currently have three boys and a girl, we were kinda hoping for another girl to help balance things out a bit, but our fifth child (who was born exactly 30 days ago, on June 1st, 2012) was another son. Say hello to Wesley Chase Dickson:


So this summer so far has been busy with me checking out the local salvage yards for cool old truck parts, chauffering my oldest sons to their soccer and Little League games, etc. But the itch to get back to work on the Olds has been getting much stronger, so last week I decided now that things are starting to settle down a bit with the new baby and with the Little League games being just about over, it was time. I called up the machine shop where I dropped my engine off last fall and was told that he'd gotten sidetracked with a lot of other projects too, but that my engine was almost done. He just had to get everything balanced and it would be ready to go, and so I talked him into bumping this up on his priority list. He told me to give him a week or so and he'd get it taken care of.
So I plan on spending the day tomorrow in the garage, hauling out a truckload of truck parts that I've been accumulating over the winter and spring, and just getting it cleaned up and ready to work in again. I need to get started finishing up on the interior of the 442, by getting the new seat covers and door panels installed, which I have on hand, and a new headliner, which I still need to order. Hopefully by that time the engine pieces will be coming home and I can then get it put together.
I'll be posting regular updates again as progress is made, so stay tuned!
First of all, I have to apologize for not posting anything for the past year to let you all know I'm still kicking and that this project just got put on a temporary hold. I should have done so before now, I know. I'll definitely try to keep you all in the loop a little better from now on. Sorry!
However, I do have some semi-valid excuses. Things around my household have been busy as hell, with two new additions to the family that have been keeping me pretty occupied. My last post here was in June of last year. About three weeks later I finally found and purchased a truck that I've been actively searching for for several years. I'm really into '60s/'70s Ford pickups and have been keeping my eyes open for that one special truck that was in very good condition and was optioned like I'd have ordered it from the factory, and I finally found one on E-bay that fit all the criteria. The family and I drove from Nebraska to Wisconsin to pick it up over the July 4th weekend last year, and I've been working on it and driving the hell out of it ever since.
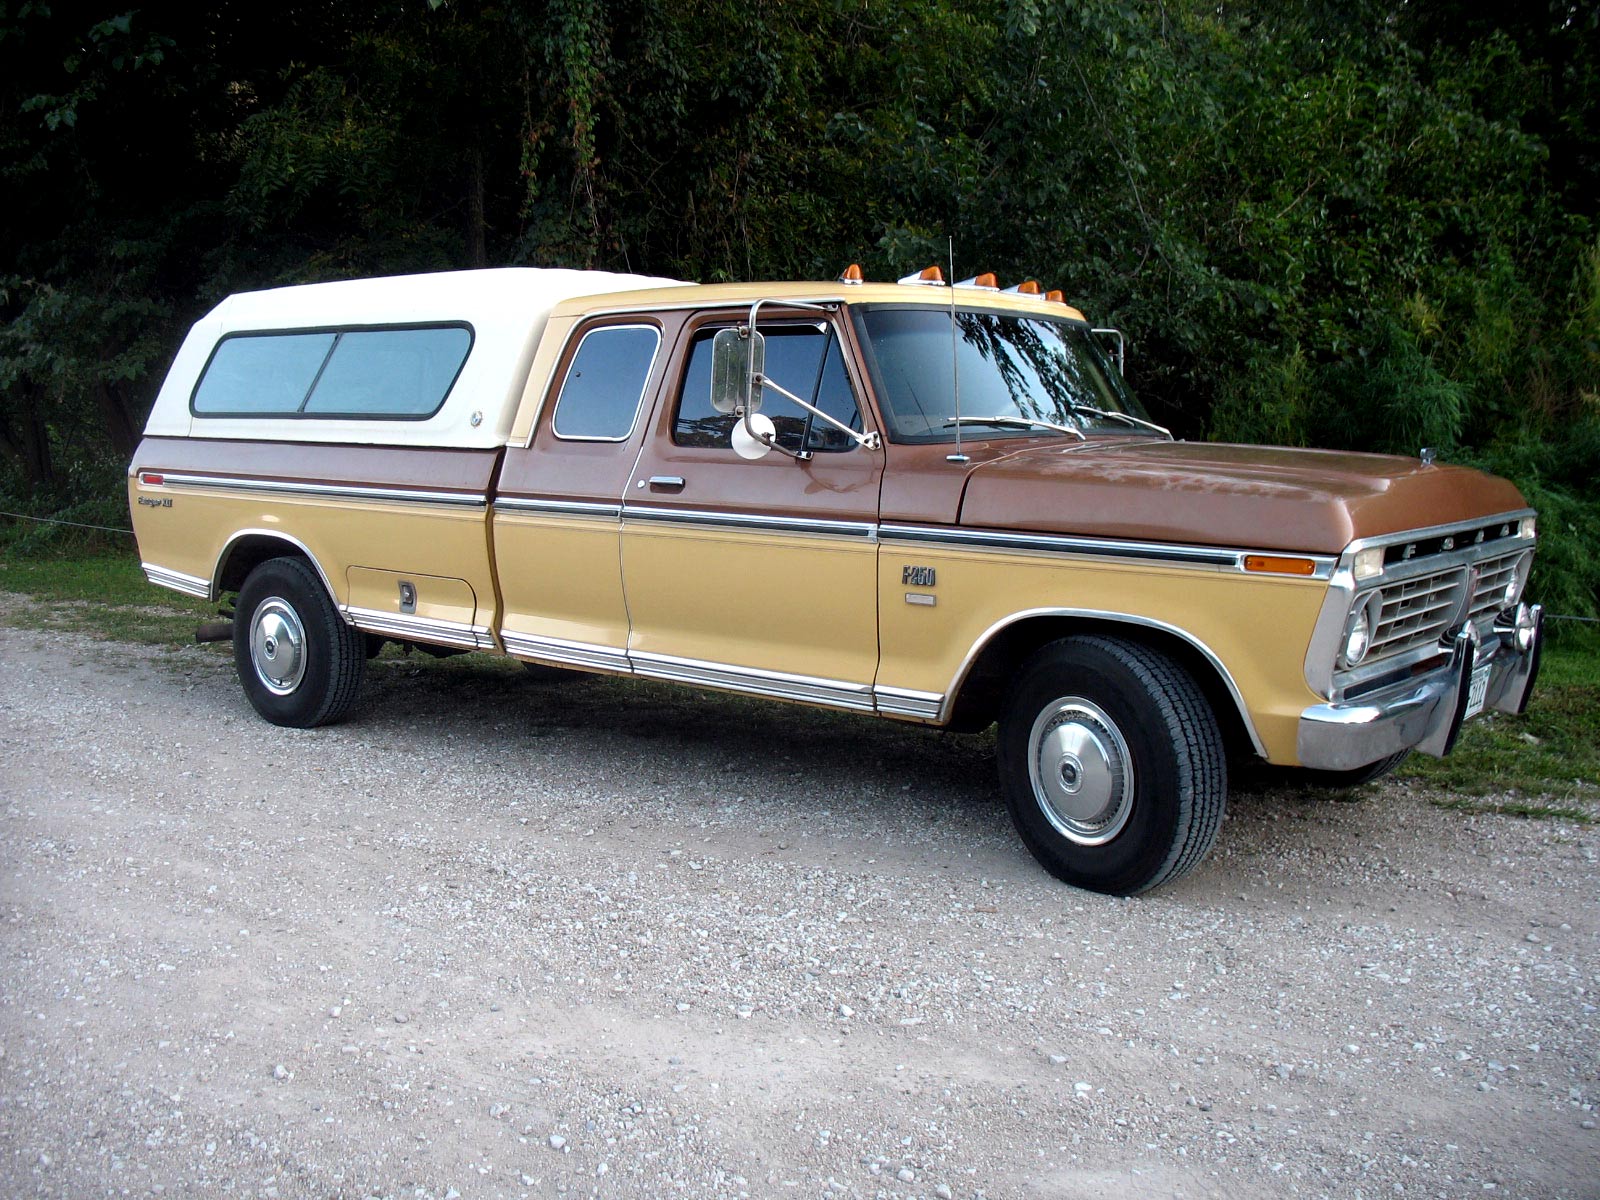
The first shot was taken with my cell phone as I was getting ready to hop in and drive home. The second shot was several months later, after I'd found an original Ford Four Seasons topper that was made specifically for this generation of truck and got it installed. (I've since replaced this Standard version with a Deluxe version, which has sliding side windows and screens and bright trim around the windows.)
Anyway, what you're looking at is a 1975 Ford F250 SuperCab Ranger XLT Camper Special. It's powered by a 460/C6/Dana 60 w/3.55 gears and is fully loaded with desireable options: power steering, power disc brakes, A/C, cruise control (this is the first year for cruise in a Ford truck), dual exhaust, dual fuel tanks, bedside toolbox, swing-out spare tire and factory air horns. When I picked it up there was only 81,000 original miles on this truck....and while there are a few dings here and there, there is no body rust whatsoever! While the truck is exactly what I'd been looking for, I did have some reservations about the colors, but they're now kinda starting to grow on me. I've since added a period-correct Ford AM/FM radio (hooked up to a vintage 7-band graphic equalizer and four speakers) and replaced a few pieces of dented trim. This truck is now my daily driver, and I've racked up almost 10,000 miles on it in the year since I bought it.
So...you remember I said there were TWO new additions? Well, a couple months after buying this truck, my wife informs me that our family was about to get a little larger!
Since we currently have three boys and a girl, we were kinda hoping for another girl to help balance things out a bit, but our fifth child (who was born exactly 30 days ago, on June 1st, 2012) was another son. Say hello to Wesley Chase Dickson:


So this summer so far has been busy with me checking out the local salvage yards for cool old truck parts, chauffering my oldest sons to their soccer and Little League games, etc. But the itch to get back to work on the Olds has been getting much stronger, so last week I decided now that things are starting to settle down a bit with the new baby and with the Little League games being just about over, it was time. I called up the machine shop where I dropped my engine off last fall and was told that he'd gotten sidetracked with a lot of other projects too, but that my engine was almost done. He just had to get everything balanced and it would be ready to go, and so I talked him into bumping this up on his priority list. He told me to give him a week or so and he'd get it taken care of.
So I plan on spending the day tomorrow in the garage, hauling out a truckload of truck parts that I've been accumulating over the winter and spring, and just getting it cleaned up and ready to work in again. I need to get started finishing up on the interior of the 442, by getting the new seat covers and door panels installed, which I have on hand, and a new headliner, which I still need to order. Hopefully by that time the engine pieces will be coming home and I can then get it put together.
I'll be posting regular updates again as progress is made, so stay tuned!
July 4th, 2012, 10:47 AM
#60
Registered User
Thread Starter
Join Date: Jul 2008
Location: West Point, NE
Posts: 163
Over the past couple evenings I've been getting started on the door panels. Since I've never done something like this before, I decided I'd start with the back panels, so that if I messed something up, it would be in an area less likely to be noticed. I got started with the passenger-side panel first.
(You'll have to excuse the poor quality of the first five pics...my wife was out-of-town with the good digital camera when I got started, and I was stuck using my cell phone.)
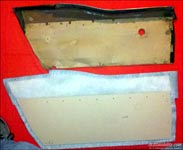
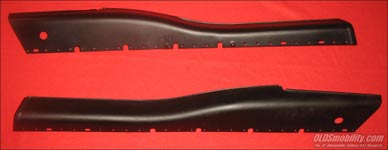
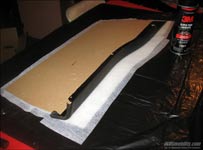
This is a comparison of my existing rear side panel and the Legendary panel. You can see the metal portion across the top that will need to be swapped over.


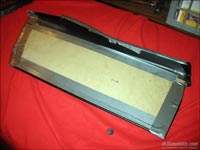
The window felt and the chrome strip were removed and the top metal backing removed from the cardboard.
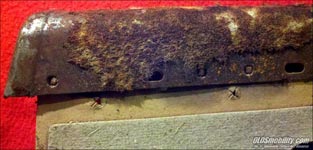
The cardboard was punched into the metal backing. By simply using a small punch to tap the cardboard out of each hole, it then separated from the metal. However, since the new cardboard has to be attached where the metal is deformed, these would need to be ground down smooth. So I spent a few minutes with the angle grinder to smooth these out, and then with a wire wheel attachment to clean off the surface rust. I then hit the metal with some fine-grade sandpaper just to roughen it up a bit, and hit it with the black paint.
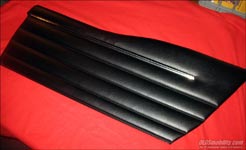
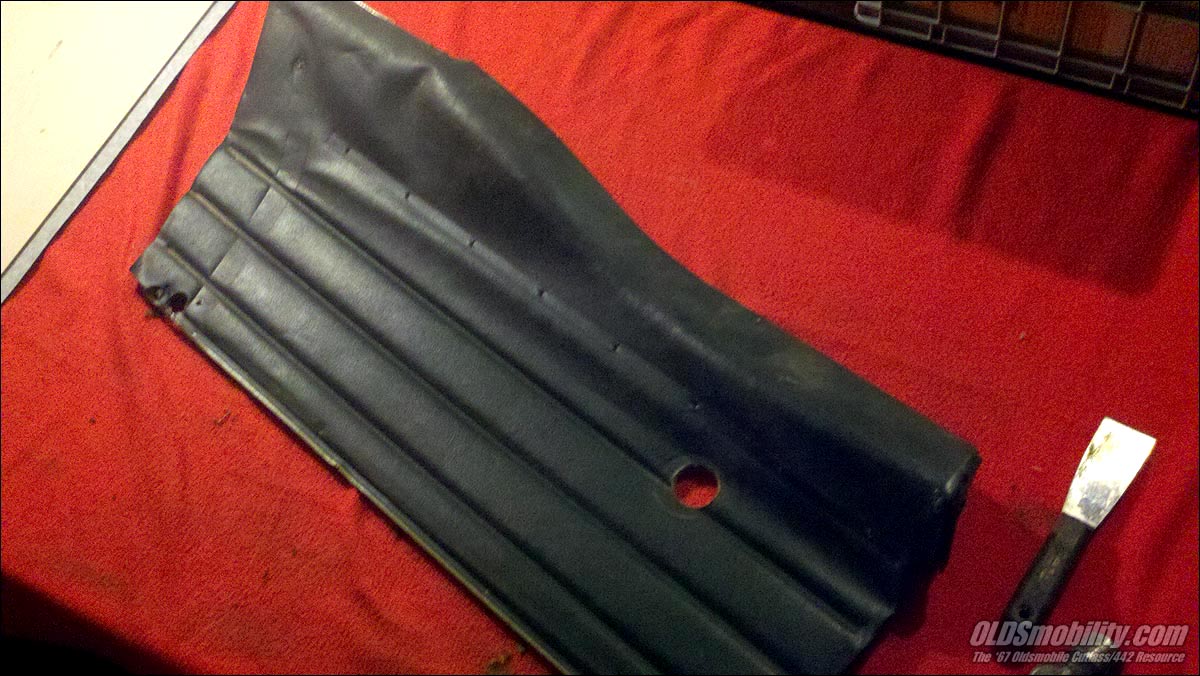
...and here's the end result, ready for installation.
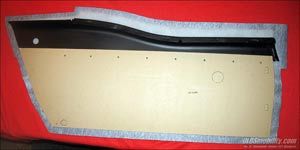
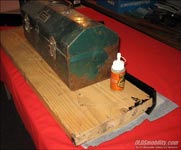
Using the old panel as a template, I scribed a mark on the metal backing where the the two overlapped, so I'd be sure to get the metal backing properly mated up to the new panel. Then I used some Gorilla Snot to glue the two together, and set a heavy toolbox on top to keep pressure on them until the glue dried.
Now I'm ready to apply adhesive to the edges and glue it down all the way around. Once the edges were glued down, I temporarily slapped some duct tape on the overlapped areas, just to hold them in place until the adhesive dried.
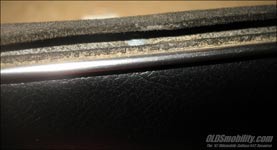
...and a final shot after reinstalling the chrome strip.
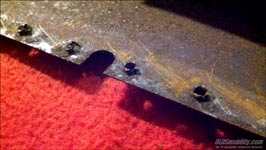
In this shot you can see the (dirty original) inner window felt which I ended up having to pop-rivet to the metal backing. My original felts were in great shape so I decided to just reuse them. (I DID give them a quick rinse under the faucet before installing and they looked clean to the naked eye, but after seeing this close-up I think I might have to try cleaning them a little better with some warm water and a toothbrush. ) These are originally stapled on, and when I was disassembling these panels I was able to carefully remove the original staples, and thought I'd be able to reuse them. However, I had so much trouble trying to get them back into their original holes that I finally gave up, and went with pop-rivets. For my use I'm not overly concerned with the rivets being visible, but it wouldn't be too hard to simply touch them up with some black model paint to make them disappear.
I then attached the clips, and just need to cut out the window regulator hole and install the panel.
I got started with the passenger-side panel first.(You'll have to excuse the poor quality of the first five pics...my wife was out-of-town with the good digital camera when I got started, and I was stuck using my cell phone.)
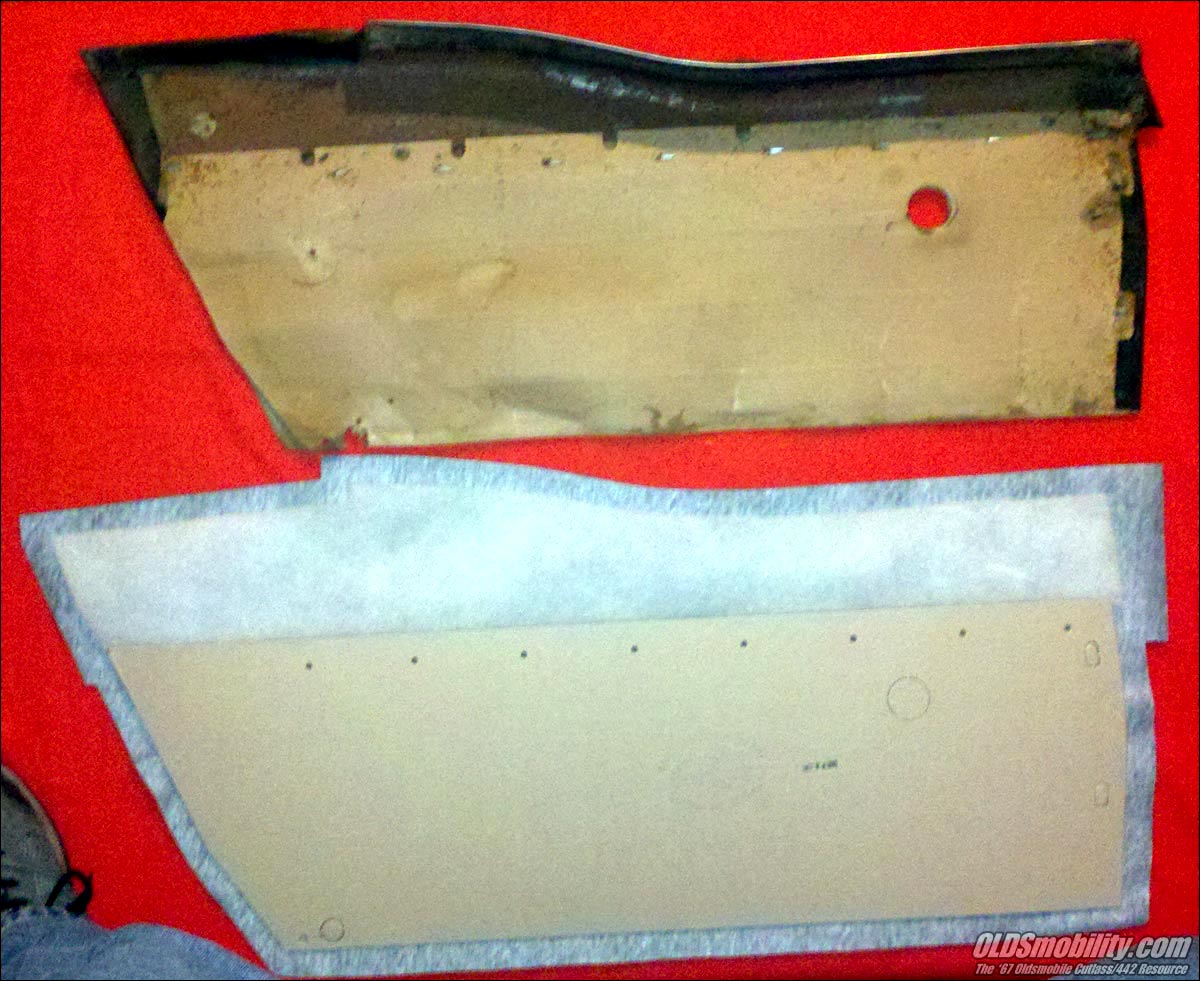
This is a comparison of my existing rear side panel and the Legendary panel. You can see the metal portion across the top that will need to be swapped over.
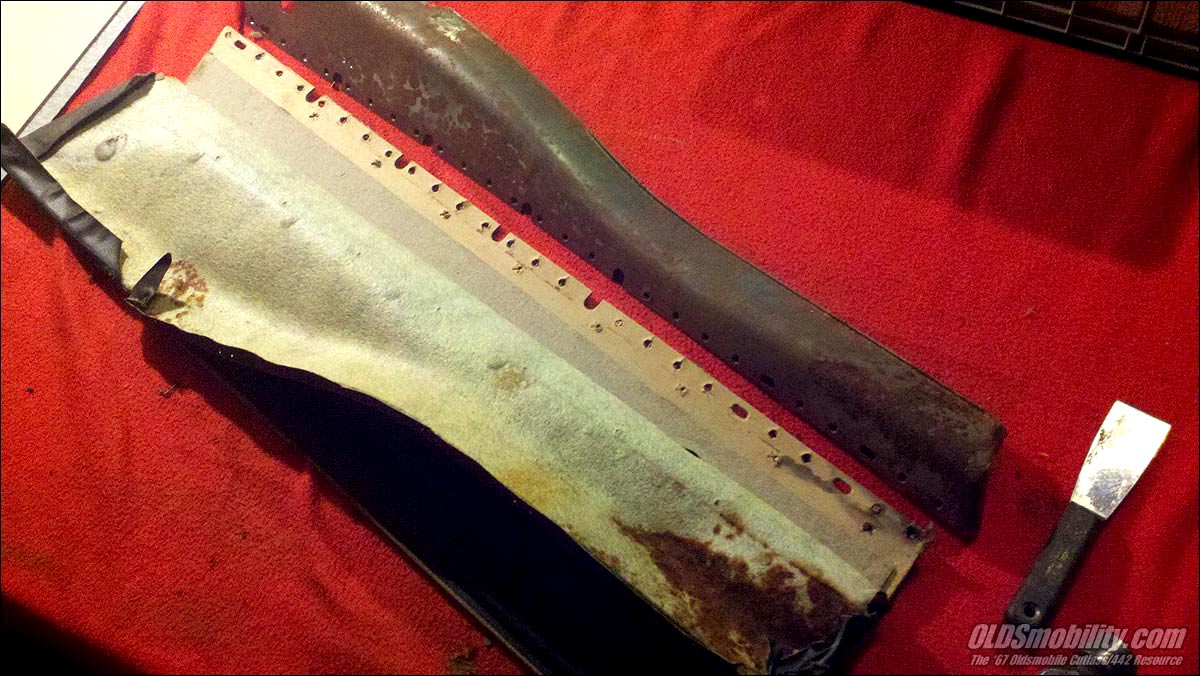
The window felt and the chrome strip were removed and the top metal backing removed from the cardboard.


The cardboard was punched into the metal backing. By simply using a small punch to tap the cardboard out of each hole, it then separated from the metal. However, since the new cardboard has to be attached where the metal is deformed, these would need to be ground down smooth. So I spent a few minutes with the angle grinder to smooth these out, and then with a wire wheel attachment to clean off the surface rust. I then hit the metal with some fine-grade sandpaper just to roughen it up a bit, and hit it with the black paint.

...and here's the end result, ready for installation.

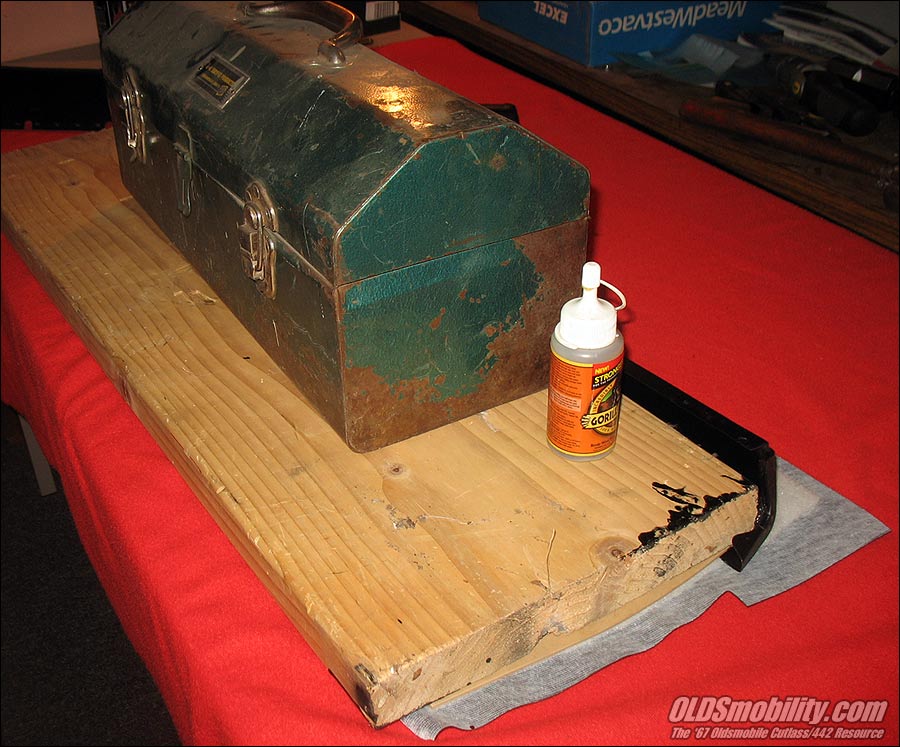
Using the old panel as a template, I scribed a mark on the metal backing where the the two overlapped, so I'd be sure to get the metal backing properly mated up to the new panel. Then I used some Gorilla Snot to glue the two together, and set a heavy toolbox on top to keep pressure on them until the glue dried.


Now I'm ready to apply adhesive to the edges and glue it down all the way around. Once the edges were glued down, I temporarily slapped some duct tape on the overlapped areas, just to hold them in place until the adhesive dried.
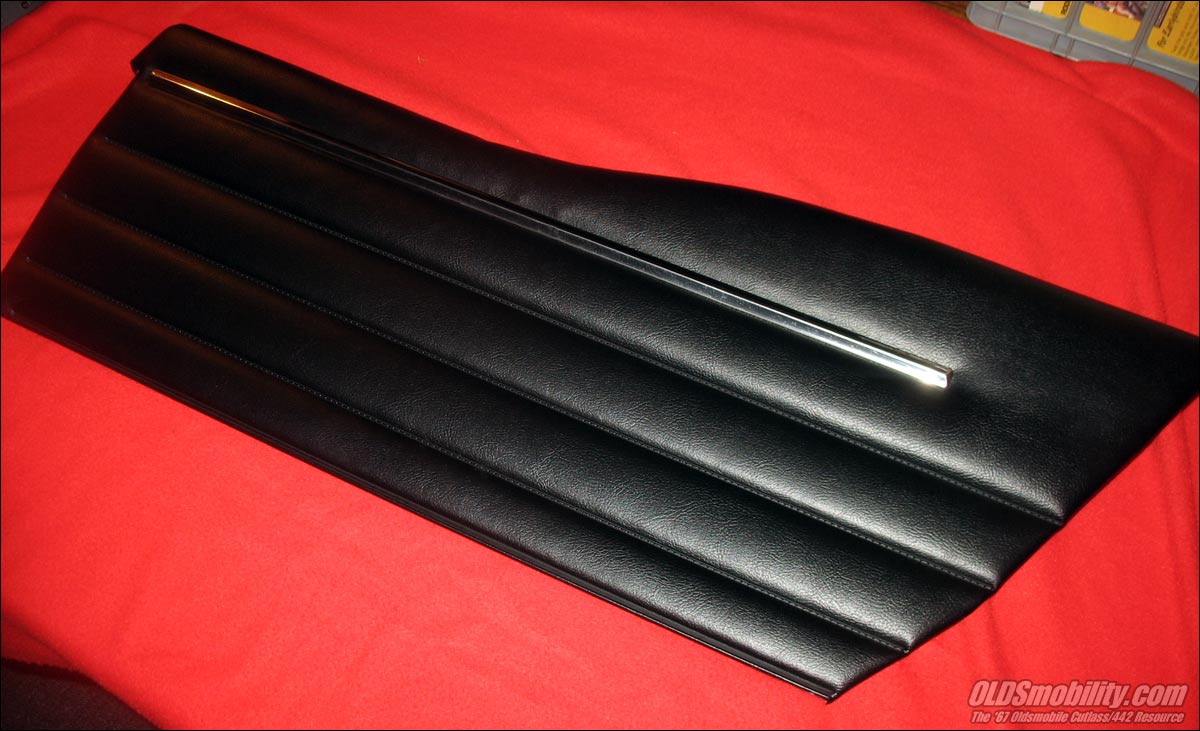
...and a final shot after reinstalling the chrome strip.

In this shot you can see the (dirty original) inner window felt which I ended up having to pop-rivet to the metal backing. My original felts were in great shape so I decided to just reuse them. (I DID give them a quick rinse under the faucet before installing and they looked clean to the naked eye, but after seeing this close-up I think I might have to try cleaning them a little better with some warm water and a toothbrush.
) These are originally stapled on, and when I was disassembling these panels I was able to carefully remove the original staples, and thought I'd be able to reuse them. However, I had so much trouble trying to get them back into their original holes that I finally gave up, and went with pop-rivets. For my use I'm not overly concerned with the rivets being visible, but it wouldn't be too hard to simply touch them up with some black model paint to make them disappear.I then attached the clips, and just need to cut out the window regulator hole and install the panel.

Thread
Thread Starter
Forum
Replies
Last Post


