Pilot bushing install
 October 5th, 2011, 02:36 PM
#1
Registered User
Thread Starter
Join Date: Nov 2007
Location: Rathdrum, Idano
Posts: 9,127
Pilot bushing install
Awhile ago during a discussion on installing pilot bushings a couple of ways of keeping the busing in place were discussed
1. If you had the crank with the snap ring then its a no brainer
2. If you have the crank without the snap ring either dimple the metal at the edge in a couple of places or use a locktight.
I would prefer to use the locktight but which one to use is the question. also what are the opinions on which is better.
I am using the Dorman Bronze bushing not the bearing.
 October 5th, 2011, 04:20 PM
#3
Registered User

Join Date: Sep 2009
Location: Hamilton, ON
Posts: 1,450
I would like to know this as well. I was considering having my crank drilled and putting in a pilot bushing just 'in case' I end up going the manual trans route.
2blu won't ship me his snap ring manual crank
2blu won't ship me his snap ring manual crank
October 6th, 2011, 11:51 AM
#4
Registered User
Join Date: Jul 2009
Location: Dallas-Fort Worth
Posts: 3,112
Guys on my 455 build I used a thinner pilot bearing that is available and will work without drilling the crank. But if the crank is out out of the block may as well drill the hole out.Not a problem in my buggy since 07. If interested I can go through my receipts and locate the vendor. I believe it was Bill Travato but not 100% sure.
October 7th, 2011, 08:41 AM
#9
Registered User
Thread Starter
Join Date: Nov 2007
Location: Rathdrum, Idano
Posts: 9,127
January 3rd, 2012, 06:41 AM
#10
Registered User

Join Date: Oct 2009
Location: Erie,PA
Posts: 3,814
Bringing this back up,since someone else inquired.Here is what a factory 4-spd crank looks like without the pilot bearing installed.The first hole,or the largest hole,is where the hub for the torque converter would go,if it is an automatic.All cranks,auto or 4-spd,have the large hole.The auto cranks do NOT have the 2 smaller holes that this 4-spd crank has.If you have the crank out of the block,I would suggest having it machined correctly for the pilot bearing.
If the engine is together,and you want to make an adapter ring,you will still need to drill a relief hole for to make a void for the tip of the input shaft to pass through,without bottoming-out.The relief hole does not need to be exact,and can be done by hand,but just make sure the hole is larger than the tip of the input shaft.Then you can have an adapter ring machined,that will press into the large hole.Mic the diameter of the large hole,and have the outer diameter of the ring machined for a press-fit.I have found this diamater to vary among the different cranks,so measure the crank that you will be using.Once the have the outer diameter machined,you can have the inner diamater machined to accept the factory pilot bushing.Another thing is that you will need to shorten the pilot bushing itself,or drill that relief hole larger enough that the pilot bushing will start to penetrate it.If you install the adapter ring & pilot bearing so everything is flush with that outer edge,it is not in enough.The problem you will encounter is that the splined section of the input shaft begins to enter the large hole of the crank,so if the adapter & bushing are flush,the splined section will hit,and the transmission will not seat flush against the bellhousing.Try to leave at least 1/8" step inboard.if you are not able to get everything in that far,you can chamfer the hole/opening to mimmick the shape of the splines.I know some of this might sound confusing without actually looking at it,but I have been through this entire procedure a few times,and after the first go-around,I got it all figured-out,made notes,and made the rest of my adapters & conversions accordingly.

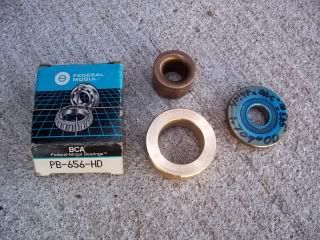
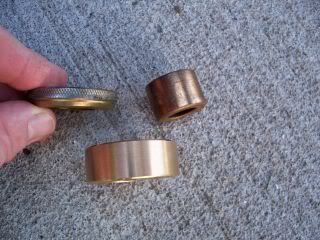
Pilot bearing adapter ring & factory pilot bushing next to one of Mondello's "adapter bearings". That "adapter bearing" is far to small to live up to the demand,and was not intended for this use,but if you can get it to work,or you don't mind changing it every few hundred miles,maybe it will be fine for you.
Pilotbearingadapter001.jpg
Pilotbearingadapter002.jpg
Pilotbearingadapter003.jpg
If the engine is together,and you want to make an adapter ring,you will still need to drill a relief hole for to make a void for the tip of the input shaft to pass through,without bottoming-out.The relief hole does not need to be exact,and can be done by hand,but just make sure the hole is larger than the tip of the input shaft.Then you can have an adapter ring machined,that will press into the large hole.Mic the diameter of the large hole,and have the outer diameter of the ring machined for a press-fit.I have found this diamater to vary among the different cranks,so measure the crank that you will be using.Once the have the outer diameter machined,you can have the inner diamater machined to accept the factory pilot bushing.Another thing is that you will need to shorten the pilot bushing itself,or drill that relief hole larger enough that the pilot bushing will start to penetrate it.If you install the adapter ring & pilot bearing so everything is flush with that outer edge,it is not in enough.The problem you will encounter is that the splined section of the input shaft begins to enter the large hole of the crank,so if the adapter & bushing are flush,the splined section will hit,and the transmission will not seat flush against the bellhousing.Try to leave at least 1/8" step inboard.if you are not able to get everything in that far,you can chamfer the hole/opening to mimmick the shape of the splines.I know some of this might sound confusing without actually looking at it,but I have been through this entire procedure a few times,and after the first go-around,I got it all figured-out,made notes,and made the rest of my adapters & conversions accordingly.
Pilot bearing adapter ring & factory pilot bushing next to one of Mondello's "adapter bearings". That "adapter bearing" is far to small to live up to the demand,and was not intended for this use,but if you can get it to work,or you don't mind changing it every few hundred miles,maybe it will be fine for you.
Pilotbearingadapter001.jpg
Pilotbearingadapter002.jpg
Pilotbearingadapter003.jpg
Last edited by 507OLDS; January 3rd, 2012 at 07:38 AM.
January 3rd, 2012, 09:37 AM
#11
Registered User

Join Date: Mar 2008
Posts: 3,841
If you have an early crank, up to 1969 or 1970 I think (I know 69 is early, and 1972 is late), the recess in the back for an automatic trans application will be shallow and the V part is smaller diameter than the late stuff. The early ones can be bored (in a lathe, not drilled with a hand drill--the hole must be perfectly centered--for the Chevy pilot bushing pictured above. That bushing, Dorman 609-014, has a nice entry rounded chamfer, and is deeper than the Olds Dorman 609-023 bushing. The machine shop will bore the hole .55" deep measured at the OD of the bushing (the crank surface is sloped, so measure at that point). The depth of the trans nose into the crank will depend on whether you are using a scattershield with block plate, etc. so it would be best to measure carefully to see what arrangement will give you the best inset of the trans nose into the bushing or bearing. If you want to keep it simple and not optimize everything, just get the crank bored for a stock bearing or replacement bushing, and if you worry, peen over the edge of the crank per factory procedure through the 1960s. Actually, as noted above, if the press fit is good, peening isn't even needed. I clean the bushing and crank with solvent and use blue loctite, no peening. The loctite is as much to lubricate the bushing when pounding it in as to help retain it. A slight chamfer on the edge of the hole helps prevent scraping material off the OD of the bushing.
January 5th, 2012, 04:28 PM
#13
Registered User
Join Date: Jun 2011
Posts: 715
you guys sound like ER doctors, dont mind my lack of knowledge.
My crank is out of the engine, so I only would need to have it drilled at a machine shop and in following purchase a pilot bearing and then have it installed?
My crank is out of the engine, so I only would need to have it drilled at a machine shop and in following purchase a pilot bearing and then have it installed?
January 5th, 2012, 09:49 PM
#14
Ben
Join Date: Mar 2009
Location: Snohomish, WA
Posts: 1,823
ok- so i gotta ask... Joe mentions it but i just want to ask again to be sure.
I have in my hand a Dorman bushing for the olds. I don't have the pn. Its like half the size of the chevy one that brian posted.
Is that the correct one? Really freaks me out to see brians post & the wider bushing. A friend of mine is getting ready to redo the clutch in his 66 442, and his new clutch kit came with that same wide one- totally differnt than what i have....
I had my crank machined for the bushing last year to the specs in mondellos book. and it appears to be right for the bushing i have (which i gave them at that time to make sure the hole was right- i have not double checked it to mondellos specs yet, but will eventually) THe fitment is VERY tight- TIght enough that i've never actually even gotten it started in its seat- I'd have to tap it in for sure, the machine shop told me to freeze it first and it should go right in...
But i'm fairly concerned about it being the right width bushing after seeing the one my friend got with his kit, and now brians post...
I'll upload a pic to show what mine looks like (unfortunatly my crank is at the machine shop pending block mockup so i can't take a pic of the drill out work)
Thanks-
Ben
Last edited by RAMBOW; January 5th, 2012 at 09:54 PM. Reason: added pics
January 6th, 2012, 04:35 AM
#15
Registered User
Join Date: Oct 2009
Location: Erie,PA
Posts: 3,814
Rambow,
The one that I posted a picture of is correct for the Oldsmbile cranks.It fits in the factory 4-spd crank,pictured above.I'm not sure what you have there,but I'd like to get one in my hand,to check it out.It looks a lot like a solid version of his adapter bearing,which is also pictured above.It does not look like the bronze oil-lite material though,which is highly recommended by most manual transmission builders/specialists.Most of the clutch kits that I have worked with,also came with a pilot bearing,and they were just like the one I have pictured.However,the cheaper clutch kits have the cheaper bronze cintered bearing,not the true bronze oil-lite.It is hard to compare the two differences,unless you have one of each next to each other.
The one that I posted a picture of is correct for the Oldsmbile cranks.It fits in the factory 4-spd crank,pictured above.I'm not sure what you have there,but I'd like to get one in my hand,to check it out.It looks a lot like a solid version of his adapter bearing,which is also pictured above.It does not look like the bronze oil-lite material though,which is highly recommended by most manual transmission builders/specialists.Most of the clutch kits that I have worked with,also came with a pilot bearing,and they were just like the one I have pictured.However,the cheaper clutch kits have the cheaper bronze cintered bearing,not the true bronze oil-lite.It is hard to compare the two differences,unless you have one of each next to each other.
January 6th, 2012, 10:39 AM
#17
Registered User
Join Date: Oct 2009
Location: Erie,PA
Posts: 3,814
This is the same bearing that I have in everything else,or at least so far.Part number is on that box in the picture.PB-656-HD. I have a 66 400 crank with this same bearing in it.The bearing that Rambow has pictured looks like a better candidate to use for the adpater rings,since it is thinner,and could set inboard from the edge of the crank.
January 6th, 2012, 05:07 PM
#18
Ben
Join Date: Mar 2009
Location: Snohomish, WA
Posts: 1,823
When i got mine, i asked for a pilot bushing for a 66 cutlass 330 4/speed.
Brian, looking at the pic of the crank in the first post- which step does your bushing go? in innermost one or the 2nd one? Mine goes on the 2nd step.
I may have to go up my machinists place to spec out the drill job done on my crank (done by a different machine shop a year ago) and compare to the mondello specs.
I would have assumed GM would have setup the ends of their cranks the same since the transmission input shafts are the same. Guess not.
January 7th, 2012, 05:19 AM
#20
Registered User
Join Date: Oct 2009
Location: Erie,PA
Posts: 3,814
Starting to make a little more sense,and I think what Rund is describing too.I have a 67 W30 crank with a roller beairng.I thought it was aftermarket,but I guess that is original.That crank just has 2 steps,the large hole,then the bearing hole.The crank I have pictured above,which I think is from 72,has 3 steps.I think your bushing would go into the middle.Mine goes all the way in to the smallest hole.My 70 W30 cranks also have 2 steps,and take the smaller bushing that I have pictured.So,when exactly did they go from 2 steps to 3 steps?I've had a few 71 stick cars,and they only had 2 steps as well,and I have some diagrams somewhere,that shows 2 different patterns to drill the Olds crank.
January 7th, 2012, 05:41 AM
#21
Registered User

Join Date: May 2008
Posts: 1,399
Brian,
The crank you have pictured is just like any olds original 4 speed cranks. All of the early production engines did not have the snap ring. However, your machine shop can install a grove for the snap ring. The earliest engines that I have seen with the snap ring were from 2/70.
I always use a roller-bearing and not a bronze bushing. My self, I would never use an adapter.
Pull the engine and pull the oil pan and pull the crankshaft.
January 8th, 2012, 09:24 AM
#23
Registered User
Join Date: Mar 2008
Posts: 3,841
All the Olds cranks that I have seen, factory bored for pilot bearings (including mid-70s), had only a provision for the factory ball bearing or replacement bushing. I would be leery of putting in a Chevy bushing, even if it fits, because the cut out for the bearing could mean that the Chevy bushing either is too far from the trans nose or the part that does contact the nose would be unsupported and the bushing would be prone to working itself out. At a minimum, I'd check and make sure all is OK. When using a Lakewood block plate, .14" thick, you are already spacing the trans nose back substantially. The Quick Time plate is .12" and Jerico trannies come with an input that they say is .25" longer to help. It would be worthwhile to verify trans input depth into the pilot bushing when setting up. Also, it is very worthwhile to index the bell housing, using Lakewood offset dowels if necessary. I have found them to be as much as .021" out, and the Lakewood .021" offset dowels were just enough to get 0 runout.
January 8th, 2012, 06:07 PM
#24
Registered User
Join Date: May 2008
Posts: 1,399
Here are a couple of pictures of a origainal replacement pilot bearing, and a picture of a early 1970 crankshaft without the pilot bearing installed and a picture of the pilot bearing installed. I also did a test fit on a spare m21 input shaft to make sure the bearing fit.
January 9th, 2012, 08:45 AM
#27
Registered User
Join Date: Mar 2008
Posts: 3,841
If the trans is perfectly aligned, if the bearing doesn't lose its grease or get contaminated with clutch dirt, the bearing lasts longer. If a problem occurs, the bronze bushing won't eat the nose of the transmission input. The bushing lasts plenty long enough for the amount of driving these cars generally get these days. Chevy used a bushing for decades. Wear only occurs when the trans input and engine are at different rpm, meaning the clutch pedal is depressed. The biggest issue isn't which you choose, but how well the trans is aligned to the crank. Just plugging the bell housing onto the factory dowels usually isn't sufficient for best performance and wear.

 February 21st, 2012, 12:40 AM
#32
Registered User

Join Date: May 2011
Location: Delta BC Canada
Posts: 3,688
 February 21st, 2012, 11:15 AM
#34
Registered User
Join Date: Jun 2011
Posts: 715
February 21st, 2012, 04:31 PM
#36
Registered User
Join Date: Jul 2008
Location: Seneca Falls, NY
Posts: 5,258
May 27th, 2013, 03:47 PM
#37
Registered User

Join Date: May 2012
Posts: 21
What one?
Theres 3 there. I realize one is the adapter from mondello. Do the other 2 go together? Im having my crank drilled with the mondello diagram that is on here and theres so many part numbers and this and that I just wanna know what one to buy to take to the machine shop?
Bringing this back up,since someone else inquired.Here is what a factory 4-spd crank looks like without the pilot bearing installed.The first hole,or the largest hole,is where the hub for the torque converter would go,if it is an automatic.All cranks,auto or 4-spd,have the large hole.The auto cranks do NOT have the 2 smaller holes that this 4-spd crank has.If you have the crank out of the block,I would suggest having it machined correctly for the pilot bearing.
If the engine is together,and you want to make an adapter ring,you will still need to drill a relief hole for to make a void for the tip of the input shaft to pass through,without bottoming-out.The relief hole does not need to be exact,and can be done by hand,but just make sure the hole is larger than the tip of the input shaft.Then you can have an adapter ring machined,that will press into the large hole.Mic the diameter of the large hole,and have the outer diameter of the ring machined for a press-fit.I have found this diamater to vary among the different cranks,so measure the crank that you will be using.Once the have the outer diameter machined,you can have the inner diamater machined to accept the factory pilot bushing.Another thing is that you will need to shorten the pilot bushing itself,or drill that relief hole larger enough that the pilot bushing will start to penetrate it.If you install the adapter ring & pilot bearing so everything is flush with that outer edge,it is not in enough.The problem you will encounter is that the splined section of the input shaft begins to enter the large hole of the crank,so if the adapter & bushing are flush,the splined section will hit,and the transmission will not seat flush against the bellhousing.Try to leave at least 1/8" step inboard.if you are not able to get everything in that far,you can chamfer the hole/opening to mimmick the shape of the splines.I know some of this might sound confusing without actually looking at it,but I have been through this entire procedure a few times,and after the first go-around,I got it all figured-out,made notes,and made the rest of my adapters & conversions accordingly.
Pilot bearing adapter ring & factory pilot bushing next to one of Mondello's "adapter bearings". That "adapter bearing" is far to small to live up to the demand,and was not intended for this use,but if you can get it to work,or you don't mind changing it every few hundred miles,maybe it will be fine for you.
May 27th, 2013, 05:54 PM
#38
Registered User
Join Date: May 2012
Posts: 21
Bushing
Theres 3 there. I realize one is the adapter from mondello. Do the other 2 go together? Im having my crank drilled with the mondello diagram that is on here and theres so many part numbers and this and that I just wanna know what one to buy to take to the machine shop? I thought the bushing was a one piece bronze that just pressed in? Thank for clearing things up.


