Brake Booster changeout
 July 20th, 2011, 04:20 PM
#1
Just an Olds Guy
Thread Starter
Join Date: Jul 2008
Location: Edmonton, AB. And "I am Can 'eh' jun - eh"
Posts: 24,525
Brake Booster changeout
Got to the Olds car show and popped the hood. Everything looked fine except for the master cylinder that decided to die. The pedal was also pretty stiff so I'm figuring that since both are 39 years old, its time to replace them. Just ordered a new brake booster for my car. Got about a week to wait for it to get here. In the meantime I went out in the cave and took a look at how the unit is mounted.
1. No problem undoing the clevis on the pushrod.
2. The 4 bolts that hold the booster? Anyone got any suggetions on how to do that? You gotta have skinny fingers or something to get to them. Maybe a long box wrench? On the passenger side, it looks like you have to take off the washer pump to access the nuts, especially the lower one.
Anyone have any experience with this? Couldn't find any references in the 72 CSM or in any related threads.
 July 20th, 2011, 04:46 PM
#3
Just an Olds Guy
Thread Starter
Join Date: Jul 2008
Location: Edmonton, AB. And "I am Can 'eh' jun - eh"
Posts: 24,525
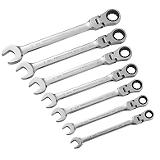
edit: Just checked out Canadian Tire. They have OPEN box end ratcheting wrenches on sale for 28.00 for a set of 7. Looks like a neat feature.
Last edited by Allan R; July 20th, 2011 at 04:56 PM.
July 20th, 2011, 05:34 PM
#5
Registered User
Join Date: Mar 2007
Location: Tracy Ca
Posts: 1,564
All the suggestions are good. I have found the some boosters are different. I had one that sticks out from the firewall a little farther,makes it easier. I have found that you need a long hand swivel, ratchet, a long open handle box end, and a ratchect box end. With the hood off would be a big help. My problem in being older, my eye site is a problem. I now, when I have a engine out, I change the booster, and heater core. So much easier with motor out.
July 20th, 2011, 05:57 PM
#6
71 & 72,now I want a 68
Join Date: May 2009
Location: NW Indiana
Posts: 1,864
Wish I could offer good solid advice but can't remember exactly what tools I used.
I can tell you I have just basic hand tools,nothing fancy.Pulled the swap off,no problems.
During the before hand planning as you are,I thought...crap!this is gonna be a pain. Turns out,it was alot easier than what it looks getting at the booster mounting nuts. I was pleasantly surprised.
Here's a pic of how mine turned out. Get ready to reap the same rewards
DSC02551-2.jpg
July 20th, 2011, 06:44 PM
#7
Registered User
Join Date: Jan 2008
Location: Sherwood Park, Alberta
Posts: 2,623
Allan, try this. http://www.youtube.com/watch?v=qgf8X4ZzBfg It's even an Oldsmobile.
Last edited by 442much; July 20th, 2011 at 06:47 PM.
July 20th, 2011, 07:48 PM
#8
Registered User
Join Date: Feb 2008
Location: Plano, TX
Posts: 11,798
Ugh... Have fun. 72 CSM simply said "Remove the four mounting nuts". Geez - sounds simple but how to get to them??
I pulled the inner fender....
https://classicoldsmobile.com/forums...tml#post292889
That made getting to the LH side easier.
I got to the RH side by standing in between the fender and the frame. No suspension in the way was a plus. Wiper motor remained there.
Some other firewall parts may need to be removed for clearance, like fan relay.
Use a wire brush on a dremel to clean the threads. Then spray with WD40 afterwards. Let sit over night. If they break free, then they should spin off easily afterwards.
Mine was the "close to firewall" model - a true pain.
I could not get sockets on any of them in any way, and I have lots of varieties.
9/16" box wrenches are the way to go (no 14mm). Ratcheting ones would work well once free. If they are gorilla tight, use long handled box wrenches - they work!
If any start to round, you are in big trouble - get out the dremel and cutters.
https://classicoldsmobile.com/forums...tml#post298896
I finally got the skuzzy bastard out and shipped it off for rebuild. Good riddance...........
July 20th, 2011, 08:37 PM
#9
Registered User
Join Date: Mar 2011
Location: Delaware
Posts: 286
When I bought my car, my MC was nearly dead and the booster was shot completely.
I did the same job on my 71, without pulling the fender or the ww pump. I first tried to use standard box wrenches - took way too long. Then I got some ratcheting ones from Sears. The kind that look like these are the ones that fit. You'll need the 9/16ths...

The normal box-end, sandwich ratcheters don't fit, the heads are just too wide (ask me how I know). Unfortunately, the USA-made ones are a lot harder to find now. Even Craftsman apparently stopped making them here.
Anyway, to get the lower bolt closer to the passenger's side, I climbed under the car and reached up to it. That seemed easier.
One last thing - loosen the windshield washer pump assembly screws. It'll give you that little bit of extra space that you'll probably need. You can remove it, but I just loosened them enough to shift it upwards. Worked out well.
Anyhow, I put a little anti-seize on the studs and replaced the nuts with matching new ones because the original ones were SO frozen (and painted over, etc.).
And be ready - when I replaced the MC, I found that one of the brake lines was kinked and leaking a little. Long story short, the car has all new SS brake lines, all the way around, with a new prop valve. I got the setup where the prop / combo valve is mounted under the MC - not down on the frame. That makes room for headers.
Here's how mine looks now, sorry for the crappy picture quality.

I did the same job on my 71, without pulling the fender or the ww pump. I first tried to use standard box wrenches - took way too long. Then I got some ratcheting ones from Sears. The kind that look like these are the ones that fit. You'll need the 9/16ths...
The normal box-end, sandwich ratcheters don't fit, the heads are just too wide (ask me how I know). Unfortunately, the USA-made ones are a lot harder to find now. Even Craftsman apparently stopped making them here.
Anyway, to get the lower bolt closer to the passenger's side, I climbed under the car and reached up to it. That seemed easier.
One last thing - loosen the windshield washer pump assembly screws. It'll give you that little bit of extra space that you'll probably need. You can remove it, but I just loosened them enough to shift it upwards. Worked out well.
Anyhow, I put a little anti-seize on the studs and replaced the nuts with matching new ones because the original ones were SO frozen (and painted over, etc.).
And be ready - when I replaced the MC, I found that one of the brake lines was kinked and leaking a little. Long story short, the car has all new SS brake lines, all the way around, with a new prop valve. I got the setup where the prop / combo valve is mounted under the MC - not down on the frame. That makes room for headers.
Here's how mine looks now, sorry for the crappy picture quality.
July 20th, 2011, 09:04 PM
#10
Just an Olds Guy
Thread Starter
Join Date: Jul 2008
Location: Edmonton, AB. And "I am Can 'eh' jun - eh"
Posts: 24,525
Allan, try this. http://www.youtube.com/watch?v=qgf8X4ZzBfg It's even an Oldsmobile.
Ugh... Have fun. 72 CSM simply said "Remove the four mounting nuts". Geez - sounds simple but how to get to them??
I pulled the inner fender....
https://classicoldsmobile.com/forums...tml#post292889
That made getting to the LH side easier.
I got to the RH side by standing in between the fender and the frame. No suspension in the way was a plus. Wiper motor remained there.
Some other firewall parts may need to be removed for clearance, like fan relay.
Use a wire brush on a dremel to clean the threads. Then spray with WD40 afterwards. Let sit over night. If they break free, then they should spin off easily afterwards.
Mine was the "close to firewall" model - a true pain.
I could not get sockets on any of them in any way, and I have lots of varieties.
9/16" box wrenches are the way to go (no 14mm). Ratcheting ones would work well once free. If they are gorilla tight, use long handled box wrenches - they work!
If any start to round, you are in big trouble - get out the dremel and cutters.
https://classicoldsmobile.com/forums...896...........
 July 20th, 2011, 09:16 PM
#11
Just an Olds Guy
Thread Starter
Join Date: Jul 2008
Location: Edmonton, AB. And "I am Can 'eh' jun - eh"
Posts: 24,525
......... Then I got some ratcheting ones from Sears. The kind that look like these are the ones that fit. You'll need the 9/16ths...
The normal box-end, sandwich ratcheters don't fit, the heads are just too wide (ask me how I know). Unfortunately, the USA-made ones are a lot harder to find now. Even Craftsman apparently stopped making them here.
Anyway, to get the lower bolt closer to the passenger's side, I climbed under the car and reached up to it. That seemed easier.
One last thing - loosen the windshield washer pump assembly screws. It'll give you that little bit of extra space that you'll probably need. You can remove it, but I just loosened them enough to shift it upwards. Worked out well.
Anyhow, I put a little anti-seize on the studs and replaced the nuts with matching new ones because the original ones were SO frozen (and painted over, etc.).
And be ready - when I replaced the MC, I found that one of the brake lines was kinked and leaking a little. Long story short, the car has all new SS brake lines, all the way around, with a new prop valve. I got the setup where the prop / combo valve is mounted under the MC - not down on the frame. That makes room for headers.
The normal box-end, sandwich ratcheters don't fit, the heads are just too wide (ask me how I know). Unfortunately, the USA-made ones are a lot harder to find now. Even Craftsman apparently stopped making them here.
Ummm, How do you know?  Sorry, couldn't resist.
Sorry, couldn't resist.
What an interesting idea. Hadn't thought of that. But you're probably skinny enough to fit under there comfortably too! 
Ah hah!! Another great tip. Sounds like a plan
And be ready - when I replaced the MC, I found that one of the brake lines was kinked and leaking a little. Long story short, the car has all new SS brake lines, all the way around, with a new prop valve. I got the setup where the prop / combo valve is mounted under the MC - not down on the frame. That makes room for headers.
Mine actually look not bad. I'll be some disappointed if this turns into a brake line replacement project
July 20th, 2011, 09:21 PM
#12
Moderator
Join Date: Sep 2006
Location: Medford, Oregon
Posts: 13,680
Allen, I've removed these before without pulling the wiper or hood hinge. What I remember the most is that the nuts are really really tight! What I use is two open/box end wrenches. The first I put on the nut, then the second I hook the box over the open end of the first to get leverage. By threading the conventional box end down over the bolt (more like a stud in this application) I don't have to get my fingers in there. The bottom passengerside one is tighter, and I may not have been able to get the second wrench on it. But when your reefing on it think about what your knuckles are going to hit when it comes loose!
Once it's loose you can use a ratchet or ratcheting wrench, whatever will fit. I hold my tounge just right and with the standard box end turn the wrench a tiny bit at a time. After several minutes of this the booster comes off the firewall leaving the bolts/studs from the brake pedal in place. Here's some pic's of what I'm describing
P1010104.jpg
P1010105.jpg
P1010106.jpg
July 21st, 2011, 05:35 AM
#13
Registered User
Join Date: Feb 2008
Location: Plano, TX
Posts: 11,798
I had the valve cover off (prolly the reason I was able to leave the wiper motor undisturbed).
As soon as the sucker broke free, knuckle kissed corner of cylinder head. That long handled wrench suddenly became the "sonofabitch" tool...
I still wear the scar...
July 21st, 2011, 06:47 AM
#14
Registered User
Join Date: Jul 2010
Location: Montreal, QC
Posts: 2,175
-Tony
July 21st, 2011, 07:44 AM
#16
Registered User
Join Date: Jul 2010
Location: Montreal, QC
Posts: 2,175
Not gonna lie, I keep seeing my brake booster when i open my hood, it looks disgusting (Previous owner painted it burnt orange) you guys are making me want to try my hand at loosening those bolts too...
July 21st, 2011, 08:00 AM
#17
Registered User
Join Date: Feb 2008
Location: Plano, TX
Posts: 11,798
July 21st, 2011, 08:24 AM
#18
Registered User
Join Date: Jul 2010
Location: Montreal, QC
Posts: 2,175
July 21st, 2011, 08:54 AM
#20
Registered User
Join Date: Jul 2010
Location: Montreal, QC
Posts: 2,175
Slowly Slowly i'm getting there.. Rob..
here is a picture of the before and after of the outside too.
Along with a really nice air cleaner that i got from Oldspackrat and cleaned and painted with high temp paint!
here is a picture of the before and after of the outside too.
Along with a really nice air cleaner that i got from Oldspackrat and cleaned and painted with high temp paint!
July 21st, 2011, 03:06 PM
#22
Just an Olds Guy
Thread Starter
Join Date: Jul 2008
Location: Edmonton, AB. And "I am Can 'eh' jun - eh"
Posts: 24,525
Allen, I've removed these before without pulling the wiper or hood hinge. What I remember the most is that the nuts are really really tight! What I use is two open/box end wrenches. The first I put on the nut, then the second I hook the box over the open end of the first to get leverage. By threading the conventional box end down over the bolt (more like a stud in this application) I don't have to get my fingers in there. The bottom passengerside one is tighter, and I may not have been able to get the second wrench on it. But when your reefing on it think about what your knuckles are going to hit when it comes loose!
For some reason, it looks like you have more room than I do...maybe it's just the way the camera was angled.
Ok, you are right. Those nuts are darn tight. I put a closed 9/16 on the nut and snipe on the open end and gave it some oomph. Didn't budge at all. So I'm going to soak it with some penetrating oil for a couple of days to try and loosen it a bit. I don't want to round off the nuts. I probably will take off the ww pump. When I looked it appears there's only 2 bolts instead of 3. ???? did I miss seeing one?
The message in your post seemed to come across as "Take your time and have patience". I think that is wise advice I plan to follow.
July 22nd, 2011, 01:07 PM
#23
Just an Olds Guy
Thread Starter
Join Date: Jul 2008
Location: Edmonton, AB. And "I am Can 'eh' jun - eh"
Posts: 24,525
Yesterday those nuts were so tight not much would move them. Last night and all today it's been raining. Guess what? Maybe the humidity or maybe just good luck. The nuts moved! Leaving them done up till the booster arrives though.
Anyone know why they attached the brake lines to the side of the booster though? What a stupid place to put a bolt/bracket.
Anyone know why they attached the brake lines to the side of the booster though? What a stupid place to put a bolt/bracket.
July 22nd, 2011, 01:35 PM
#24
Registered User

Join Date: May 2009
Location: USA
Posts: 2,200
Easiest with the hood off and a ratcheting box wrench set.
Get yourself a set of GearWrench tools. These are the best investment I ever made.
http://www.amazon.com/GearWrench-941.../dp/B0002NYD1C
July 22nd, 2011, 01:36 PM
#25
Registered User
Join Date: Feb 2008
Location: Plano, TX
Posts: 11,798
")
That clamp bolt came off pretty easy with a 9/16" socket. After the MC is off, the tubes can be move out of the way more.
The tube insulators look like slit fuel line.
July 22nd, 2011, 04:48 PM
#26
Just an Olds Guy
Thread Starter
Join Date: Jul 2008
Location: Edmonton, AB. And "I am Can 'eh' jun - eh"
Posts: 24,525
Whattay think? for 49.95?
I got 3 of the nuts loose. The only one left is the bottom left (under the ww pump). I think the easiest thing to do is just loosen the 3 ww pump screws to give me the room to access that last nut! John's method is working well for me. Although I sure wouldn't mind having a set of these wrenches...
I got 3 of the nuts loose. The only one left is the bottom left (under the ww pump). I think the easiest thing to do is just loosen the 3 ww pump screws to give me the room to access that last nut! John's method is working well for me. Although I sure wouldn't mind having a set of these wrenches...
July 22nd, 2011, 05:52 PM
#27
Registered User

Join Date: Jun 2008
Location: Near Muskegon Michigan
Posts: 1,015
I really don't know what the big problem is with the brake booster. It may take alot of 1/8 turns, flipping the wrench to get it loose. Of course mine is not rusted, and just spin them off.
July 22nd, 2011, 06:45 PM
#28
Just an Olds Guy
Thread Starter
Join Date: Jul 2008
Location: Edmonton, AB. And "I am Can 'eh' jun - eh"
Posts: 24,525
July 23rd, 2011, 05:47 PM
#29
Registered User
Join Date: Jun 2008
Location: Near Muskegon Michigan
Posts: 1,015
Actually it's not a big problem, it's just an annoyance because I really can't drive the car with the brakes not working well. As for the booster, well it's just a tight fit. Glad there's someone else out there who also does 1/8 turns for a while. Good thing I'm not getting paid by the hour
 What a pain in the...
July 25th, 2011, 10:10 AM
What a pain in the...
July 25th, 2011, 10:10 AM
#30
Just an Olds Guy
Thread Starter
Join Date: Jul 2008
Location: Edmonton, AB. And "I am Can 'eh' jun - eh"
Posts: 24,525
FWIW, I found that accessing the brake booster from the DS to do those bolts is really easy. The problem I had with the PS ones was I couldn't see them. Problem solved. I took off the air cleaner and stretched out across the top of the engine. Take off the vacuum line from the booster check valve and, Voila! (the vacuum line still had the GM hose clips securing it!) Give a perfect view of the PS Booster nuts. Access is a little tight, but really a lot easier when you can see what you're doing.
Here's a shot showing the master cylinder leak.
IMG_1482.jpg?t=1311612577
Here's what I found when I looked at the booster from the PS. That's why I got the idea of crawing across the top of the engine. ALSO, if you (block your wheels so the car doesn't roll) move the trans selector to L, that moves the trans pushrod tang down and gives extra clearance into that lower left nut area!
IMG_1481-1.jpg?t=1311613219
July 27th, 2011, 06:43 PM
#32
Just an Olds Guy
Thread Starter
Join Date: Jul 2008
Location: Edmonton, AB. And "I am Can 'eh' jun - eh"
Posts: 24,525
Booster Changeout Complete!
Well it's over. I got my new Brake Booster in the mail today. Morons at the customs office apparently don't have any brains when it comes to opening and repacking a parcel. Turns out their best efforts to trash GM restoration parts aren't good enough - it survived.
It took a little doing to get the nuts off - but they basically just came off by finger rotation once they were loose. The only one that caused me any grief was the bolt holding the brake lines to the booster. Robb - bad boy - I tried to loosed that bolt for close to 15 minutes using your advice. Turns out it's NOT 9/16 as you said, it is 1/2. Oh well, guess that's minor compared to you having to work in 90� heat.
Here's how the changeout finished up.
IMG_1488.jpg?t=1311815680
Thought that was a neat profile shot across the top of the engine. Looks like I'm going to have to dust the engine bay...
IMG_1486.jpg?t=1311816468
The booster is a Delco Moraine GM restoration part. Got it from Crane Corvettes. 164.00 shipped
I didn't like the cotter pin assembly that attaches to the brake pedal, so I kept the old clevis pin and clip. BTW, had fun with the brake lights. Forgot you had to take pressure OFF the switch to have the lights go on. They all work really well. Tested the brakes, they work fine. A little stiff but not bad. I'll have to look up the CSM to see how any adjustments should be made to the brake pedal pushrod length. No problem with bleeding.
I'm going to see about getting my old parts reconditioned. I like the bleeding valves that came with the original Master Cylinder; they aren't on the new one so you have to actually bleed the brake line at the cylinder.
Anyway, I feel a LOT better and have one more thing done on my car. Next: gotta check those front brake hoses, calipers and pads. Then it's off to the drums on the back.


Thread
Thread Starter
Forum
Replies
Last Post
zodiacblueS
Brakes/Hydraulic Systems
44
October 12th, 2014 03:22 PM
plasma98
Brakes/Hydraulic Systems
5
April 20th, 2007 12:06 PM


